Chris's Non-Inductive Coil Experiment

  • Topic Is Sticky
  • 29K Views
  • Last Post 04 July 2023
Chris posted this 08 October 2019

My Friends,

I am going to show a small experiment, one that follows the works of Andrey Melnichenko and even Tariel Kapanadze's works and as we know many others.


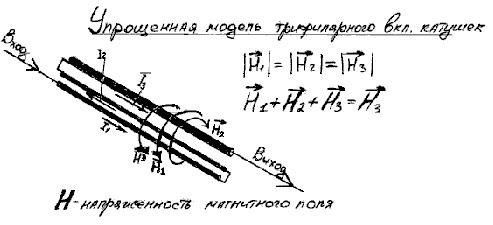
We have discussed here before, the fact that H3 is H3 simply because H1 and H2 cancel out: H1 + H2 + H3 = H3, why is this so, because H1 is Positive and H2 is Negative! We have seen this equation before: 1 + -1 + 1 = 1.

I think with Fighter's success recently, its time for some hands on!

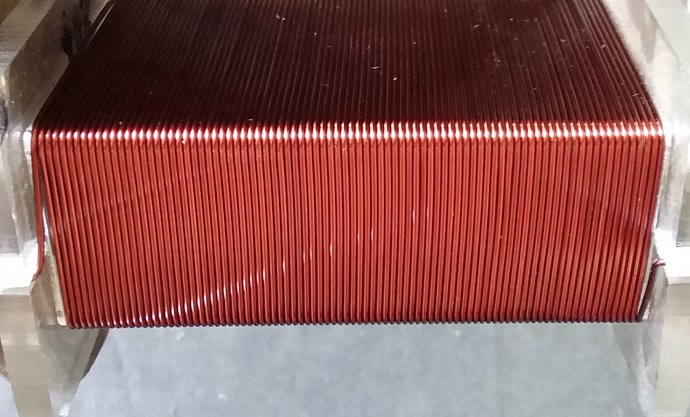
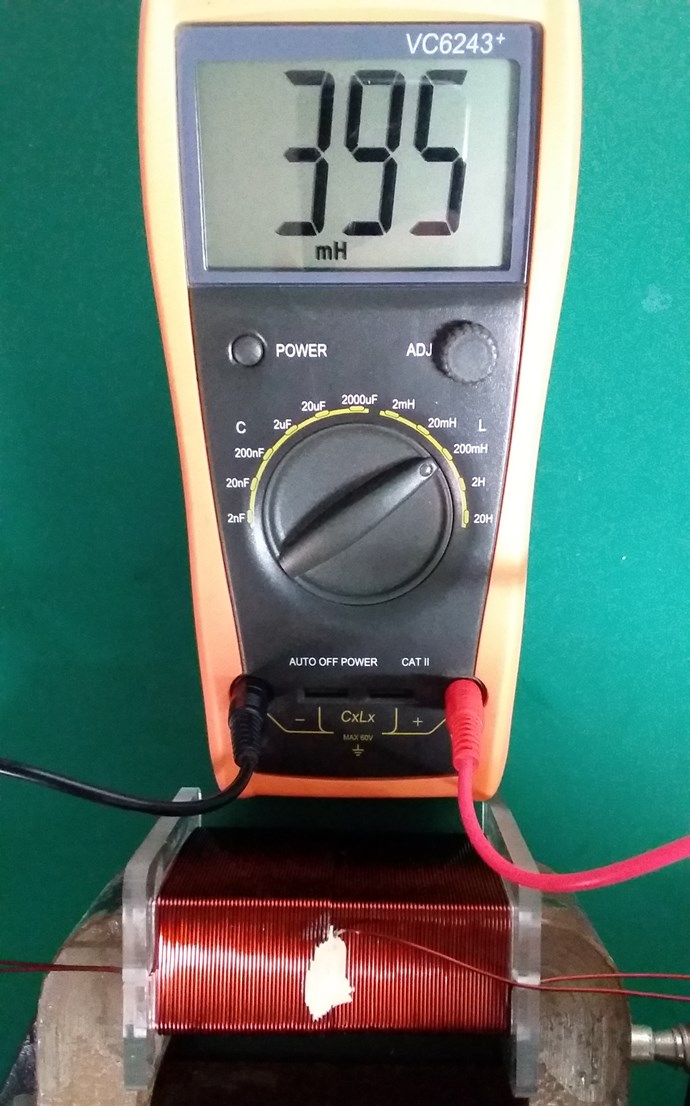
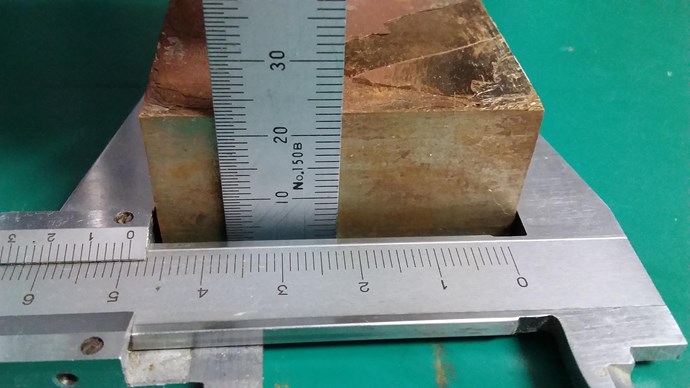
  • First Layer: 88 Turns.
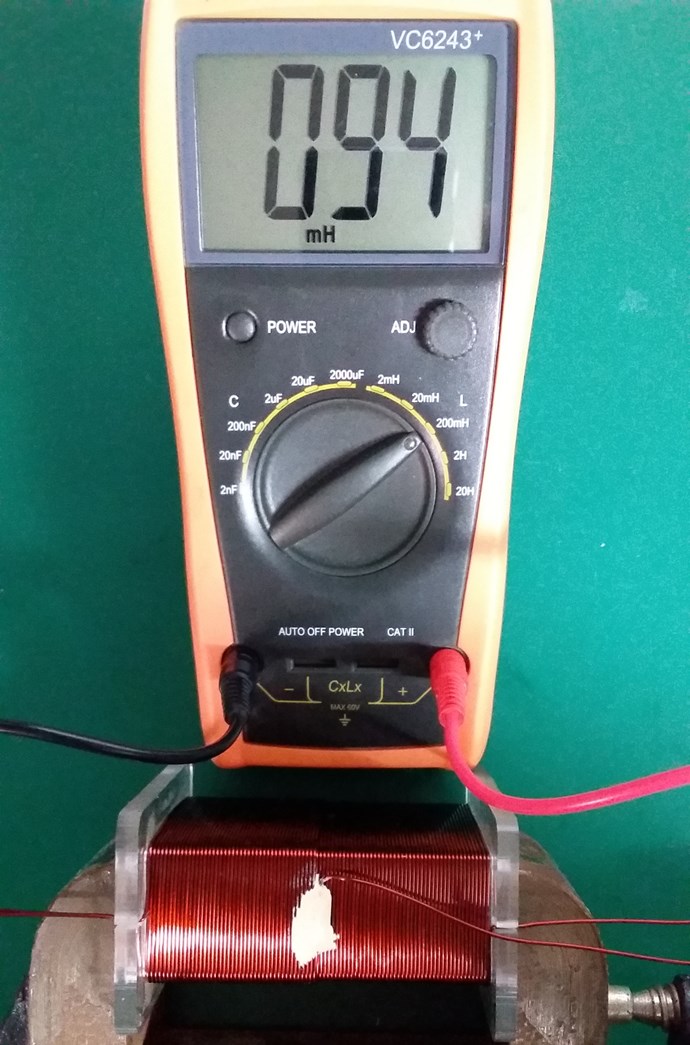
  • Second Layer: 43 Turns.


Layer One:


Layer Two:


Turns Direction:


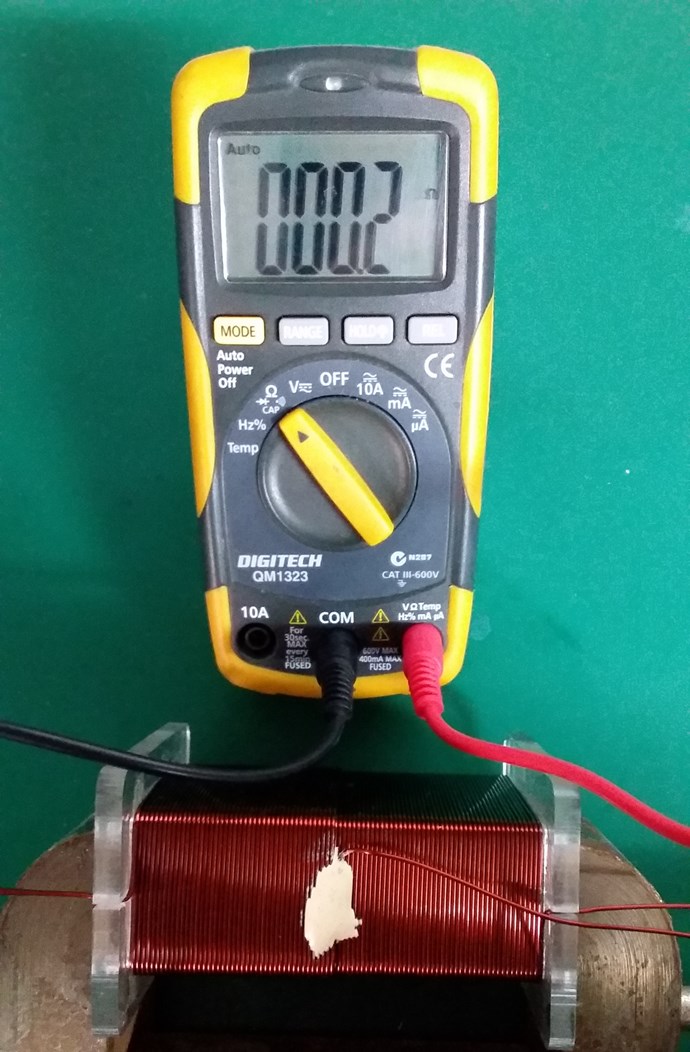
Layer One Inductance:


Layer Two Inductance:


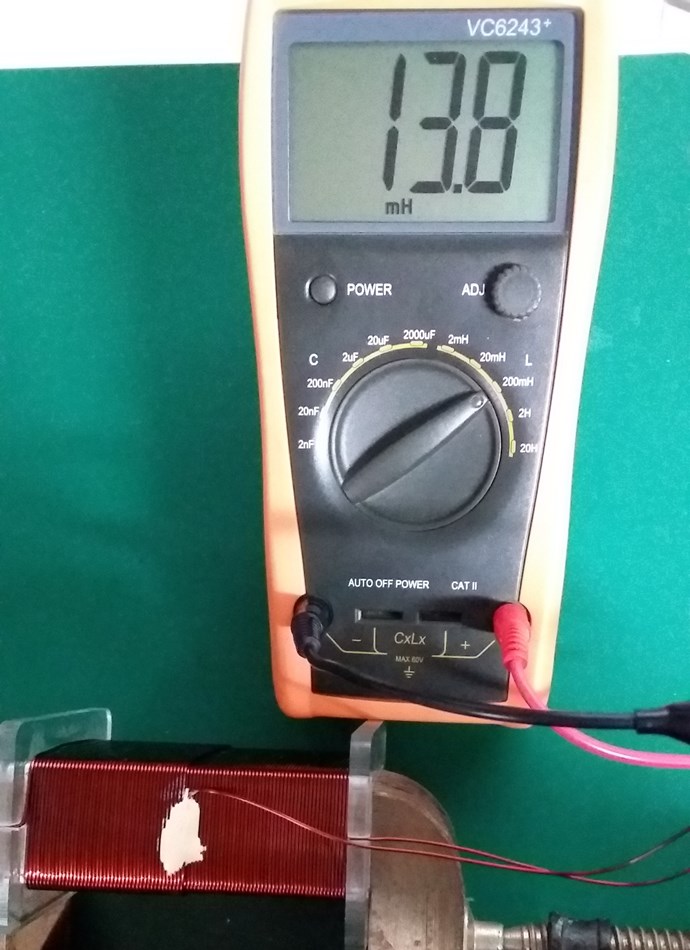
Non-Inductive Connected:


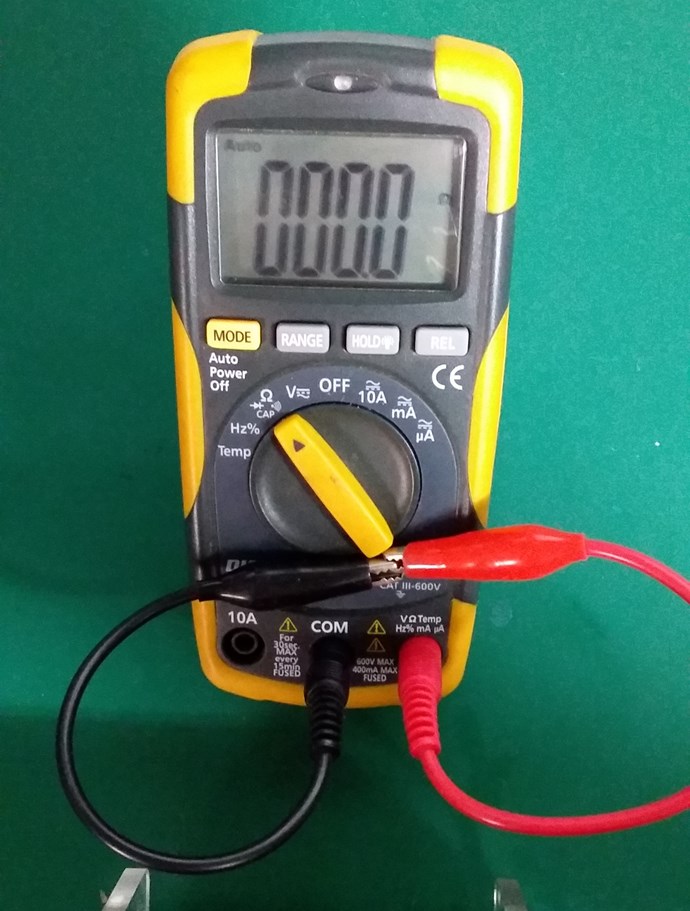
Layer One Resistance:


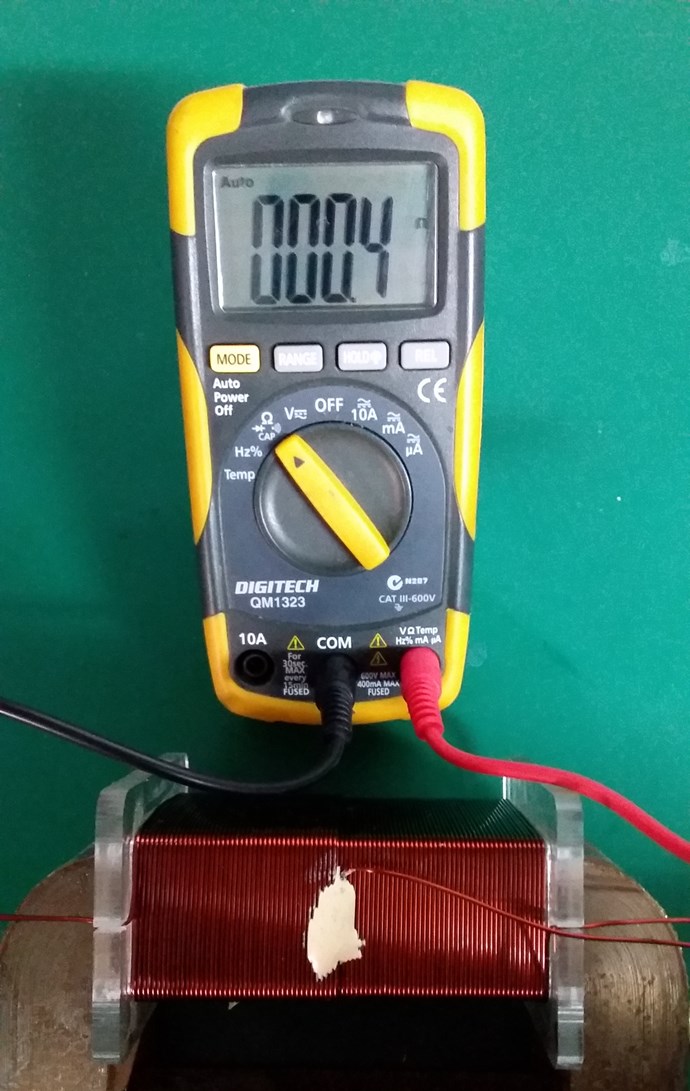
Layer Two Resistance:


Closed Loop Resistance:


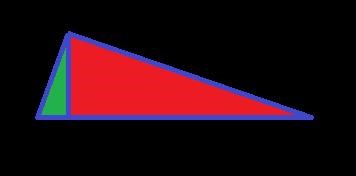
My Coil, like Andrey Melnichenko's, is 0.33 + -0.33 + 0.33 = 0.33.

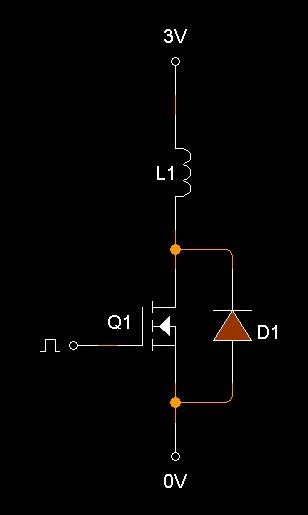
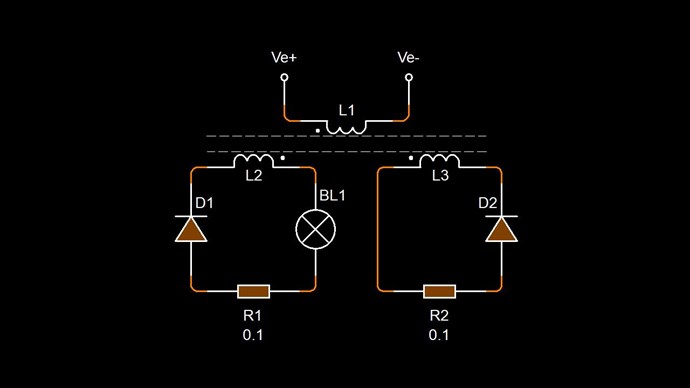
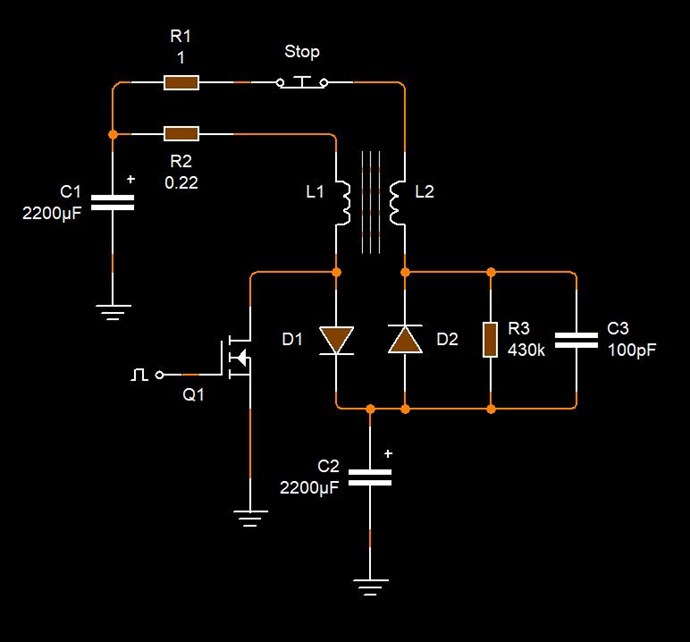
Two thirds of my Coil is canceled out. My Circuit looking like this:
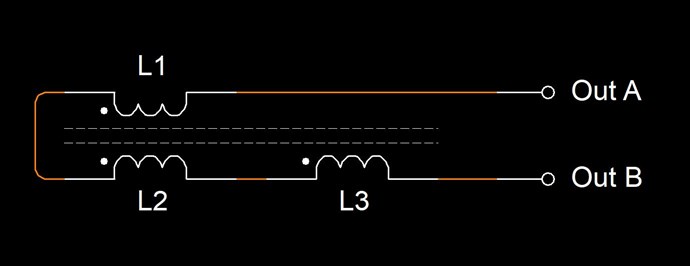
Where:

  • L1 and L2 are Non Inductive.
  • L3 is Inductive.


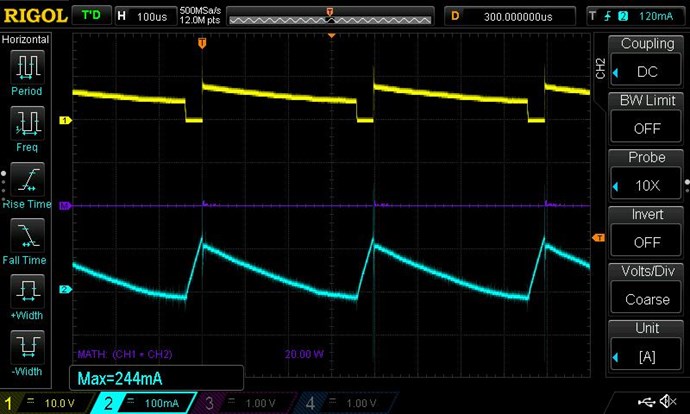
If this Coil is carrying 1 Ampere of Current, and exactly one half of the Coil is Non-Inductive, then Turn for Turn, only 45 Turns will create an M.M.F, which is considered as 45 Turns x 1 Ampere = 45 Ampere Turns or 45At.

Science tells us, that Turn for Turn, where we have Non-Inductive part of the Coil, this part of the Coil does nothing! Creates no Magnetic Field, therefore does nothing.

However, from Experiment, we know that this part of the Coil DOES do something! Remember Floyd Sweets paper: Nothing is Something, this is the same!

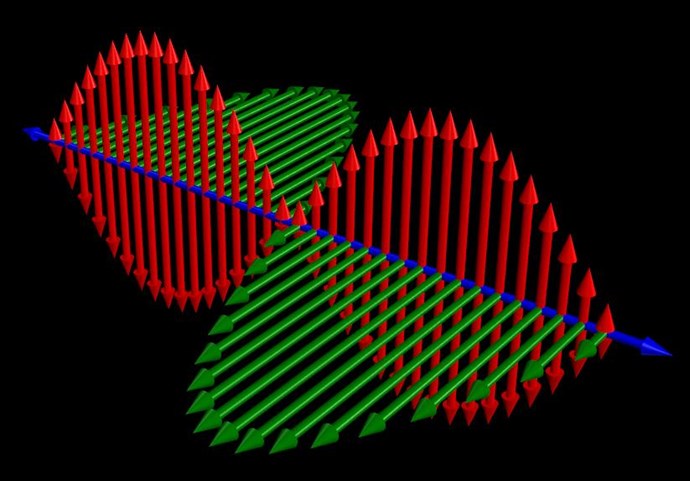
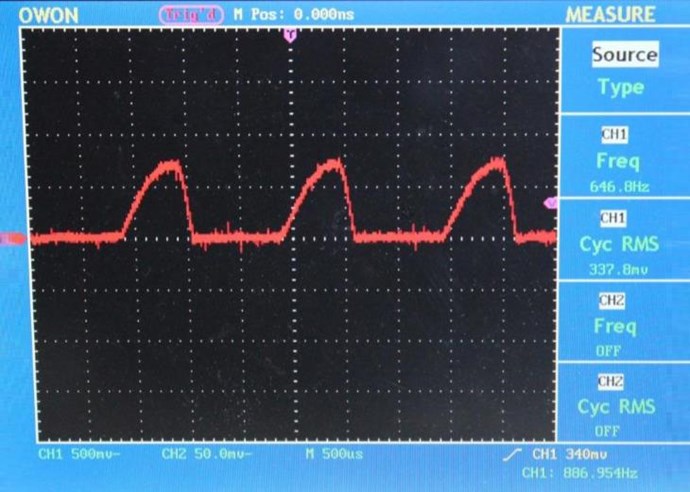
At Resonance, we have a perfect Standing Wave! We know this as Magnetic Resonance! Where each Magnetic Field is 180 Degrees out of phase:


Now, straight away, we should see a problem! Why? Kirchhoff's Current Law says the Current must be equal at every node, but we have Turn for Turn, one Coil that is Inductively Zero, and another Coil that has only a part of the Induction canceled!

In the specific case of positive charges moving to the right and negative charges to the left, the effect of both actions is positive charge moving to the right. Current to the right is:

I = da+ / dt + da- / dt

Negative electrons flowing to the left contribute to the current flowing to the right.


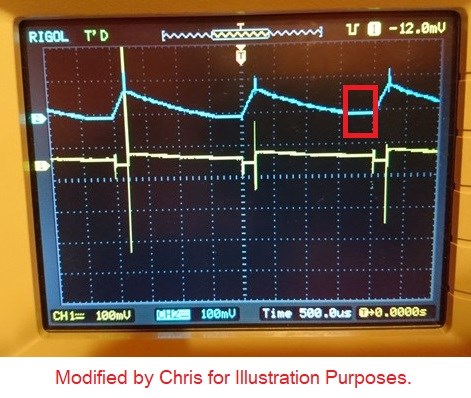
Each node does not equal the other, so the Circuit must balance out, Current is Increased as the Standing wave shows us.

Remember what Induction is? See here: Non-Linear Inductance

Induction gives us an approximation on the Coils ability to carry a Current: L = ε / di / dt

By Bringing a Coil arrangement like this into Resonance is our task.

Where each Electromagnetic Wave travels in opposite directions. One through the other in the same space.

THE NATURE OF SPACE

Space itself is the ability to accommodate energy. Consider for a moment the following illustration:

A signal (energy) is transmitted from point A to point B. A and B are separated by a finite distance. Consider three periods of time:

  • The signal is launched from A.
  • 2) The signal resides in the space between A and B.
  • 3) The signal arrives at B.

If (3) occurs simultaneously with (1) we say that the signal has traveled at infinite velocity. The signal has never resided in the intervening space and therefore there exists no space between A and B. A is virtually at the same point in space as B. For real space to exist between A and B it is necessary that a signal travelling between them be "lost" with reference to both points for a finite period of time.

Now we know that for real space to exist between two points a signal travelling between them will propagate at a finite velocity c, ( c = 1 / √με )

If a signal will not travel between two points, as in the case when c = 0, then we can also conclude that there is no link or intervening space between them. 

Ref: Floyd Sweet - Nothing is Something.


Floyd Sweet tried very hard to make c = 0! What does this mean? It is simply a Standing Wave, a Team Wave was used:

It is a simple matter using the equations E / H = √με and c = 1 / √με for a team wave to get rid of H and c and so convert the first equation into the well known equation for energy density in the so-called electrostatic field.

Ref: Floyd Sweet - Nothing is Something.


I have pointed out: Why 'C' is equal to One in these Devices.

We have a lot of data!

   Chris

Order By: Standard | Newest | Votes
Chris posted this 19 January 2020

I agree Fighter, you are wise my friend!

Both scenarios are possible! We are a lot further ahead than what he thinks anyway, so either way, we still win! 

   Chris

Chris posted this 25 January 2020

My Friends,

Many times I have posted on how Partnered output Coils work. Today I tried to post to the 8Kun boards. Many do not believe. Feeling the water, its easy to see that many distrust something so simple.

We, those of us that have done the work know better. I have said it before, smart people are often the dumbest! There is a deeper meaning to this statement.

It appears the promises that our old mate TinmanPower now known as OzSolarPower, have flopped as usual. A bit sad, this is what Tinman has come to, never ending broken promises! These tactics are why others do not believe those of us telling the truth!

Perhaps today we should look at the laws of Electromagnetic induction again. The series I have shared with you:


In the video's above, I have laid out a lot of information! Video Seven shows a functioning Above-Unity machine. What we have learnt in the videos, shows how the manipulation of Magnetic Fields can induce a Solid State Generator, the only thing moving is the Magnetic Fields in time!  

Many others here have replicated these effects and some have gained the results we have shown.


What have we done?

There is two processes occurring in Time:

  1. Accelerate Charge down the Wires - Green part of the Triangle.
  2. Decelerate the Charges in the Wire - Red part of the Triangle.


The Green part of the Triangle shows what I call: Reduced Impedance Effect

This is a very important part in the process! The Reduced Impedance Effect allows for the Coils to get to maximum amplitude very fast! You may remember the experiment I did, showing how much faster the Currents and there fore the Magnetic Fields can grow to maximum amplitude:


FROM:


TO:


From 75 milliseconds approx, to 500 microseconds, a factor of: 0.075 / 0.0005 = ‭150‬ times faster. This is the same reason we see the Triangle get to maximum Amplitude fast, but when our Input turns off, the Output Coils change their Impedance / Reactance, and they don't allow the Current to decay immediately. The Current is forced to decay linearly over time. We have referenced this before:


Again we show the Triangle:


Remember, this is Asymmetrical Regauging:


How the Oscilloscope measures the Waveform:


Remember, we have two things we must take into account:

  1. Amplitude ( Y Axis ) = Value of the Potential Measured.
  2. Time ( X Axis ) = the time the Amplitude is non Zero during the measured time frame.


So if we have more area under the curve on the Scope when our Input is off, compared to when our Input is On, then the area shows more Power, Voltage x Current x Cos( θ ), is being measured.

Our machine has become a Charge Pump, a system that requires Regauging every X seconds, the Frequency and Duty Cycle of Operation. We have invoked the use of Magnetic Fields to pump Current in the Wires exactly the same as our old reference video, the Hydraulic Ram Pump: Energy Machine Operation


We have offset the Forces of Magnetism ( M.M.F ) so our Input is not negatively effected as much as we would normally see in a normal Transformer.

   Chris

Chris posted this 27 January 2020

My Friends,

If you want Free Energy, then you need to study and replicate the above work! My last post has video information and other posts have a huge amount of information! If you study and learn what I have shared, then you can build Free Energy Machines!

It is very simple!

It is very Cheap!

Once you have the experience you can build it very quickly!

Please, share your work here! Please replicate this Technology I have shared with you! Its easy and cheap, whats a few hours out of your day? Please join us:

Be Part of Something Better!


We have many successful replications already:

  • CD_Sharp Here.
  • Vidura - under another project name - Here.
  • Jagau Here.
  • CaptainLoz Here.
  • Atti Here.


Please everyone, we MUST do this together, we cant do it by ourselves!

It is so Simple and Cheap that Science should be so absolutely embarrassed to come forward and join the Cause! The cause; to solve the worlds Energy Problems!

   Chris

Chris posted this 01 February 2020

My Friends,

I just love Coincidence! It appears others are waking up! The thread I started is top of the list right now, again. One Troll is not liking the attention it is getting!

I would like to ask you all of a favor: Would you mind going to the thread Partnered Output Coils - Free Energy and directing others, willing to learn here, to this forum?

Please don't put your accounts at risk by getting into arguments / debates with the Trolls! 

People that are waking up, need to know the truth! We need to do our part and help where we can. wink

Best wishes,

   Chris

Captainloz posted this 02 February 2020

Hi Chris,

Done!  I just posted on the thread over there!  I was going to post a link to one of my videos, but they'll have to join this forum to see it. Hahah! smile

Cheers,

Loz

Chris posted this 02 February 2020

Thank You mate, I appreciate it!

I agree, let them do the work themselves, if they want to move forward they will do the work, if not then we don't really want to deal with the non-sense. wink

Thanks Loz!

   Chris


EDIT: Wow the responses...

Chris posted this 02 February 2020

Hey CD,

Yes, there is a ton of non-sense there! Huge amount of wasted space! Still if we can get the few that wish to move forward join us, then we become stronger everyday! We can only do this together! You and the others here working hard to move forward are inspiration my friend!


We are Light Years ahead of the other forums!

Best wishes,

   Chris


P.S: As Loz pointed out, those that wish to move forward and do the work will succeed! You guys and gals already know that! There is a steep learning curve if those that come have not dome their homework. But we as a Team, a Family, here, can help those that need help.

Chris posted this 04 February 2020

My Friends,

I am dissapointed!

It appears Atti, the one yelling from the top of the roof for measurements, after getting close, he drop's the truth like a hot potato, has gone ahead and deleted his prior Successful replication of this experiment, Asymmetrical Regauging! Only having the Image left I got for a screenshot:

Now, I see this as deceitful! I see this as an act of trolling! Especially after his last rant! Atti, I almost banned you because of your last rant!

Atti has deleted his post:

  • CD_Sharp Here.
  • Vidura - under another project name - Here.
  • Jagau Here.
  • CaptainLoz Here.
  • Atti Here.


Atti's link no longer works! I am very disappointed Atti has attempted to mislead us and others by his upsetting behavior! His Videos posted are now made private... No doubt a Patent Pending!

What is very clear to me now, is you had no intention to progress! Most likely a Paid dissinformationist here only to cause trouble! I should have gone with my gut feeling! You have bought a world of bad Karma down on yourself!

You are now Banned! I am disappointed for what you have done!

Sadly,

   Chris

Wistiti posted this 04 February 2020

Really sad yes... We have seen this in the past and unfortunately will see it again in the future... some people just dont care abouts other and at the end they realize they are alone ...

With that said, I believe they are a minority and most of us have good intentions.

Anyways creating this forum with the strict rules you maintain was one of your best moves my freind!

Thank you for that!

thaelin posted this 04 February 2020

@Chris:

    No matter Chris, stand by your convictions. Never relax your rules here and this will always be the place to share and prosper.

I have since left most of the other places available due to the fighting and mis-info things going on. I still have a version of linux that was made strictly for research purposes and it had a strong set of rules to belong to it. They were always open to other ideas and versions but would not tolerate any indiscretions towards any other member. It worked well and that is how a research place should be run. Voice your opinions and then discuss it with your peers. Keep it sane and proper and you will always be in good standings with the rest.

Bravo


I have since started working on a type of motor-generator system with added goodies and as it starts to come together, I will start posting progress here. Not sure if non-members will be able to see it, but will hope they can and share it on the other places that I will not go back to.


thay


Chris posted this 04 February 2020

CD, Wistiti, Thay,

Thank You Guys! I will maintain the Rules, it is important as you point out.

Wistiti, re:

With that said, I believe they are a minority and most of us have good intentions.


You are wise my friend! We have many more good than bad here!

Thank You Thay! It is good to hear! We do have the best community here, all of us have the same hearts! All have similar goals! All of us are tired of Trolls!

Best Wishes to all, even Atti now banned for being a Troll!

   Chris

Jagau posted this 05 February 2020

A lot has happened in the past few days, I just got back from my trip.
Chris I think we are all behind you,

I agree perfectly with the way you manage this forum, thank you.

We feel confident.

Jagau

Chris posted this 05 February 2020

Thank You Jagau!

That means a lot to me! Hope you had a great trip!

   Chris

  • Liked by
  • Fighter
  • Augenblick
Captainloz posted this 05 February 2020

Hi Chris and all,

I wish I had more results I could share.  I know I haven't been contributing.  It is so hard to stay focused on one thing! I tried many different experiments with the ferrite toroid cores I had set up, but none of them worked out as well. So I bit the bullet and invested in a Metglas core from Mouser.  It arrives tomorrow! I'm looking forward doing a MEG replication.  However it will be a few weeks because I'll be away.  I hope to be contributing again soon!

Sorry to hear about Atti 

Loz

Chris posted this 05 February 2020

Hey Loz,

All of us have good and bad results. Its normal. Even now sometimes I have to work at it for a while before I get a machine working. Its hard to pin down the exact causes! Sometimes too many turns, sometimes not enough, sometimes tuning is hard, sometimes easy.

Sometimes getting the best result is a lot of fiddling. But, when the Machine is ideal, for example when the wave form is optimum, and one does not have too much dead time and so on, then normally this means your'e going to get good numbers.

Above, the dead time, we saw some examples:

From here.


I pointed this out to Atti also:


You could increase your Frequency, as there is some dead time at the end of your scope shot, in the waveform:

The post Here.


Sometimes this is a sign you have too many turns on your Partnered Output Coils also. When we have good waveform, like this:


We get much better results!

As we know Wave Amplitude is an indication of Energy, V x I x Cos( Theta ), and so by increasing the Amplitude, is beneficial. The old: Current ( I ) = Voltage ( V ) / Resistance ( R ). Increasing V increases I.

All of us can help, no matter what! Let us know how your'e going and we can share our experiences. You have had a taste and know what its about, so if you follow the same rules as before, you wont have any trouble.

Best Wishes, have an excellent holiday!

   Chris

Chris posted this 06 February 2020

My Friends,

Mohamed asked me for specifics, I have covered in detail in the videos if you watch, which I recommend, but following is a list:


To start:

  1. Three Coils, One Input Coil, 22 Turns 1.6mm, Two Output Coils, 0.8mm I recommend around 180 Turns.
  2. I have provided Circuits, see below.
  3. Frequency 3,000 Hz @ 10% Duty Cycle.


Circuits:


Putting a Diode on your Input, blocking Energy coming back to your Input is not a good idea! Try different Load's, the Load Resistance can make a difference! This is another reason this can be a bit fiddly. I used a 12V 300ma globe. This load is one of my better ones.

Make sure your Input Switching is clean and sharp.

Use a Core that has a reasonable Cross Sectional Area, CSA, remember it's the Magnetic Field, the Volume of it and how fast it changes in time that is important here! My Core, in the video is:


Length x Width is Area of a Rectangle, so: 49 x 23 = 1,127‬ square mm's. Your Coils Impedance, and the less it is the better, but remember, you need Voltage, get it up! Don't go to high though, its far to dangerous other wise!

This is info that's already available on this and other threads.

I hope this helps some!

   Chris

Ourbobby posted this 09 February 2020

Hello Chris,
I am slowly working my way through your tutorial videos' on non-inductive coils. Towards the end of video four , you state that that bifilar coil had enough charge to run a small city.
Could you please elaborate on that comment?

Thank you
ourbobby

Chris posted this 09 February 2020

Hey Ourbobby,

If you need help with the videos / replication, please let me know.

Please note: I have replied to your Energy question here.

I am sorry, I have to be tough on off topic posts, otherwise the forum will turn into a mess, nothing will be organised.

Best wishes,

   Chris

baerndorfer posted this 09 February 2020

hello chris,

i started to watch your videos and build some coils for testing.

when i do the measurement with the lcr meter on the opposing coils it gave me a reading far away from zero.

is it incorrect to expect zero inductance on a coil which is wound that way?

i use 1mm wire for the coil which have a diameter of 50mm. 56 CW and 56 CCW with center-tap.

thank you for the brillant videos and explanation!

regards from austria

rené

Chris posted this 09 February 2020

Hello and welcome Baerndorfer,

Please don't get hung up on the term: "Non-Inductive" its important we think broadly about this and apply the right thinking and concepts to the experiments I have shared.

It is impossible to cancel all the Inductance in Coils, even with the best wound Coils, there will always be some Inductance.

So, the meter will never read Zero, some Inductance, stray, or parasitic Inductance will always be present.

It may be of benefit to read over a document I put together some time back: Does Science truly understand Electromagnetic Induction

Many of us here can help if you need us, so please ask, please create your own thread if you wish, the best way to move forward is to experiment, prove and dis-prove the simplest things.

Best wishes,

   Chris

Chris posted this 11 February 2020

My Friends,

This post is a specific post about the broadness of the technology I am sharing with you.

In the old days when Akula was sharing information, his comments on Bucking Coils and Standing Waves and so on were hard to decipher but were there if one took the time to observe!

What I am sharing is broad!

Fighter has shown how broad this technology is!

Don't limit yourselves to one narrow path! The concepts are all the same, yes the same! The same ideas, same concepts. I will explain:

Akula tuned the Frequency and Duty Cycle to maximise the Magnetic Resonance, increase the Potential in the Coils and as we learnt in The Mr Preva Experiment, the Currents are Equal and Opposite. The Input to Output ratio is achieved by Tuning the Frequency and Duty Cycle, this video shows a similar device, but uses the same concepts:


The same basic idea, Coils, as the Mr Preva Experiment:


The Asymmetrical Regauging process is the same. Its all the same processes! Same concepts! A short pulse, Duty Cycle at a particular Frequency, when the Coils are Magnetically Resonant is where we gain Energy, Excessive Electromagnetic Induction occurs, well beyond the Unity Boundary!


Timing is a difficult task in these circuits, but others have achieved success, its not beyond reach, but be prepared for a difficult task. Working with the Coils, Partnered Output Coils, learning them first and then moving forward after learning how they work is the best path forward.

My Advice: Get the Coils working, then build the Circuitry around the Coils! Stick to the basic concept here, Electromagnetic Induction, to amplify both Voltage and also Current, don't let any complication creep in!

Best wishes,

   Chris

Chris posted this 14 February 2020

My Friends,

Sometimes I cant help but smile!

Some years back when I introduced this technology, I had some communications with Partzman. I believe Partzman has an account here as Prometheus. I am speculating and do not know this for sure.

Let it be known, I like Partzman, he seems like a good person.

This is a re-visitation of a particular ferrite toroid core that I had demonstrated years ago that had anomalous voltage levels. The two pdfs below explain my findings back then and this is an application of that core within an operating circuit.

The schematic of the test is shown below and a scope pix is also shown.

The frequency is 50kHz and the measurements are shown with statistical analysis of many measurement cycles. The vertical deflection is adjusted for near full screen and at this frequency the resolution is ~12 bits. Also note the horizontal sampling at 1Meg points.

Using the mean values, the output power is 2.151^2/500 = 9.25mw. Therefore, the apparent COP = 9.25/4.372 = 2.12.

The question is, what is the cause of this core's anomaly?

Regards,
Pm


Ref: Anomalous CMC Tests started on: 2016-04-11


I started sharing my work on: January 16, 2015 and well before, 2011 on hyiq.org.

Isn't it funny how easy it is to guide others, but others still think they came up with the ideas themselves? We have many pages here and forum posts else where that show I was well before everyone else in sharing this tech! Still its part of evolution as they say:

All truth passes through three stages. First, it is ridiculed. Second, it is violently opposed. Third, it is accepted as being self-evident.

Ref: Arthur Schopenhauer


Best wishes,

   Chris

Ourbobby posted this 15 February 2020

Hello Chris,
I hope that I am in the correct thread this time. I am not sure if this is a Partnered Output Coil test.

I have been spending my evening going through your thorough set of video tutorials on Non inductive coils. Assimmilating all the information is difficult and needs time! Especially understanding the unique differences that can appear.

I have started a test sequence using the two coils with an extra drive coil. Video 7 I think. I do not have a lot of time at the present, however, I have found some time this weekend. I think my early results might be fruitful: you can be the judge. The test set up is not complete as I have to get some 0.1ohm resistors for the current sensing. I have only been working to get resonance, which the attached photo shows, might be close?

My pulse circuit has an adjustable pulse width and adjustable frequency. In the set-up, I am using an amorphous core AMCC100. There are three coils 2 coils are 300 turns #23 guage and 1 drive coil 75 turns #17 guage which is wound over one of the other coils. The large coils are CW and CCW wound. The drive coil is CCW wound on top of the large CCW. I do not know why, but, the outputs are difficult to understand. Yellow Trace is primary CCW coil wound over Blue trace which is large CCW coil. Puple trace is CW coil on adjacent side of the core. I might have expected the output from Trace purple, CW coil to have been a larger voltage or similar output voltage to the other coils. Also, Where as the CCW coils show similarities of output,
the CW coil- purple- is a little bit unruly!

I am hoping to make a donation for you soon, as I can see that your effort in recording these videos has been tremendous.

Regards

ourbobby

Chris posted this 15 February 2020

Hey Ourbobby,

Looking really good! Well done.

What you have is a really good start! A few things to try to help,

  • Input needs to be a very short DC Pulse.
  • You could drop your Input Coil down to say 20 turns or even less.
  • You have a lot of AC signal, which is fine if that's what your'e aiming for, but aiming for DC might be a better path forward. That means you need some Diodes on your Partnered Output Coils. See below Circuit.


Sorry about my off topic complain a while back. 

Good work, Thank You for sharing. Please PM me if you need any help!

Best wishes,

   Chris

Ourbobby posted this 15 February 2020

Hi Chris,

              Thanks for the heads up. From your video comments, I take it to mean that optimum output comes with resonance. The scope shot it an expanded pulse, looking for symmetry of pulse waveforms. My input pulses are approximately 10 % as you recommend. I'll get some resistors next week and do some further work to look at the current. 

Edit: I have found a couple of 5W .1ohm resistors, or I should say, rescued. I am wondering if I should have special settings enabled on me Rigol. No matter what I do, I am unable to get the waveforms or conditions that you show in videos 5,6 and 7. Each time I get a scope image of a pulse that crosses the median, as one would expect when pulsing a coil. No rise or fall or delays. Just a ringing effect when expanded.


Regards

ourbobby  

Chris posted this 15 February 2020

Hey Ourbobby,

Yes, I used 3,000 Hz at a 10% Duty Cycle. Your Frequency and Duty Cycle might be very different. The Output should be DC, after the Diodes.

You will see a very Triangle Waveform on the Output:


Loading the Output, the Input should go down in Current Consumption, meaning Energy is sent back to the Input.

Best wishes,

   Chris

Vidura posted this 15 February 2020

Hey Ourbobby your scope shots look like if the output coils are not loaded, check if you have amps flowing, maybe change the load device, to mach the impedance better, or maybe a failure in the diodes? Regards Vidura.

Jagau posted this 15 February 2020

Hi ourbobby

I think Vidura is right.
Just a very simple little trick to check a mosfet if it is good.

If it could help


Jagau

  • Liked by
  • Chris
  • Augenblick
Ourbobby posted this 15 February 2020

Hi Chris,

              I can see what my issue is!. I am not understanding the calculation for winding for inductance. I do not recall you giving any inductance figures. Of course your core is three time the size of mine. I am showing an inductance of 1.77mH. I am thinking that I should be looking for low inductance and low resistance in the coil. On a side note, the Figueras device uses non inductive partnered coils?

Regards

ourbobby

Chris posted this 15 February 2020

Hi Chris,

              I can see what my issue is!. I am not understanding the calculation for winding for inductance. I do not recall you giving any inductance figures. Of course your core is three time the size of mine. I am showing an inductance of 1.77mH. I am thinking that I should be looking for low inductance and low resistance in the coil. On a side note, the Figueras device uses non inductive partnered coils?

Regards

ourbobby


Hey Ourbobby,

This is really to everyone, Keep it simple, don't over complicate it. Its really important you keep it simple!

Yes there are some complicated stuff in there, but treat it like an experiment. Drop Turns, test... Add turns, test... Adjust Frequency and Duty Cycle and then test...

From what we can see Ourbobby, the Input Switching is not right. Your Output Signals are wrong. You have AC wave form and that's not right. By working on that, moving one step at a time, forget about Inductance and all that, just go by Turns, you will get it working better.

We can help, we will help, but work on your Input Switching first. We have lots of info here about Switching:


I am sorry, perhaps I am a bit too blunt, but I am being honest and to the point, I am only trying to help. wink

So PLEASE don't take this the wrong way!

   Chris

Ourbobby posted this 16 February 2020

Nope! no offence taken. I just want to understand what I am doing!

My last test until I can spend some more time on it. Maybe a window next weekend. No matter what I do this is the output I get. I have uploaded a couple of shots to show the connections as per the bucking circuit with diodes and resistors. Yellow is input, Blue is asymmetric coil, purple is coil beneath input coil. The coils are wound CCW input coil 1.5mm wire 20 turns, CCW main coil 1.06mm wire #17, 164 turns, asymmetric coil CW #17 164 turns.. Probes across the resistors.


also, thanks for the heads up on the mosfet switching. I am aware of some of the issues related to switching. I use a TC4427 which will switch efficiently at high frequencies. The mosfets I am using are IRFP 260n and IRFP 460, both with low rds. What I am not picking up is the sawtooth we are seeking. That confounds me!

Regards


ourbobby


Vidura posted this 16 February 2020

Ourbobby, I see your wave forms, Chris was correct, the switching is the problem. You have to get a clean rectangular pulse at the Inputcoil. Avoid using the alligator clips for the power path, better screw connectors, a bad contact sometimes causes issues. Vidura

Ourbobby posted this 16 February 2020

Hello,

          I have found the problem. Bought five mosfets a while back, cheap! Each one is breaking down when pulsed!

Have ordered some replacements from Mouser!

Thanks for the help


ourbobby

Chris posted this 16 February 2020

Hey Ourbobby,

Lots of things can make a Mosfet fail. One common problem I have seen, is the Mosfet is not switched off properly. If you follow the guides above I gave. This should help!

PM Me if you need help.

Best wishes,

   Chris

Chris posted this 18 February 2020

My Friends,

Perhaps this needs a new thread?

I want to say something that is obvious to some, but perhaps not obvious to others. The big reason I put so much effort into my Mosfet Switching Technology, shared on the thread: Reliable and Flexible Switching System is the very fact that I realised early on that very detailed specific control of a Mosfet is critical!

Take for example the Akula days, in all Akula' Circuits, he has one thing in common in all of his circuits, a detailed control of Switching. Take for example the following two circuits:


Great detail, a huge amount of effort is concentrated on the Switching Circuits! Akula used many IC's even Phase Locked Loop PLL Circuits in there to hold Frequency and Duty Cycle.

So I also spent a lot of time and effort on full control of the Mosfet. This is why I have shared so much on Circuits and the best of what I know about the Technology behind driving Mosfets.

   Chris 

Chris posted this 26 February 2020

My Friends,

I have shared this today with other readers:

This is a general post for all interested parties.

What exactly are Bucking Coils? What is the Purpose by applying this very simple technique? This is important, its important that this is thought about in the right way!

I want to quote:

CLEMENTE FIGUERA
PRINCIPLE OF THE INVENTION - Watching closely what happens in a Dynamo in motion, is that the turns of the induced circuit approaches and moves away from the magnetic centers of the inductor magnet or electromagnets, and those turns, while spinning, go through sections of the magnetic field of different power, because, while this has its maximum attraction in the center of the core of each electromagnet, this action will weaken as the induced is separated from the center of the electromagnet, to increase again, when the induced is approaching the center of another electromagnet with opposite sign to the first one.

Because we all know that the effects that are manifested when a closed circuit approaches and moves away from a magnetic center are the same as when, this circuit being still and motionless, the magnetic field is increased and reduced in intensity; since any variation , occurring in the flow traversing a circuit is producing electrical induced current .It was considered the possibility of building a machine that would work, not in the principle of movement, as do the current dynamos, but using the principle of increase and decrease, this is the variation of the power of the magnetic field, or the electrical current which produces it.

The voltage from the total current of the current dynamos is the sum of partial induced currents born in each one of the turns of the induced. Therefore it matters little to these induced currents if they were obtained by the turning of the induced, or by the variation of the magnetic flux that runs through them; but in the first case, a greater source of mechanical work than obtained electricity is required, and in the second case, the force necessary to achieve the variation of flux is so insignificant that it can be derived without any inconvenience, from the one supplied by the machine. Until the present no machine based on this principle has been applied yet to the production of large electrical currents, and which among other advantages, has suppressed any necessity for motion and therefore the force needed to produce it.


The thought processes of Clemente is important to think about, simply he is investigating Electromagnetic Induction!

Each Coil in Partnered Output Coil's is a Rotor Coil and a Stator Coil of an Electric "Generator" - Does this make sense?

Electromagnetic Induction is encouraged by an Input Coil, but the Partnered Output Coils are the Primary and Secondary Coils in what we would normally think of as a "Generator". I have been through this many time in many different places.

The Mr Preva Experiment shows some basic, elementary principles so one can learn how the Interactions between Two Coils occur at Resonance.

We can only do this together, I am one man, I can not do it for everyone!

Best wishes,
Chris Sykes


Best wishes,

   Chris

Ourbobby posted this 29 February 2020

Hi Chris,
Well I have discovered that the fets were not faulty, but, blown up! The issue was too much current flowing upon start up. Got that sorted out and here is a photo confirming the sawtooth and subsequent current flow. I have a 12 volt globe connected. I only have to reduce the mark space for 10% to say 15% and globe becomes much brighter. This is the obvious photo.

The other photo is me changing the connections and which might bring me into new territory. The yellow trace is 12v input coil magnified by induction of bifilar coupled secondary coils. The Blue trace is the one I am unable to work out. I tried the 3000hz, but, have backed the frequency down to the low hundreds. Frequency does not seem to influence output? Globe rightness does not appear to change when increasing frequency. I have a 240v 60w incandescent connected to output, but, I have to increase 10% pulse width to get to full brightness increase. Also, where you are using special powersupply, I am using 12v pulsed input. Seeing the outcome of the bifilar connection, I am wondering how best to capture this output? Anyway, it is reassuring to be able to replicate to some degree your demonstrations.

The output is making me cautious! As you see on the scope the bifilar out put is reading very high voltage. Is this Radiant or standard electricity?

Yellow trace input coil. Blue is secondary before bifilar connection to test for current flow. Bifilar if the Globe output.


Regards

ourbobby

Chris posted this 29 February 2020

Hey Outbobby,

Very nice, well done. Please forgive me, sometimes I cover things others may already know?

A Coil has a Current Ramp Up and a Ramp Down which looks something like this:

The Voltage, something like this:


Something similar to those wave forms for Voltage and Current is a normal DC Switching waveform. When I say normal, this is normal Coil to Magnetic Field Interactions from Switch On to Switch Off during the cycle.

If we have anything other than these waveform's, then we must have different interactions occurring in our machines! Meaning, the Magnetic Interactions in the Coils, Electromagnetic Induction has been changed from what we would normally see.

This is the key, we are using Geometry and specific Action Reaction and Counter-Reaction's to change the overall operation of the Coils and Magnetic Fields changing in time. By changing our System, we get:


You are close, your waveform is on the way! Well done! Working toward the improvement of the waveform will be of benefit.

Well done Ourbobby, nice work! Thank You for sharing!

   Chris

Ourbobby posted this 04 March 2020

Hi Chris,

              Thanks for the comments. I can see why you are using a constant current during the experiments! I have rewound my test coils to search for the resonance. My primary seems to be getting too much feedback from the secondary coils. I blow a mosfet within a few seconds of switching the pulse on. And I am using much less than a 10% pulse width. So either I am drawing too much current or my voltages are peaking. I will say that the flyback diode I have in place goes off with bang too. What I have done is what seems to be similar to Don Smiths metglass device. I have wound the primary around coils L2 and L3. Too much do you think?

Regards

ourbobby


  • Liked by
  • cd_sharp
  • Chris
Chris posted this 04 March 2020

Hey Ourbobby,

My Input Current is 10% @ 3000 Hertz, so its a Pulsed DC that is used, we have Current being returned back to my Power Supply from my Machine, so this current is not being supplied, rather returned, we can not count this Current as used, because it is not.

I am happy to hear you are seeing some results! Feed back from your secondary Coils is what you want, this is power coming back to your Input, Negative Power and as a result drops your Input Power consumption.

Mosfets are normally pretty sturdy devices. 

As long as they are Turned On and Turned Off correctly they are solid within their ratings. For example:


The Datasheet for you mosfet will have your Ratings. The Ratings need to be observed and need to be adhered to.

Its worth looking up your datasheet and familiarising yourself with the ratings, and finding out what exactly is making your Mosfets pop. Its a great learning curve!

We have many threads here to help with Mosfet driving:


Protect your Mosfet with a Diode from Drain to Source, like so:


Where: D1 is an extra Diode, Ultra Fast is always nice but not necessary, to protect your Mosfet.

I also have a PCB soon for-sale that can be bought and you can purchase parts I have listed and build if you wish. I only recommend this for those that have an electronics background already as there is some work and some knowledge to building this PCB from the ground up.

Don't give up, it sounds like you are doing better than it actually sounds, with blowing up a few mosfets and that's probably a good sign! With some work, you will get it! It can be done!

Good work and Thank You for sharing!

Best wishes,

   Chris

  • Liked by
  • cd_sharp
  • ISLab
Ourbobby posted this 04 March 2020

Thanks Chris! incidentally, i had an ultra fast diode across the IRFP460 for the last burst. It blew it in half. A UF 5408. 3 amp i think. Because of the damage, I had the duty cycle at around 5%, so I suspect that even then too much current was being drawn. I am looking at two options to drive my coils. One is similar to what you are using. the other is a low voltage solid state Marx where I can adjust the output to accommodate the coils' output. At the moment, I am unable to confirm the sawtooth!

Regards

Ourbobby

  • Liked by
  • Chris
  • cd_sharp
Chris posted this 04 March 2020

Hey Ourbobby,

WOW what sort of Input power are you using? Voltage and Current?

It sounds to me that your'e going over the ratings for the Mosfet and also the Diode. Maybe do a YouTube video and post, lets see whats going on.

Best wishes,

   Chris

  • Liked by
  • cd_sharp
  • strape
raivope posted this 04 March 2020

Hi,

If you are using this circuit (above), 3V source and single rail mosfet with parallel diode you still have problem with collapsing field (high voltage) that attacks mosfet or diode. (Mosfets have always diodes inside because of the design "parasitics", but usually they are not fast - so yes, adding a parallel UF diode is good.)

Energy may cycle in coils and then during the second cycle it will go back thru the diode, but in first cycle it has nowhere to go.

3V is low and usually many circuits survive the CEMF, but I would recommend to pulse the circuit with double rail circuit (or half bridge, or full bridge with single direction pulses) where you direct CEMF further away or back to source. Then later you can go higher voltage.

Best,

Raivo

  • Liked by
  • cd_sharp
  • Chris
Ourbobby posted this 04 March 2020

I think the problem might be twofold. One i need to use a current limiter in the pulse circuit. Two, I am using 12v battery, and I am only getting 10v pulse, so mosfet is not switching properly. Likely 15v better at the gate, so need to redevelop power supply. It is also possible that my configuration of coils with primary wrapped over both secondary coils is giving me some feedback  issues, that because of the fet blowing so early i cannot see what is happening. 

The non-inductive videos have been great, cleared up some issues I have had with constant differences with other system confusing me. it is most likely, on reflection, that I should first just put a power source together with current limiting, to consolidate my understanding.

Haven't made a youtube video, will have to look into process!!

Edit: on the circuit above you must be driving the mosfet with two separate voltages. The gate would require minimum 10v, you are showing 3v at Drain. i have missed that!!


Regards

oubobby

Vidura posted this 04 March 2020

Hi Ourbobby, Would you like to post a schematic of your experiment, with component values, so it would be easier to isolate the issue and find a solution. Vidura.

Ourbobby posted this 04 March 2020

Hi Vidura,

                here are a few shots of current layout. This is modified coil, to test for resonance. Previous coil was wound as per video 6 with primary on top of L2. I have used more turns on this winding. Hope you can make out my quick drawing!

Edit: I have drawn the duty cycle configuration incorrectly. diode goes to pot adjustment, pot goes between 16 and 9. It works on the board!

Regards

ourbobby


Chris posted this 04 March 2020

Hey Guys, awesome! You guys are all awesome!

Ourbobby, I would keep your setup as is, don't change anything.

Test your Circuit and Mosfet on a Resistive Load, maybe the light you have as a load there, see if you have any trouble driving a Restive load. If you don't, then your Coils are likely the Feed Back problem.

Vidura and Raivope have excellent suggestions!

The Coil does have considerable inductance, you could load your input Coil, yes this sounds silly, but you could try this circuit:


Of course, this is not ideal, but if it saves your Mosfet, then that's a practical start.

Like I said, your'e on the right track, don't change anything yet, I always say, learn as much as you can on the experiment you have right there on the bench, its the simplest things that lead to the biggest discoveries!

Well done! Thank You for sharing!

Best wishes,

   Chris

Vidura posted this 04 March 2020

Hey ourbobby,
Thanks for the Info, now Yes we got the issue: the Mosfetdriver 4427 has to be connected to the gate, via a resistor 10-20ohm. The mosfetdriver is intended to deliver considerable current pulses for properly driving the mosfet, the optoisolater do not have likely the capability to drive it(unless it is a combined opto isolated driver IC ). The opto in your circuit would be placed between the PWM IC and the driver IC. But it is not strictly needed in your circuit, as you use a low side switch with common ground connection you could leave it away. I hope this helps.

Vidura.

  • Liked by
  • Chris
  • cd_sharp
Ourbobby posted this 05 March 2020

Thanks guys, very helpful. Have to wait until week end for some time!!


Ourbobby

  • Liked by
  • Chris
  • cd_sharp
Ourbobby posted this 05 March 2020

Hi guys,

             Before I retire for the night, did not want to dream on this all night! Two photos, showing current rise and delay. Have not captured the sawtooth yet. Will look for that next. OK, what have I learned? 10% is borderline for delay to commence. A wider delay on the tips will readily show up with say 7% - approximately in photo. The problems I am having with mosfets' is too much current. As soon as I increase width of duty cycle - Boom! Thats it for now. Living below 10%. Have to start thinking again.

Regards

ourbobby


 .


We're Light Years Ahead!
Members Online:

No one online at the moment


What is a Scalar:

In physics, scalars are physical quantities that are unaffected by changes to a vector space basis. Scalars are often accompanied by units of measurement, as in "10 cm". Examples of scalar quantities are mass, distance, charge, volume, time, speed, and the magnitude of physical vectors in general.

You need to forget the Non-Sense that some spout with out knowing the actual Definition of the word Scalar! Some people talk absolute Bull Sh*t!

The pressure P in the formula P = pgh, pgh is a scalar that tells you the amount of this squashing force per unit area in a fluid.

A Scalar, having both direction and magnitude, can be anything! The Magnetic Field, a Charge moving, yet some Numb Nuts think it means Magic Science!

Message from God:

Hello my children. This is Yahweh, the one true Lord. You have found creation's secret. Now share it peacefully with the world.

Ref: Message from God written inside the Human Genome

God be in my head, and in my thinking.

God be in my eyes, and in my looking.

God be in my mouth, and in my speaking.

Oh, God be in my heart, and in my understanding.

Your Support:

More than anything else, your contributions to this forum are most important! We are trying to actively get all visitors involved, but we do only have a few main contributors, which are very much appreciated! If you would like to see more pages with more detailed experiments and answers, perhaps a contribution of another type maybe possible:

PayPal De-Platformed me!

They REFUSE to tell me why!

We now use Wise!

Donate
Use E-Mail: Chris at aboveunity.com

The content I am sharing is not only unique, but is changing the world as we know it! Please Support Us!

Thank You So Much!

Weeks High Earners:
The great Nikola Tesla:

Ere many generations pass, our machinery will be driven by a power obtainable at any point of the universe. This idea is not novel. Men have been led to it long ago by instinct or reason. It has been expressed in many ways, and in many places, in the history of old and new. We find it in the delightful myth of Antheus, who drives power from the earth; we find it among the subtle speculations of one of your splendid mathematicians, and in many hints and statements of thinkers of the present time. Throughout space there is energy. Is this energy static or kinetic? If static, our hopes are in vain; if kinetic - and this we know it is for certain - then it is a mere question of time when men will succeed in attaching their machinery to the very wheelwork of nature.

Experiments With Alternate Currents Of High Potential And High Frequency (February 1892).

Close