Building a Smith Generator

  • 19K Views
  • Last Post 15 October 2022
  • Topic Is Solved
sampojoe posted this 12 January 2018

I am starting work on building a Smith Generator.  Thanks to your work here, I am getting the role of Bucking Coils on the circuit.  I found this link for starters, a pdf that purports to tell you how to build one:  

projectavalon.net/forum4/attachment.php?attachmentid=25399

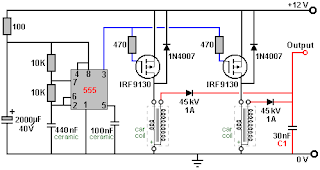
I extracted another schematic and made it an attachment below.  What they do not mention anywhere in the document is that coil L2 most likely is a Bucking Coil, as you have most eloquently shown here!  I guess they do say it is a "Tesla Coil".  I guess that could be a Partnered Output Coil.  I have seen similar schematics on youtubes by kdkinen, where he shows his replication attempts seemingly at least generating OU.  His schematics I can clearly see the Partnered Output Coils.  So with this understanding I think I will attempt a replication.   It seems very simple.  You use a 30 ma NST to get thousands of volts.  The front of the the circuit as shown uses a small inverter driven by a 12v battery to get 120v AC, which is fed thru a variac to control the input voltage to the NST.  The final output is supposed to be up to 8000v @ ~20A DC, as the L1/L2 is 4:1 step-up!   Pretty astounding.

I am not going to use a battery to run an inverter to drive the system.  I will just initially plug my variac into the wall.  You do need a real sine wave input for this.

So the front of the circuit feeding L1 starting with the output of the NST is grounded at the center point tap of the NST.  The output of the NST is rectified to extract the starting HV and then reconverted to AC with a spark gap tuned with resistors and caps to the coil L1 for about 31.5 kHZ AC .

Here is a hand drawn schematic online and in the pdf : Hand Drawn Don Smith Schematic

I got a little excited about solving the performance issues of the L1 circuit and clicked the solved button thinking it just applied to the post by Marathonman showing how Tesla built such circuits. But no, it got applied to the entire trhead, and is apparently a big database issue to correct.  So please ignore the green solved check!

Attached Files

Order By: Standard | Newest | Votes
Jagau posted this 04 May 2018

.

Very accurate Chris is another way to represent the technique.

The great Nicolas Tesla used this technique in his patent 336961 see figure 2 of his patent.In his time the semiconductors did not exist, so he replaced the diodes mechanically.And yes switching inductance is the same thing as shunting inductance. Let me explain.

When a diode is forward bias the other diode becomes reverse bias and shunt so the corresponding coil and the cycle is repeated at each change of polarity.Tesla used this technique in his time well before us, see Tesla's description at line 15 of his attached patent 336961.

Imagine Tesla today with all the electronic equipment we have, it is permissible to dream.

Jack

Attached Files

  • Liked by
  • Chris
  • Augenblick
sampojoe posted this 04 May 2018

Fantastic resource for the switched inductance explanations.  I have left those diodes off of my remake of the Don Smith circuit I am trying to make!  WAIT!  I have noticed several circuits now in the Utkin PJ Kelly doc that do not have them, just bridge rectifiers.  More study needed.  

And it seems we have some sort of agreement that we can just hook up 60 cps power to a coil instead of trying to operate on an NST frequency.  Before I try to bypass the SGFP circuit on my NST, I will look at using an ignition coil.  I have a GM coil upper right in my last pic on the NST ready to go.  It has a dual output.  Not sure if it has dual internal coils or if the same coil would drive two spark plugs.  One thing I have noticed is that the spark plugs with these coils would do double duty, sparking at the top of each piston stroke, exhaust or combustion.  These coils seem to operate at high current and voltage.  Here is a circuit featuring a replacement for the NSTs which show their capacity. It is on P95 of the PJKelly book for Don Smith's Resonant Energy Systems Document.

Notice the oscillator and output diode circuitry, which we are on track to remove (from my replication anyway).  

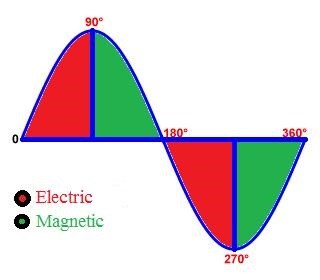
So Chris, your diagram conveniently shows one spark discharge at the peak or trough of the sine wave for input power on L1.  Do you agree with my contention that there may be hundreds of output sparks per each input AC power cycle.  Is my point not clear enough with my diagram or is your diagram just a simplification?

  • Liked by
  • Marathonman
  • Augenblick
Chris posted this 04 May 2018

Jack, your'e absolutely correct again!

Don does say many times about this very patent:


@All - All these devices are the same! There are two ways I know of, to get to the same result:

  • DC Switched
  • Wave Theory, using 1/4 Wave technique.

Two different ways to reach the same end result. Timed Interactions of Electromagnetic Acceleration and Liberation of Electrons, an Electron Pump!

All the same: Don Smith, Akula is the same, Ruslan, all the Electromagnetic Machines that produce Energy, all the same!

   Chris, 

  • Liked by
  • Marathonman
  • Augenblick
Chris posted this 04 May 2018

Hey Sampojoe,

I am a firm believer in simplicity.

If I may recommend, again, start small simple and cheap, replicate my Thread: Some Coils Buck and some Coils DONT

Reason: The fundamental processes are the same and can be learned from.

It is then much easier to add to, to get to the same end result as Don Smith, or Akula, or Andrey Melnichenko, or Ruslan, or Tariel Kapanadze, after all, the basic underlying process is exactly the same!

   Chris

  • Liked by
  • Marathonman
  • Augenblick
sampojoe posted this 08 May 2018

Notice that it includes oscillator circuitry and uses the diodes.  Building a faster oscillator was discussed in the thread previously, to try to get up to a MHz range Don talked about, but it is apparently unnecessary as long as you are using a spark gap that fires sufficiently fast.  With my L1 coil length of ~18', I am off the top of my head looking at maybe 18Mhz quarter wave.  I think this is a big step so far and I am confident it will work.

  • Liked by
  • Chris
  • Augenblick
Chris posted this 08 May 2018

Hey Sampojoe,

Do you know the turn on times of your Diodes? Anywhere near 20ns? For High Voltage, I cant imagine they would be any faster than that. wink

   Chris

  • Liked by
  • Augenblick
Marathonman posted this 09 May 2018

Thank you Jagau for that PDF, very informative.

Marathonman

  • Liked by
  • Augenblick
Chris posted this 10 May 2018

Hey Sampojoe,

Do you know the turn on times of your Diodes? Anywhere near 20ns? For High Voltage, I cant imagine they would be any faster than that. wink

No answer?

   Chris

  • Liked by
  • Augenblick
Chris posted this 14 May 2018

@Sampojoe - I hope all is ok, I hope your'e well.

I see you still have not replied.

   Chris

  • Liked by
  • Augenblick
Chris posted this 09 June 2018

My Friends,

I stumbled on to the following Video when looking for a full version of another:


Although its a good demonstration, I would have to say, this is a demonstration of how NOT to approach Energy Machines! I see so many problems in this video, Energy In is never ever in a billion years going to magically Create more Energy Out!

A Means of "Generation" and a clear understanding of it is the first basic requirement and this is not shown at all during this video.

In saying this, this guy does do a good job at giving some basics.

Pseudo Circuits I am also guilty of - Reason being is there is many hundreds of ways this can work!

The Video I was looking for I found and its clearer than the one I had 15 Parts to: ( Thanks missispots for sharing!)


   Chris


  • Liked by
  • Augenblick
sampojoe posted this 11 June 2018

Hello All, Nice videos Chris.  I have been busy and still trying to catch up on personal matters, but still trying some new circuits. Summarizing the last post, I think Jered is getting off on a tangent with the second capacitor in his corrected and more correct Tesla L1 circuit pretty much as we have come to agree here, or at least the one I believe is best and most correct.  But I will hold an open mind until I get a working test rig. 

It is of course in his L2 coils, it is not at all clear if he has Partnered Output Coils, and probably not since he seems to have gotten out less than he has input.  We all must realize that Don was a petroleum engineer retreading himself in physics, and I understand him best when I spot potentially some basic mistakes possibly just when he is speaking extemporaneously.  Yes I have breezed by that diagram Jered talks about as being wrong, looking past the mistake of frequency vs. time, etc.  But his book,  "Resonant Energy Systems",  has a more representative workable Tesla style circuit.  In many of his videos, he states  "just hook things up and it will work" or as in the above video at 13:45 approx. "almost tuned immediately", but does get strict about the quarter wave theory.  I want to expand on his relatively disarming statement about things like "just hook it up and it will work"

I am leaning toward Marathonman's inputs, i.e. his simplified Tesla diagram here,

and focus on something he pointed out about the sparkgap signal that is generated containing essentially all frequencies, similar to for instance a square wave.  I am moving toward the L1 circuit not needing a diode, as I have posted about such a circuit with AC input generating high voltage relatively continuous sparking.   Not exactly continuous as I theorize with this diagram.

In any sparking circuit , I believe we will get layers of sparking events, at increasing frequency.  The highest major frequency will be the individual spark rate.  A group of sparking events will follow the base input frequency of the AC power, either the NST frequency or say 60cps as in Tesla's diagram.  I believe the individual spark discharge will have an odd sometimes random shape, dependent upon the gas discharge properties on the plasma for that event.  As with a square wave, that event will be constructed of the necessary broad spectrum of frequencies.  To generate those of a square wave, I remember from my engineering calculus, it requires the integration of an infinite or essentially all frequencies, as Marathonman has pointed out in this thread.  Therefore a spark gap easily supplies whatever the harmonic frequency of your particular LC circuit needs.  Thus Don is proven right in some advanced electronics theory, when he states, "just hook it up and it will work".

Looking at this circuit, I have tried a circuits with elements I have had laying around, a dual coil from my 2006 Buick, a dual fan dimmer, and my variac instead of a dimmer.

It seems my variac has quit working, I can't tell if my coil is working or which side is ground, and the dimmer is putting out suspicious performance.  I salvaged the needed caps from some TVs, and I don't get the expected voltage performance on the other side.  I have new caps, a new old-style points type car coil, and a new dimmer and wiill be hooking up soon, as life gets in the way still.


  • Liked by
  • Chris
  • Augenblick
sampojoe posted this 11 June 2018

The L1 circuit will be built off of the spark gap side of the above coil, and I will examine dropping the use of diodes in it.  An I must mention how Jagu stated previously that the circuit need not be built around the NST frequency, as I assume he had come to the same conclusion as Marathonman.  My coil length of my L1 quarter wave theory I calculated to operate around 900 MHz, a bit higher than Don's 220 MHz number that has been brought up in this thread.  Not there yet, but perhaps an LC calculation is in order, the bigger problem being the capacitance of the coil, but I think it obeys a formula I can find.  But just an academic exercise based on if it sparks it works.

  • Liked by
  • Chris
  • Augenblick
Vidura posted this 12 June 2018

Hi sampojoe Following the thread I would like to give some hints I you want. I have been working with tesla coils for a couple of years, for other usage, corona ozonizers for water purification and swimming pool sterilization.With this devices I had much better results with 35khz neon drivers than with the ignition coil circuits.Although the latter gives very high voltage, the overall power and efficiency is less due to the frequency limiting cores. With a high sparking rate(convenient for high frequency coils) such a high voltage is not necessary. For lower power applications the best results I had with a 12v 6A and 6000volts out driver China made ~25$ . It has moderate power consumption , output voltage can be controled with input voltage. When I connected a ground between the driver and rectifier the output doubles without affecting the input. If you are interested I can send specifics and image, also I have some design for tungsten spark gap device.If I can help with anything just let me know. Hopefully we will see this generator working soon.

  • Liked by
  • Chris
  • Augenblick
sampojoe posted this 12 June 2018

Reply to Vidura:

Hi sampojoe Following the thread I would like to give some hints I you want. ... For lower power applications the best results I had with a 12v 6A and 6000volts out driver China made ~25$ . It has moderate power consumption , output voltage can be controled with input voltage. When I connected a ground between the driver and rectifier the output doubles without affecting the input. If you are interested I can send specifics and image.

Yes, interested.  I do have a 10000v NST, but I had a poor spark rate, that I have been blaming on the Secondary Ground Fault Protection circuitry.  It seemed to pulse at a few sparks per second, as I thought the SGFP was triggering and resetting.  I have been weighing an option  to attempt to disable that circuitry with possibly a switch, which may end badly as I do have to remove a soft potting material around it   You do not have such issues with your NST?


  • Liked by
  • Chris
  • Augenblick
Vidura posted this 12 June 2018

The small 12v device has no ground fault protection, only open circuit shutdown. When connected to a load-capacitor it starts immediately. For the bigger devices i used the old type of NST the transformer type with 12 - 15KV  30mA output without GFP, but usually i used only one half of the windings(centre tap and one output), as i found that 6- 7 KV is enough when the coil is properly tuned. A higher primary voltage will also affect the spark gap material, it wears out quickly in continuos operation.

with the 12KV  35khz device that you have i have never tried, so i don't know how to cancel the GFP, but there is certainly some info on internet about.


  • Liked by
  • Chris
  • Augenblick
Vidura posted this 12 June 2018

It is this type of NST i have used , the one i have is 6KV ,this is 7.5KV.

https://www.ebay.com/itm/CPI-Advanced-CPI-DC-75-Neon-Sign-Transformer-Power-Supply-12v-DC/163078480959?hash=item25f83c243f:g:wqIAAOSw4EhaeNMd

You can find some pics of a sparkgap and a hv capacitor, custom made, as attachment.

  • Liked by
  • Chris
  • Augenblick
Vidura posted this 13 June 2018

Here is some additional information for the spark plug device: the spark plug has to be without resistor , I have removed the outer electrode and drilled a 2mm hole in the center electrode, about 4mm deep. Here a peace of tungsten bar (from mig welding 2mm) is inserted, the same at the stainless steel plate on the opposite side, which is attached with silver welding.The gap should be around 1.5 - 2mm, if adjustment is needed ,some washer can be used in the spark plug thread. The device can be filled with argon to avoid oxidation. The Capacitor is made from two copper sheets 0.1mm x10cmx100cm with 5 layers of polyethylene foil 0.15mm in between. This is inserted in a 50mm pvc tube and filled with dielectric transformer oil( I have also made some with line seed oil, it works as well).care has been taken that no air bubbles remaines, as the corona discharge will damage the polyethylene foil.

  • Liked by
  • Chris
  • Augenblick
Marathonman posted this 13 June 2018

sampojoe;

 That circuit is directly from Tesla himself not me. i just found it in some early 1900 book i was reading online a few years ago and thought i needed to save it for a rainy day, well guess what, it's raining.  yes you are correct about the spark gap, it does contain all frequencies and yes the system will pick out it's own resonate frequency from what is offered to it but can be raised or lowered to your own frequency of choice. that is why Don stated just hook it up and it works. reading between the lines is sometimes useful habit.

i personally would start with that circuit as it just may well you will not need all the other garbage in the system. if you find out it does well no harm done just add it.

Marathonman

  • Liked by
  • Chris
  • Augenblick
sampojoe posted this 14 June 2018

sampojoe;

That circuit is directly from Tesla himself not me.

Of course Mman!  But credit goes to your astuteness!

SOOO  I would like to announce  


Success, sort of.  I am getting +10,000v with my new car coil, 2uF cap, and dimmer.  However I seem to have no control with my dimmer.  I sure would like to put out about 1000v here.  Well this bypasses the diodes and SGFP issues!  Whew, at least its sparking!  It seems like it is getting the full 110v AC

So now the task is to control the input power and then move on to L2 construction!  At last some movement! My variac is acting up with the other previous components and I am just not understanding some multimeter measurements either.  I will be troubleshooting the variac.  In order to control noise in this circuit, the plug on the other side of the dimmer needs that noise attenuation loop so it doesn't get into house power circuit also.

  • Liked by
  • Chris
  • Augenblick
Marathonman posted this 15 June 2018

I thank you for the comment.

I did study the Smith devices for a few years but back then there was not as much information as there is now. that is why i have a B W coil and two non GFI neon sign transformers one at 7,500 v  and the other at 9,000 v along with a few 10 and 15 thousand volt caps. maybe after the Figuera device i will try my hand at it again...... who knows.

also remember Tesla did use opposing magnets on his spark gap at times i guess as sort of a snubber circuit that also compressed the electron gap to a thin layer arching between the electrodes which is very interesting to me but i never researched it in depth. everything Tesla did was for a very good reason.

Marathonman

  • Liked by
  • Chris
  • Augenblick
sampojoe posted this 16 June 2018

OK, just gave the variac another try, plugging my dimmer cord into it and VIOLA! running it at a ~40v setting and then the dimmer seemed to provide control of the spark, but not as expected again.  It hummed when first turned on, no spark, as the voltage is too low.  Turning up the dimmer, and my spark gap set at bout 2mm, I first get some intermittent sparking.  About midrange I get a steady strong spark.  Turning up the dimmer to full strength, it surprisingly stops sparking, the opposite of what you would expect.  I should test with just the variac.

Running at midrange then, with a dielectric breakdown constant of 3 x 10⁶ v/m (Tipler, Paul A. College Physics. Worth, 1987: 467), I calculate a nice voltage of 1500v!   I think this is getting close.  Assuming about a 4 times step-up voltage in L2, that brings it to 6000v.  The cap on that circuit that I plan to use is good to 5000v,  so I need to operate at no higher than 1250v.  I will mic out the gap very carefully.

  • Liked by
  • Chris
  • Augenblick
sampojoe posted this 16 June 2018

Construction of L2


From the PJ Kelly version of Don Smith's Resonant Energy Systems on the last 2 pages, there are instructions to build these homemade, rather than buying the from Barker-Williamson.  I think it would be a special order since we are going to do a CW half and a CCW half, as Chris shows in his hyiq pic


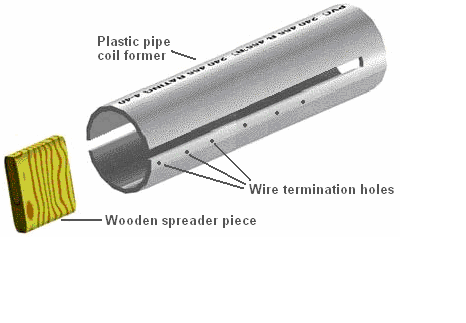
Shown below is how to construct the coil former to wind the coil parts on.


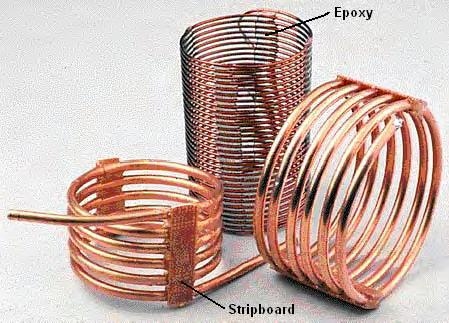
In this diagram epoxy is shown to form a strip when it was on the former.  Plastic strips ar overlaid on the epoxy on one coil, building in some strength.


See the book, copies of which have been attached on this thread and of which Chris has the file also.

  • Liked by
  • Chris
  • Augenblick
dummyload posted this 16 June 2018

  • Liked by
  • Chris
  • Augenblick
Vidura posted this 16 June 2018

Hi dummyload, The function of the oil is as dielectric in first place, with higher dielectric constant than air, and also for cooling the spark gap electrode,as they get consumed when working for extended periods.Tesla has built some devices which where entirely submerged in oil, as this also prevented losses from streamers when operating at high voltage levels.

  • Liked by
  • Chris
  • Augenblick
Marathonman posted this 18 June 2018

I was always under the assumption that the spark gap had to be between the cap and the primary coil for it to pick up it's resonate frequency. if it is on the other side it will not as the caps will interfere.???

Marathonman

  • Liked by
  • Chris
  • Augenblick
Vidura posted this 18 June 2018

Hi MM. The spark gap "shorting" the input was teslas prefered design, as in this configuration the two capacitors with the L1 coil in between charge up in series, when the spark ocurres the potential on input is equally and nearly all current from the caps discharge thru the L1 coil, then the input transformer or generator act as ground and the C-L1-C circuit goes on oscillating .this makes this configuration very efficient and less energy is dissipate in the spark gap.

  • Liked by
  • Chris
  • Augenblick
sampojoe posted this 18 June 2018

Thank You Vid!    So now I have a working L1 but it is designed around the 9th harmonic of  the NST frequency, which I calculated at 18MHz.  It makes my L1 at 5" total length, many times larger than than Don's, supposedly operating at 220MHz.  I have seen repliications using some pretty long L2 coils, getting interesting output.  Not sure if they did the wavelength calculations.  My L2 length will be about 14" total. which does not seem to hard to build.  My L2 details for my current design of L1 is 3.5' D, 29 turns per half coil, with .25" spacing.  The wire length per half coil is ~26'.  It seems every thing gets easier if I go to a higher frequency...  I think I may bump everything up to operate at 35.9Mhz.  but this seems to make my L2 small.  I think Don's comes in around 19 turns per half coil,   So it would seem to be several multiples of wavelength greater than his L1, which would still resonate.  I would say that 1 wavelength in coil length is the minimum of L2.  Don's 5 tuns of wire on L1 would again be much larger than Chris' quarter wave theory he has posted.  But again I believe the quarter wave on the L1 transmitter would be a minimum, and it could be a whole wavelength? 

Chris, Please comment.

As far as L2, if it were 2 wavelengths long it would also receive just as well, Maybe better since it would receive more signal?

I am leary about deviating much from Don's pictured device, but I keep coming back to it being just a display model.  Left to my own devices, I may shorten L1 and stay with the 19 turn L2 half coils.

  • Liked by
  • Chris
  • Augenblick
Chris posted this 18 June 2018

Thank You Vid!    So now I have a working L1 but it is designed around the 9th harmonic of  the NST frequency, which I calculated at 18MHz.  It makes my L1 at 5" total length, many times larger than than Don's, supposedly operating at 220MHz.  I have seen repliications using some pretty long L2 coils, getting interesting output.  Not sure if they did the wavelength calculations.  My L2 length will be about 14" total. which does not seem to hard to build.  My L2 details for my current design of L1 is 3.5' D, 29 turns per half coil, with .25" spacing.  The wire length per half coil is ~26'.  It seems every thing gets easier if I go to a higher frequency...  I think I may bump everything up to operate at 35.9Mhz.  but this seems to make my L2 small.  I think Don's comes in around 19 turns per half coil,   So it would seem to be several multiples of wavelength greater than his L1, which would still resonate.  I would say that 1 wavelength in coil length is the minimum of L2.  Don's 5 tuns of wire on L1 would again be much larger than Chris' quarter wave theory he has posted.  But again I believe the quarter wave on the L1 transmitter would be a minimum, and it could be a whole wavelength? 

Chris, Please comment.

As far as L2, if it were 2 wavelengths long it would also receive just as well, Maybe better since it would receive more signal?

I am leary about deviating much from Don's pictured device, but I keep coming back to it being just a display model.  Left to my own devices, I may shorten L1 and stay with the 19 turn L2 half coils.


Hi Guys, some good progress!

First, I want to re-iterate, I definitely do not recommend the use of High Voltage! However, at your own risk be it.


Quarter Wavelength

I have covered the Quarter Wavelength many times, but the reason one needs Quarter Wavelength is simply the configuration of the Coils. Each Partnered Output Coil is Quarter Wavelength, both together is Half Wavelength.

All the greats before us told us this if one does the research!


Kind time of day. Maybe here we will find a common language. At once I will say that I do not sit at forums much. No time ! However, now for the 5th time I am collecting Akulin for a capacity increase. There are ideas .... But in fact the people are looking for a bit of everything is not right. All these systems operate on the basis of standing and traveling waves. It is necessary first to catch the motion of particles in the coil. Those. as Kapanadze does with a tester or an ammeter. Only at HF frequencies no ammeter will help and you will need to catch an oscilloscope. The first rule: Wind the coil 40 meters. 2. Find out its resonant frequency (1/4 wave) Inductor 1/4 = 10 meters of the same wire (for example, 2.5mm) Connect the generator to a 10 meter coil, drive the rectangles at a frequency of 1 MHz and crawl higher until 40 meters do not appear sinusoid. The maximum amplitude. The generator is desirable to take a normal, laboratory! With output adjustment from 0 to 20 volts. We achieve maximum amplitude and move tenths of a kilohertz until it starts to dance. This is your wave resonance !!! We fix the frequency and voltage. It is for this all have to do the generators. Further ... Tesla we shake under this frequency that the effect has turned out. Then we do everything as I did or the Shark. In this case, everyone wants to repeat this device. Forward! We fix everything beautifully and stiffly, without forgetting that the resonance and effect can escape in the case of fastenings on the snot. We need to get the effect itself and work, and not a ready device. Once you begin to understand what to do next, you can already move. So .... Tesla, as we know, also wets the sinusoid. Suppose your frequency is 1.821MHz. The frequency, but alas. It is necessary to adjust Tesla on it. The shark used a critic between Tesla and the toroid (Antenna) over the inductor. This is just an accurate adjustment. It is needed before launching. Then the system holds and no matter what has slipped in not large limits. But! Again ... What where? On the Inductor we feed the signal of rectangles with a frequency of 1/50. Consider: 1820: 50 = 36.4 kHz pumping a rectangle through the junction (Pot) with 23-29 turns of wire 2.5 squares. I repeat, you need to make the voltage on this harmonic not 10-20 volts, but higher by an order of magnitude. Approximately up to 50-60 volts and get the same dancing effect at the output. Further ! Do not forget that Tesla does not need strong power. Do not let sparks run and wet so that it breaks through. This is not necessary !!! It's better to make a controlled Tesla. Continue: The output voltage will be 195-200 volts. This voltage will not be higher. Why? Later we will return to this. It is necessary to rewind the transformer-reactor (Coil) so as to obtain the desired voltage. This requires experiments. Remember that we push the current in the reactor with a transverse wave. Created by Tesla. In the coil another wave is formed under the action of pumping by rectangles. The particles of which constantly rotate left and right. By giving them the movement of the pulsating Tesla, we disperse them in the very conductor. This is a gemmoroid understanding, but a fact. Tesla must operate in one half-cycle or one arm of the transistor. It is advisable to manage the Tesla pack - pulse generator. When everything is clearly adjusted, you will see how the effect manifests when changing the width of the pack. Consumption Tesla is scanty, and pumping does not strain at all. The current at the output is up to 7 amperes and the voltage is 200-209 volts. Bulbs and PSU pulses work well. Now for removal: 1. The coil is connected via a diode bridge. No parallel capacitors !!! 2. You need from Tesla only one half wave. Otherwise Tesla will take what she gave, back !!! Therefore, and put the diode from the ground to the very take-off coil (40m) The shark did this at the reception. He removed one part of the sine at the reception itself. Because Tesla. No one knows this and -bip-tsya to this day, nichrome does not work. It's clear! You need to swing the swing in the coil of energy removal. It is there that we push the current. By the way, the surplus from Tesla and the frequency setting of the Shark used a simple light bulb. Since the Inductor is galvanically isolated from the entire circuit, the light bulb serves as a resistive load to suppress surplus from cords and pickups. You can not bet, but do not rock Tesla very much. Do not ! Remember that the current is subject to voltage. This I see from experiments that I spent 2 more years ago. Next: The diode on the receiving take-off coil destroys one half-cycle and so we swing the oscillations without hindering them by the negative Tesla period. This, too, many do not know and continue to sculpt. That's why Roman (Shark) says that he is eating ground ... Everything is right! Because it kills the half-period pulse at the reception, which is grounded. This can be seen in all his settings! I wondered for a long time why he decided to use this solution and realized that it's easier to pick up BB diodes. Since interference at such frequencies in Tesla will lead to its improper operation. In other words, it will not be possible to cut off the half-period. Kapa solved this issue with an arrester and rectifiers at low frequencies. There everything is simpler, but more wires .... So on the German installation the diode is small, Tesla is far away, the grounding cable is long. By the way is equal to the length of Tesla !!! Do not forget about grounding .... On this installation it is important and without good support (grounding) will not work. Do not forget that the systems use high voltage. As we know, it moves even in the air. That's why grounding is necessary. Plus wave resonance and safety .... Like that .....


For me, I choose to learn one step at a time, I do not label a theory to be wrong until I fully understand where and why the theory is wrong. I believe following the clues that those before us, gave us, is much more beneficial than branding what can not yet be branded.

Please stay open minded, you truly do, already know how these machines are supposed to work. Bucking Magnetic Fields at the right Time in the Cycle and to do this one needs to make the Reflectance back on the Input Additive! 

   Chris

Vidura posted this 19 June 2018

Hi sampojoe ,Chris.

Im glad to see that there is a progress. You are all so much better in doing this calculations than me, only think about a few practical behaviours of this coil systems. Although you do very accurate calculations be aware that you have not only the coils,wires. there is a important influence of capacitive components. By only move any object near the coil the frequency changes, still more all the components with direct wired connection will have an influence. so the final tuning has to be done by trial only. Many of the Smith devices have means for tuning , adjustable caps, moving L1 coil and others. I have never worked on this kind of application, but i would Guess that it could be more practical to keep frequency and also L2 voltage at lower levels, this will be saver and easier for the final rectifying stage(components will be less stressed). You can bring down the frequency by adding capacitance or by grounding at convenient points. also be aware of the layout, as all the connecting wires adds to the coils length when longitudinal oscillating. 

  • Liked by
  • Chris
  • Augenblick
Chris posted this 19 June 2018

I hope this helps some:


   Chris

  • Liked by
  • Augenblick
sampojoe posted this 19 June 2018

How to Make Uni-directional Wound Coils "Buck".


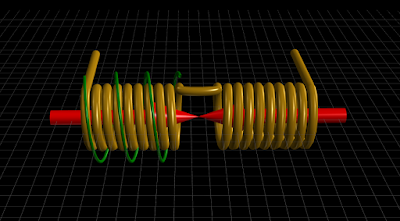
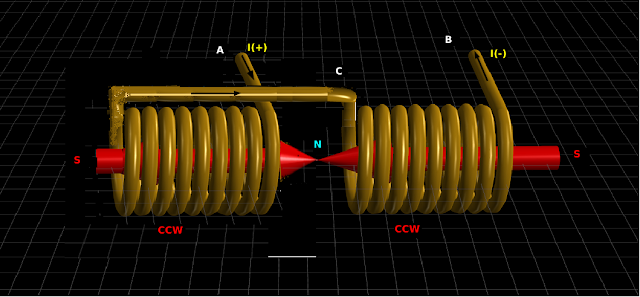
In Chris' partnered coils hyiq lead off photo, let us examine coil winding and current flow.  As we employ this circuit, we use AC current as Nikola Tesla and Don Smith did.  Lets take a snap-shot of current flow in one direction, as indicated by the black current arrows in the coil wires, to understand how it works.  In doing this I am just extrapolating the right-hand rule to the generation of a magnetic field by current in a wire.  Due to the change in coil winding direction from Clockwise to Counter-Clockwise, these coils generate opposing North magnetic fields, cancelling themselves to give us current amplification, as I understand so far.


In the video I posted back in Jan. on Kdkinen's work on the Smith Generator, he uses Barker-Williams stock coils hooked up in "series", just as Don shows in his display model, all wound in the same direction.  He notes he gets significantly better performance, however, when he has hooked the coils up in "parallel".  What exactly does that mean?   These coils are wound in one direction only.  The question I would like to elucidate is,

Can you make two coils wound in the same direction behave as indicated above when they are wound either both CW, or CCW?  If so, how?"  

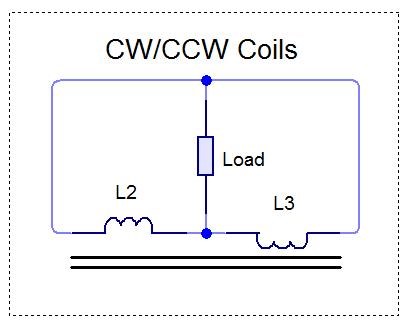
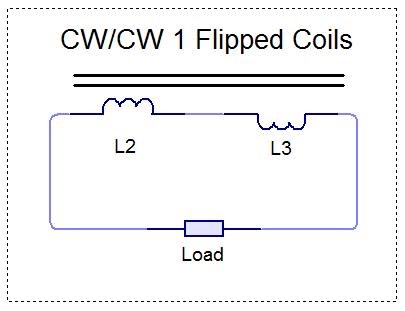
I wish to illustrate what he means using Chris' diagram slightly redrawn to illustrate it.  In the following diagram, both coils are wound CCW.  The twist direction is a coil's unique property.  It is the same no matter how the coil is rotated to examine it.  The right side coil is the same and in this snap-shot of DC current, with it exiting out at connection B, the same for Chris' coil.


In order for the left coil to generate an opposing N magnetic field, the current must be driven in the opposite direction if both coils are wound in the same direction.  Using the right-hand rule, the input point A of the left coil must be moved to the middle of the whole coil.  The center-point connection C must now be made from the left side of the coil to the left side of the right coil.  For a CW coil to generate cancelling N magnetic fields, the current flow in the above diagram must be reversed also.  That is how an off-the-shelf Barker-Williamson coil, or any set of coils wound in the same direction can be connected to achieve partnered output performance.

  • Liked by
  • Augenblick
sampojoe posted this 19 June 2018

But getting back to the quarter wave stuff, I have not gotten a good look anywhere of exactly the size of Don's L1, but it seems only about 2.5' total length, on a ~2" pipe, (I say it is 2.5"), it would have to be closer to 36MHz, not Don's 220MHz. And the 19-turn full wave Barker-Williams coils, comes out to be more like 18Mhz, again not the 220MHz.  Don't you think my L1 is at least twice as large as Don's?  I will go over my wavelength calculations again.  Agreed that the 4-1 ratio is key as an rf transmitter-receiver arrangement, but not getting close to 220MHz so far.

  • Liked by
  • Chris
  • Augenblick
dummyload posted this 19 June 2018

  • Liked by
  • Chris
  • Augenblick
Chris posted this 19 June 2018

DummyLoad - Excellent reference!

This is true, a node can easily be fouund:


Studding carefully here one can see some very important details!

   Chris

  • Liked by
  • Augenblick
Chris posted this 19 June 2018

@Sampojoe

The modifications to my Graphic of Partnered Output Coils is not correct!

Your drawing does not directly follow any of the information I have laid out.

My main and long time released Circuit for these Coils is Parallel and this is also what my recent set of experiments with CD_Sharp shows.


I have detailed another Configuration also:


One must remember, the E.M.F and also the Current is "Generated" by the Action - It opposes because its Lenz's Law


Two Configurations I have found that work, and one can be better than the other. I have covered this in great detail in my Thread: Some Coils Buck n some Coils DONT and also in my pdf document: Guidelines to Bucking Coils.


Some more helpful Info:


   Chris

  • Liked by
  • Augenblick
Chris posted this 19 June 2018

Sapmpjoe and all following,

If I may put my 2 cents in, I think there is some confusion here.

Don used off the shelf Barker & Williamson Coil Stock:


There is One Turn difference from this coil to Don's Coils, almost ZERO Modifications to the Off the Shelf Coils, remember he had two back to back:


One Coil was LC Resonant with a small Capacitor parallel to the Coil. This Coil must be bought into Resonance or tuned for resonance.


The Wavelength that needs to be worked with is the Resonant Frequency of the device, not of the NST or any other component. The Coils them selves must be bought into resonance, just like I showed in the above quote, just as The Mr Preva Experiment shows, just as we have learnt in our follow up experiments. This is the Wavelength that needs to be worked with, none others!

The Input is only a catalyst for the Output Coils, its the tickle under the Chin, its the "Common boys we got work to do" but as always the boss does no work!

Start from the Output and work back, its much easier, do not focus on your Input, its going to change no matter how good a guess you make!

Remember, 16/17 Turns to 4 Turns = 1/4 or 0.25 the Wire length, of the Output Coil. Focus on the fact that ALL EM Energy sits in the 1/4 Wavelength:


Remember our work in the Parametric Resonance area:


EDIT: Its worth noting, the Partnered Output Coil that is LC Resonant, will most definitely change the Resonance Frequency when the Second Partnered Output Coil is connected, so for this reason, one must tune with this in mind!

Also Remember: 1 + -1 + 1 = 1

In other words, the Second Output Coil stops all negative and actually is additive to the input, so the Resonance on the Output Coils, the same as in The Mr Preva Experiment and also the Diodes, brings a positive affect on the Input. 

   Chris

  • Liked by
  • Vidura
  • Augenblick
Chris posted this 20 June 2018

My Friends,

I have always stated, focus on hard facts and nothing else. Here is some hard data for you.

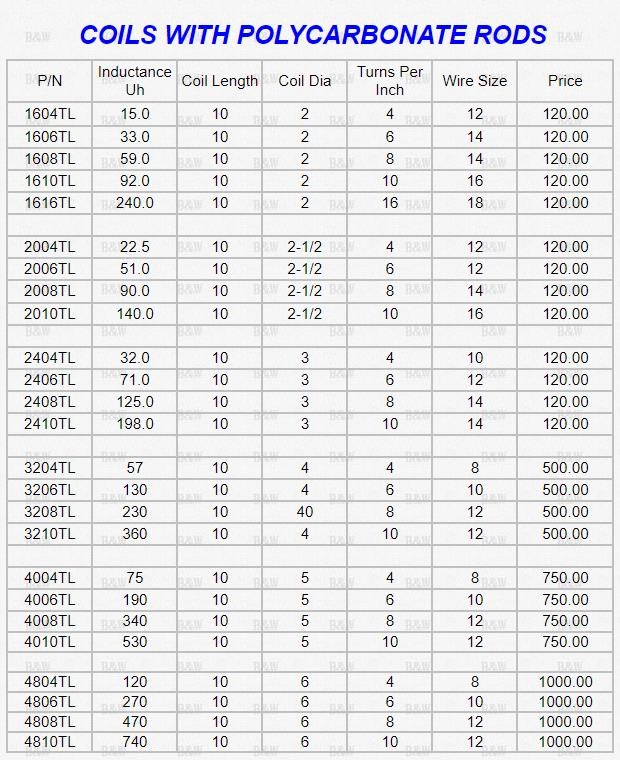
Barker and Williamson still sell Coils, the following website: https://www.bwantennas.com/ - Notice the use of Antennas in the URL

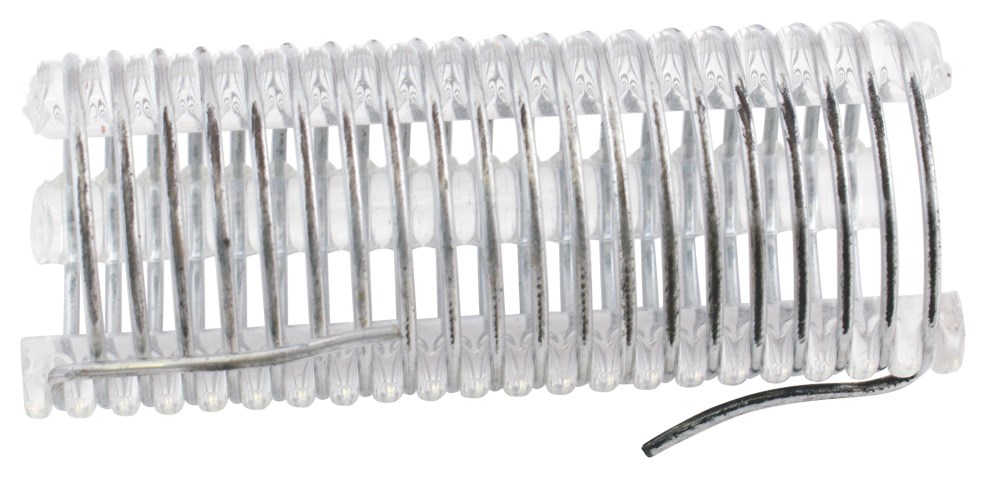
Barker & Williamson air wound inductors have been an industry standard since their introduction in 1932. They offer high Q and mechanical stability, and come in a variety of sizes. Diameters from 1/2 to 6 inches, coil lengths to 22 inches, and wire sizes from AWG #8 to #24. The coils are wound with tinned solid copper wire that is embedded in plastic ribs.

Now, the Website has a catalogue, copied for your convenience:


EDIT; My mistake on Coil Turns, removed for correctness and clarity.


My Friends, this is hard data off the website, Don stated exactly and empirically:The Output Coils are off the shelf, no modifications, stock standard Coil, 


Remember what Don said, its all about getting "the Coils to Talk to each other":


We know Don referred to L2 as a singular Coil, I do not, it is two separate Coils, I call them Partnered Output Coils. Each Coil must by Faraday's Law of Electromagnetic Induction, induce an E.M.F on the other and this will be in opposition to the change, so the Amplitude on half of L2 that is resonant must induce the same change but in the opposite direction to the other half of L2, so technically, these two Coils are separate, they are individual Coils, each having an individual task and doing work on each other.

again, which Don has also said:


Lets keep this simple, lets not complicate where no complications are necessary. Does everyone know what Wattless power is? Research this, Don also referred to it. Learn why 

   Chris


P.S: I am not always right, and will admit it, I am still learning. I encourage all here to do their own homework, check and double check, Hard Fact can never be proven wrong, no matter how good the Troll is!


  • Liked by
  • Augenblick
Marathonman posted this 20 June 2018

WOW ! I never realized it before Chris but you are totally right, Don did use two BW's in his device. well kiss my grits how in the world did i ever miss that one,

THANKS !

Marathonman

  • Liked by
  • Chris
  • Augenblick
sampojoe posted this 21 June 2018

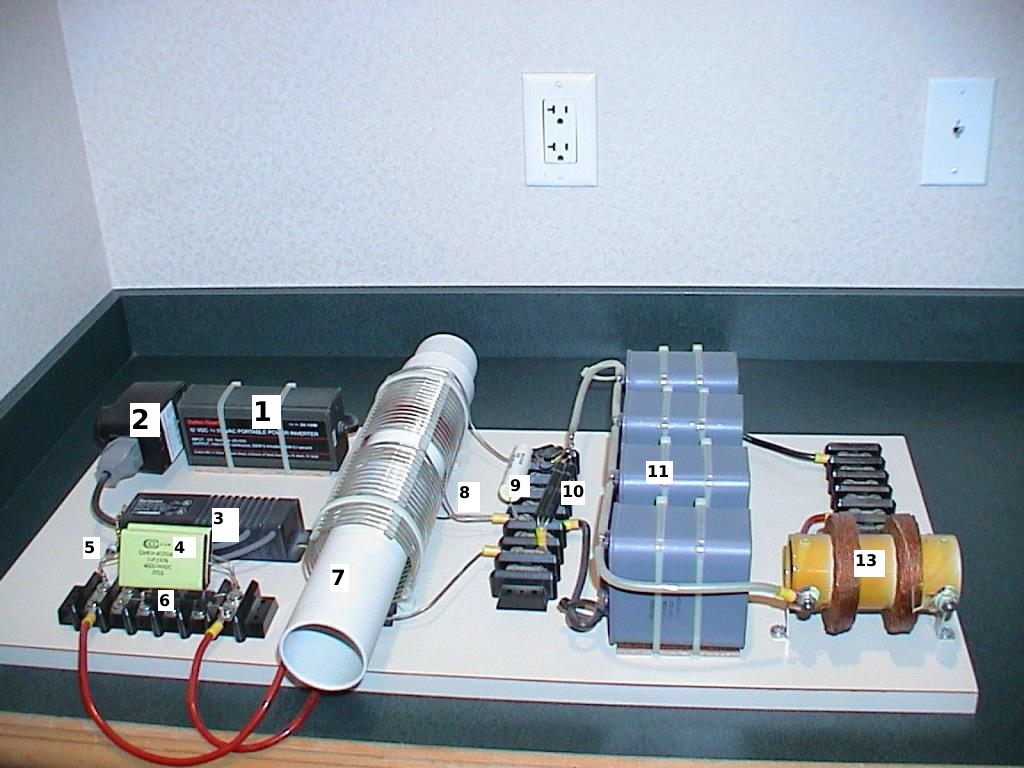
The use of the BW coil is mentioned in my original source material obtainable at Line 4 of my post, and also mentioned in PJ Kelly's Don Smith book.  Here it is in this well-known picture, but to which I have added enumeration of points of interest: 

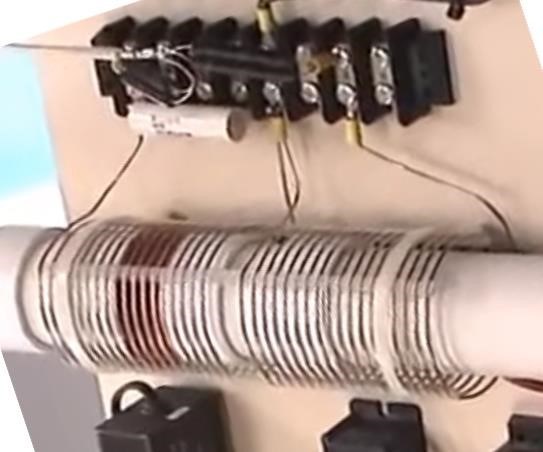
It is clearly a 4" 40 turn model, about 12 gauge, cut in half, and then joined again at location 8 in the diagram.  

Please note.  This means, and you can clearly see, that both halves are CW wound, and thus not a partnered CW/CCW pair.

The first wire comes down from overhead, is joined on the junction block with the second wire, which then proceeds to go under the pipe to the second coil in the same winding direction, as opposed to reversing to CCW.  This is why I posted the workaround modified hyiq parthered coil diagram.  I will strive to prove it after a successful DS build is achieved.


  • Liked by
  • Chris
  • Augenblick
Aetherholic posted this 21 June 2018

Some information, maybe useful or not.

It is very probable that Don Smith used a layer of piezo electric material underneath his L1 coil. It can be seen as a black layer on the L1 former in the last series of videos he made where he is going through some old photographs of his many builds. I believe he said it is the same material used for under road vibration electricity generation.

"If you wish to understand the universe think of energy, frequency and vibration." - Tesla


Aetherholic - One truth, One field

  • Liked by
  • Chris
  • Augenblick
Chris posted this 21 June 2018

Hey Sampojoe,

I saw and read your Barker and Williamson Coils and yes you're right. But still, they are off the shelf.

Technically the term "Partnered Output Coils" is defined as any device, or any machine that has Two Output Coils, any... The key word being Two.

I have provided a Pseudo Schematic for convenience for the public. I have predefined two optimum configurations that can be easily learned from, from very early days, in my Guidelines to bucking Coils, around 4 or so years ago now, and others that do not work very well in my Thread: Some Coils Buck n some Coils DONT - Winding direction is dependant on Configuration and not defined in the Term: "Partnered Output Coils"..

I have stated on many occasions, this can work many hundreds of ways, there is no right or wrong. This is the reason for the Pseudo Schematic. 

Critically, the Interactions between these Two Output Coils are what "Generates" Electrical Energy.

Start with the Output Coils, get them working properly and then the Input can be constructed around the requirements of your Partnered Output Coils.

I hope you succeed!

   Chris

  • Liked by
  • Wistiti
  • Augenblick
sampojoe posted this 21 June 2018

Hey Sampojoe,

...

Start with the Output Coils, get them working properly and then the Input can be constructed around the requirements of your Partnered Output Coils.

   Chris

Exactly!  So in that direction, I will build them on "paper" first!

Frequency calculations affecting L1 & L2 Design mods.

I am going to design around Don's L2 and work backwards to establish L1 parameters. My L2 coil former will be 3.5” in diameter. A 40 turn coil length will equal one wavelength at about 11.2m, or 26.8MHz. At a quarter wavelength, the L1 must then be 2.8m in length. On my 2.75” D L1 former, I must cut back my current model to 12.75 turns. This takes care of the physical parameters of my "antenna" to support my selected frequency.  

Next, we must look at the electrical characteristics. Lets calculate the inductance of the L1 coil first, using my Navy Basic Electricity Training Manual. The formula is:

L=.4πN2μA x 10-8/l , μ is permeability(=1 for air coil), A cross-section cm2, N turns, l coil length cm


L1 inductance comes in at 2.4 microhenries. Now we calculate the value of capacitance needed to create resonance at the right frequency, using a formula from my Foundations of Electromagnetic Theory,

ω2=1/LC -or- solve for L, L=1/C ω2, or solve for C, C=1/L ω2

Now here is a surprise. C calculates to be 576 pF!! This is considerably smaller than than what is shown in Don's display models at .2uF. With smaller components comes a price savings!  Of course, this will be a starting point, and any and various means mentioned in this thread will be employed to fine tune the system. Also the addition of a ferrite core, estimated at a permeability of 500 will lower the value of the capacitance to about 1pF!  

  • Liked by
  • Chris
  • Augenblick
Chris posted this 21 June 2018

@Sampojoe - For the record, I think your'e doing an awesome job!

I apologise if my posts are in anyway short of rude, that's not my intention, I am only trying to help. Please understand, I spend many hundreds of hours, sourcing, sorting, and referencing Data for all here. My word is only a small part of what I am trying to share,

In many cases my posts are planned out well in advance.

I spend a lot of time just keeping things going. Like most of us, I have a lot of other things I have to also attend to.

So, Good Job, keep the good work up, if you keep it simple and keep it to Dons Device and his excellent advice, many will benefit very soon. Remember, it is Partnered Output Coils where the magic happens, find their resonant Frequency and make the coils talk to each other as Don said.

   Chris

  • Liked by
  • Augenblick
AHargis75 posted this 21 June 2018

Im not sure if this has been mentioned but the Barker and Williamson coils have been tin dipped he said, when you coat a wire with tin it increased is magnetic field by like 300%. thats all. 

Chris posted this 21 June 2018

Im not sure if this has been mentioned but the Barker and Williamson coils have been tin dipped he said, when you coat a wire with tin it increased is magnetic field by like 300%. thats all. 

Hey AHargris - Wow thanks, I did not know that!

   Chris

  • Liked by
  • mrblobby
  • Augenblick
Marathonman posted this 24 June 2018

I know this is a distraction for which i am very sorry but it is very funny as i have been laughing for hours and i hope you find humor in it also.

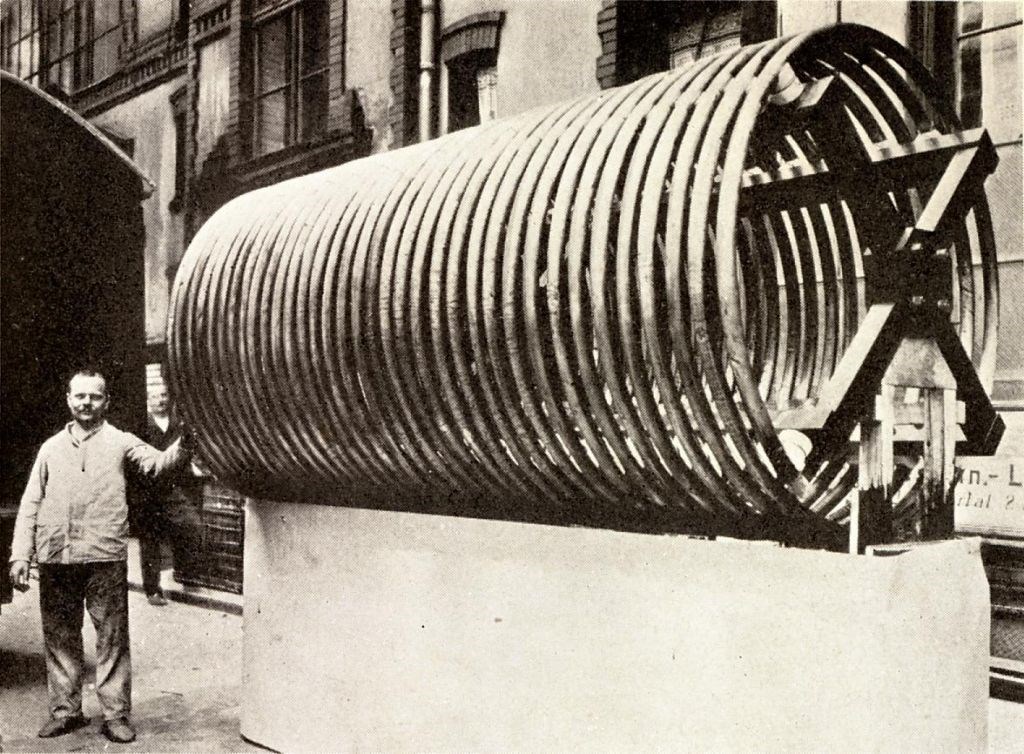
here is my secondary i might use for my Don Smith replication, i hope it is big enough as i plan on powering my house with it i hope.

I ordered it special from BW and i might need help on the calculations.

Please forgive me Sampojoe.

Marathonman

  • Liked by
  • Augenblick
Vidura posted this 24 June 2018

Awesome coil MM. I imagine a coil like this in a Smith generator could power an entire city!! @sampojoe Your comment in the secondary coils calculations about the capacitors, I am in doubt about the 220mhz operation of the original device, as the output rectifier would need to operate at4.5ns period wave, what devices could manage this?

  • Liked by
  • Augenblick
sampojoe posted this 25 June 2018

MM: HaHa, he got bit bad by the Tesla bug.  Vid: Yeah the wavelength if applied to the possible length of the BW coil will be a little longer than mine, as I think it is a 4" coil, judging from the catalog posted by Chris.  Hmm, that would move it toward 22MHz!  I wonder if Don got an extra zero in his calculation?  Some construction info below in case someone finds it useful.

My L2 Construction

I have not been able to find some essential components to build my L2 by the method found in the PJK's Practical Guide to Free Energy Devices on Don Smith Resonant Energy Systems publication. I think it might be easier than what I have so far, but I may try it next time, as I still hunt for what else I need for those construction techniques.  I have everything I need for my alternative and have started it.  Here is a picture of the components:


My basic construction will be each coil half will be shaped around the white rings cut from a 3.5" PVC pipe.  Each half will have a ring on each side and fastened together on 4 5/16" fiberglass poles.  Each pole will be countersunk and held by a 2-56 screw and epoxied also.  In order for the coil to have a 1/4" spacing, 20 slots will be made in each pole, but staggered by 1/16" from pole to pole to accomodate the "screw" pattern of the wire.  In order to make those slots I put 4 poles in a wood holder with the stagger step at each block on the side.  I can now make 4 properly aligned slots on each pole at once, which are marked on the white poles.  I will use 2 blades together to get the required .08" slot for 12ga. wire.   I calculate the coil length to be about 5" but the total length will be 6", in case I need to move out to gain resonance.  


  • Liked by
  • Chris
  • Augenblick
Chris posted this 30 June 2018

My Friends,

I tried to share another video from Don Smith and it was instantly removed, instantly as soon as I hit the publish button.


The video is actually this one with all the guff removed:


So, clearly YouTube are running their Copyright Algorithm on Name and Description first.


   Chris


  • Liked by
  • Augenblick
Zed Varnett posted this 30 June 2018

Hello Chris,

I'm the owner of energyevo.com (you might have seen collection of Don's Yahoo Group posts there before =)

First of all, I want to thank you for your dedication and contribution to this field of new energy technologies. Seeing these 4 new Don Smith videos is like a miracle, thanks so much for releasing them! I knew these VHS tapes existed but for some reason no one ever talked about them Your decision to share them is very much appreciated!

I guess you've already seen this audio recording of 2003 Inventor's Weekend conference that was also missing on the net for some reason

Regarding the 1994 Tesla conference, any chance you could upload an original (uncut) version to some file sharing website? including all the guff...

Keep up the great work and thanks again!

We're Light Years Ahead!
Members Online:

No one online at the moment


What is a Scalar:

In physics, scalars are physical quantities that are unaffected by changes to a vector space basis. Scalars are often accompanied by units of measurement, as in "10 cm". Examples of scalar quantities are mass, distance, charge, volume, time, speed, and the magnitude of physical vectors in general.

You need to forget the Non-Sense that some spout with out knowing the actual Definition of the word Scalar! Some people talk absolute Bull Sh*t!

The pressure P in the formula P = pgh, pgh is a scalar that tells you the amount of this squashing force per unit area in a fluid.

A Scalar, having both direction and magnitude, can be anything! The Magnetic Field, a Charge moving, yet some Numb Nuts think it means Magic Science!

Message from God:

Hello my children. This is Yahweh, the one true Lord. You have found creation's secret. Now share it peacefully with the world.

Ref: Message from God written inside the Human Genome

God be in my head, and in my thinking.

God be in my eyes, and in my looking.

God be in my mouth, and in my speaking.

Oh, God be in my heart, and in my understanding.

Your Support:

More than anything else, your contributions to this forum are most important! We are trying to actively get all visitors involved, but we do only have a few main contributors, which are very much appreciated! If you would like to see more pages with more detailed experiments and answers, perhaps a contribution of another type maybe possible:

PayPal De-Platformed me!

They REFUSE to tell me why!

We now use Wise!

Donate
Use E-Mail: Chris at aboveunity.com

The content I am sharing is not only unique, but is changing the world as we know it! Please Support Us!

Thank You So Much!

Weeks High Earners:
The great Nikola Tesla:

Ere many generations pass, our machinery will be driven by a power obtainable at any point of the universe. This idea is not novel. Men have been led to it long ago by instinct or reason. It has been expressed in many ways, and in many places, in the history of old and new. We find it in the delightful myth of Antheus, who drives power from the earth; we find it among the subtle speculations of one of your splendid mathematicians, and in many hints and statements of thinkers of the present time. Throughout space there is energy. Is this energy static or kinetic? If static, our hopes are in vain; if kinetic - and this we know it is for certain - then it is a mere question of time when men will succeed in attaching their machinery to the very wheelwork of nature.

Experiments With Alternate Currents Of High Potential And High Frequency (February 1892).

Close