Tinker's Non-Inductive Coil Experiment Replication

  • 1.5K Views
  • Last Post 3 weeks ago
Tinker posted this 19 February 2024

Hi Chris, This is sad news but you but your personal health, wellbeing and family come first.  I was going to post about about my progress which I'm pretty pleased about and have you and other members on this forum to thank. So without a lot of photos and videos here's a rundown of what you have helped me achieve.


  1. Measurement block pcb's ordered, built and working - awesome tool
  2. Switching circuit (4 Ch) board pcb's ordered, built and working - albeit a few burnt out diodes! 
  3. Scope (Siglent) , Power supply (Siglent) and Function gernerator (Attend) purchased
  4. C Cores and test spools and coils wound
  5. Have been able to replicate Video 7 and have a saw tooth wave and bulb on L2 lit. I don't fully understand what is happening and having issues understanfing the electron flow in coils L2 and L3 but I'm learning and experimenting.

I took your advice and kept it simple and got results. Plenty of room for improvement but I'm on the way.

Chris, I will PM you to see if I can help with keeping the site going if some shape or form.

My setup

Thanks

Neale

Order By: Standard | Newest | Votes
Tinker posted this 04 March 2024

Hi all,  I'm in the about to post an introductory video on my replication of Chris' Non-Inductive coil experiment. This is a bit of a milestone for me as I've spent the last 4 months of so learning and setting up my hardware and tools.  A big thanks to those members that assisted me with the switching system which working great.

I am following this circuit:


However I have a question with regard to the coil orientation on the C cores and if under stand correctly the rotation plays a part here.  Am I correct in my understanding that in order to have the POC oppose each other  that POC2 is rotated 180 degrees as shown in option B?

Coil positions


Thanks

Plasmonic posted this 04 March 2024

Hey Tinker,

You have a nice setup going, it looks good.

I think all 3 variations you have are correct, but I should point out that option A and B are in fact the same, the coil isn't flipped but just twisted so the leads come off the core on the outside rather than the inside.  If it was inverted, which I believe would be the incorrect orientation of the top coil, the turns would have a /// pattern instead of a \\\ pattern.

Matt

FringeIdeas posted this 04 March 2024

Hey Tinker, very nice!

The pictures are a bit hard to follow, but if I'm following your thinking correctly it's option B. Basically if you had the top picture, side by side coils and just slid one around the core to the bottom.

Line in the Mr Preva experiment. Both wires enter the on the same side, but wind off in different directions.

If the coils were side by side, imagine standing in between them. Look at one, clockwise turns, then turn around and look at the other with counter-clockwise turns.

Or in the case of one coils on top, and one on bottom, as in the experiment, you should see the layout like this.

Hope this helps, just woke up here and still working on coffee.

Marcel


Chris posted this 04 March 2024

Hey Tinker,

Good to see progress!

Regarding your question, its a good question:

However I have a question with regard to the coil orientation on the C cores and if under stand correctly the rotation plays a part here.  Am I correct in my understanding that in order to have the POC oppose each other  that POC2 is rotated 180 degrees as shown in option B?


What makes POC Oppose each other: Lenz's Law

You see, as a Voltage is "Generated" it is assumed that the Current follows the Voltage, conventionally flowing from Positive to Negative, in the old theory using Conventional Current Flow. However, we know today, this is wrong, conventionally, they got it wrong, and Current flows from Negative to Positive, being that the Electron has a Negative Charge, and not a Positive Charge.

For the moment, we will ignore that and stick with Conventional Theory, because everyone knows it already!

So, POC Oppose, because the Magnetic Field, Changing in Time, "Generates" a Voltage, and the Current flows, to create a Magnetic Field, that opposes that which created it. This is Newtons third law, for every Action there is an equal and opposite Reaction!

The exact same analogy is seen here:


Your POC does the exact same thing, seen here. Why does the magnet fall at a reduced rate? The Opposition of Fields!

Zero out all magic! There is no magic, no BS! Its all conventional Theory and it works entirely on a Asymmetrical level, not a Symmetrical level! Asymmetry contains Symmetry, Symmetry does not contain Asymmetry, so we can see, half of Science is missing, because they choose to ignore Asymmetrical Systems!

Remember: Voltage is "Generated" via Charge Separation, Current is Pumped!

Best Wishes,

   Chris

Tinker posted this 04 March 2024

Hi all,

I had a late night at the bench but making some great progress in my opinion, certainly lots of learning. Chris, Marcel and Matt, thank you for taking the time to respond and provide guidance, much appreciated and always welcome.

Here's the setup thus far;

L1

  • 0.8mm @ 30 turns CW
  • L = 6.8mH

L2

  • 0.7mm @ 97 turns (2 layers)
  • L = 51.1mH 

L3

  • 0.7mm @ 97 turns (2 layers)
  • L = 52.8mH


I followed the steps to determine the Magnetic Resonance and  have determined this setup has a 1/4 WL peak of 10µs.  From there I set a starting duty cycle of 10% and adjusted the frequency to bring the wave on the scope into that region. I made a quick video (long overdue) this morning and clearly have to brush up on my video performance but here it is. 

Link:

Neale

Tinker posted this 05 March 2024

Hi Marcel,  

The pictures are a bit hard to follow, but if I'm following your thinking correctly it's option B. Basically if you had the top picture, side by side coils and just slide one around the core to the bottom.

Line in the Mr Preva experiment. Both wires enter the on the same side, but wind off in different directions.

If the coils were side by side, imagine standing in between them. Look at one, clockwise turns, then turn around and look at the other with counter-clockwise turns.

Or in the case of one coils on top, and one on bottom, as in the experiment, you should see the layout like this.


This helped more than you know, it was really doing my head in so now I'll draw my coils and confirm the polarities of the diodes and current flows with the right hand rule. It's not the first time I incorrectly applied this rule.


Love it!  The simplest pictures as often the best. I'm printing this out and pinning on the wall. Based on this I believe I I wound the coils incorrectly, I definitely did one CW and the other CCW but I started at the same side of the spool (if that makes sense).  


Thanks again

Neale

Chris posted this 05 March 2024

Fantastic Work Neale!

Excellent work! Thanks for sharing!

POC 1 and 2, you could double your turns, that would help on the output, but hey this is excellent! Well Done!

Yes, from what I can see, you have Magnetic Resonance, for the most part, the Sawtooth waveform appears to show this!

Well done, keep experimenting and thanks again for sharing, remember, the Output Voltage, its "Generated" and your Input Coil is not under Load to do this, all your Input coil is doing is Driving the POC Frequency, the POC themselves "Generate" the Voltage, doubling your turns will double your output voltage. At the same time, POC Pump Current!

Dont give up, you are Light Years ahead of the rest of the Forums out there!

Best Wishes,

   Chris

FringeIdeas posted this 05 March 2024

Hey nice. Bench time and progress I like it!

For some reason the wire turn direction messed me up for a while too. I had a printout and the cardboard form from a tape roll with a dozen turns of wire on it so i could pick it up and stare at it when i needed  

The 180' out of phase that you are talking about, I am guessing you are talking about the time during the pulse? If you have your diodes set up correctly, and it appears you do, then the coils are opposing each other during the input's off time. This IS the 180' out of phase. Opposing POC magnetic fields. With this setup, that bit during the pulse will look a bit different between POC coils because of the interactions. The action, reaction, counter reaction.

Also, the input coil to POC coil turn ratio, if I may suggest, for now don't get too hung up on it. I'm sure there are relations there and optimizations that can be made, no doubt. But for example, my setup ended up being 10 turns on the input 310 on each POC coil. My first few builds I was trying to stick to 1/4 or 1/3 and it was either too much on the input or not enough on the POC coils. Of course if you notice some relationships there in turn ratios please share. I still have some experimenting to do around that myself, just been way too busy with life.

But yeah, very nice, and nice video! Glad to see work of others!

Thanks,

Marcel

Chris posted this 06 March 2024

Hey All,

Of course, we are dealing with Scale!

Scaling this up, we get a whole different Power Level! The same as is seen in Electrical "Generators".

Half the reason I say: "Double the Turns", is to get the Voltage Up, and we get a linear increase in Output Power for no extra Input Power, most of the time Less Input Power. Because more Input Power is sent back to the Source!

Humans helping other Humans, Brothers and Sisters all helping each other, because the very same blood runs through our veins, no matter what colour our skin is!

My Brothers and Sisters here can tell you this works! Energy can be Free, if you only choose to make good decisions and move forward. The Future awaits!

Best Wishes,

   Chris 

Tinker posted this 07 March 2024

Thanks all,  @Chris, understood, will double windings accordingly.  I've ordered some more wire and in the mean time I'll increase the windings by soldering onto the existing one and heat shrinking.  I suspect this is not ideal but I can continue to move forward at the moment.   


So I hope it's ok but I'd like to use this thread for not only questions and feedback but to document what I'm doing so some content may just be there because I think it makes sense to me and hopefully adds value to others. Onward...   


🤔I have a question with regard to the bobbin width vs number of layers for a given number of turns. For example, let's assume I'm aiming for 200 turns on POCs. I can use my 40mm bobbins and do 4 layers of 50 (4x50=200) or an 80mm bobbin and do 2 layers at 100 turns (2x100=200) each. I know there will also be a slightly different wire length given the increase in layers (each layer increase in length by approx. 4 x wire diameter) but let's assume this is negligible.  With my little new found knowledge I would say there is a difference in the magnetic field but the real question relates to which is the better option for what we are doing and why? To answer part of my own question I believe an increase in the radius (more layers),  impedance and inductance will occur in the 200T coil on a 40mm bobbin when compared to the 80mm bobbin. So for this reason the 40mm bobbin with more layers is preferred?? If 40mm then why not 30mm?😬

Photo below: I have the luxury of a laser cutter so can make bobbins extremely precise. Here's a sample of inner width of 20mm, 40mm and 80mm to fit my c core.

For the group : these are 3mm MDF. Happy to publish the files and/or make some up for the different c cores. 


So... since my video I've corrected the winding direction/orientation in L3 and this definitely cleaned up the sawtooth wave from what I can see. I added some arrows to remind me!


I then re-measured the Magnetic resonance and this time it was 6.6µS at 38.6Khz using the technique found here - The Secret Revealed - Resonance Magnetically


Here's the lovely sawtooth wave. Input is 12v @ 28.5kHz and 19.2%DC 


Again not to fussed at the measurements at this stage but I noticed a strange affect at much higher frequencies. If I ignore the 1/4 WL and 10X the frequency to say 380kHz and adjust the duty cycle and voltage up I get a very different wave but much higher current on L2. Perhaps a little off topic but interesting none the less.


This scope capture is with 6v input, 380kHZ at 30.2%DC

 And this one with an increase in voltage so 12v input, 380kHZ at 30.2%DC

Note to self: Investigate this with the new coils and take some measurements once I've sorted that out.


Thanks again. I really love this forum and have been inspired and humbled by the words of encouragement! More to come.


Neale

Chris posted this 08 March 2024

Hey Neale,

Playing with some calculations, on the coils, with the Aboveunity.com Member Calculator:


You can get an idea on the Magnitude of your Magnetic Field of your Partnered Output Coils. The Magnetic Field is a very important aspect, to make steps forward! I have said: "Get your Magnetic Fields up", well, this tool helps you in doing this!

Best Wishes,

   Chris

Tinker posted this 15 March 2024

Thanks Chris, this calculator is amazing!


Update: My wire has arrived and I've doubled the turns on two new coils. I also used the time to make a new electric coil winder given the number of turns are on the increase. 

Question: So, I have a rookie question, and a little embarrassed to ask but learning is learning!  In the "Magentics and Coils" calculator there is an input of "Length". Is this  the wire length or width of the coil, I believe it is the latter?  I also read through the Coil Geometry thread and saw this so I just need to ask, thanks in advance.


And based on this (below) the Coil Length is in fact the width of the bobbin or as mentioned below the Length of the Spool?


FringeIdeas posted this 15 March 2024

Hey Tinker, if I may jump in.

You are correct! The Length value is the width of the coil. Which is basically the "width of the bobbin" or "length of the spool".

And I'm a bit jealous of the electric coil winder. Been meaning to build a rig myself, haven't had the time. Still doing them by hand.

Marcel

Chris posted this 15 March 2024

Hey Guys,

Fantastic progress, and some good questions!

Yes Marcel is correct, the Length of the Spool's Geometry:


In the thread: "5KW Generator Teardown", we saw, the stator Coils have a very short length:


At a guess, no more than 1.5CM's

We also saw this in the videos I shared on the Arc Welder:


No such thing as a rookie question, thanks for asking, because so many still don't know and have not asked!

Best Wishes,

   Chris

Tinker posted this 15 March 2024

Excellent, thank you! 

With that I'm reading through the Measurements thread and watching related video's as I'm all over the place and not trusting my use of the scope at this stage. @Marcel I believe you have the Siglent scope so I may compile a few scope specific questions if I may. 


Thanks again, onward...

Tinker posted this 20 March 2024

Hi everyone, another update and along with it comes some great learning and even more questions. Life is good, this forum is awesome!


So in this video I go over the new coil setup that has POC1&2 increased from 100 to 200 turns each. I have also increased the Input from 0.8mm to 1.0mm wire.  I am getting the sawtooth waveform and starting to play around with the resonance frequency and related harmonics. I'm still having 'fun' with measurements as I'm a lot of the data is out of range and messing with the values, still I Know I'm on the right track. 


My apologies for the video length, I think I started to ramble a bit so bare with me 😬

Tinker's Non-Inductive Coil Experiment Replication - Video 2 (


Lastly my tip for new comers (from a new comer) - watch and rewatch the videos. I find each time I do I learn and understand more of what Chris and others are presenting.  And lastly test small, test fast (doesn't need to be "perfect") and test often.  I learn as much when I make a mistake as when I don't.  And don't even ask me about the confusion I got into with winding coils CW and CCW and which end to start and end at.


Thanks everyone. 

Neale

Chris posted this 20 March 2024

Hey Neale,

Well Done My Friend! I am impressed! At this point, learn as much as you can, as you have shown in this video. Double check the Right Hand Grip Rule and that the Diodes are ensuring each coil is Bucking as is required. Its just a case of checking, and keep experimenting, add the same Load conditions to POCTwo as you have on POCOne, because we need to see, both POC are an Output and need to be used as such, so we have basically 2X Outputs for only the one input.

Also, verify, by switching in and out POCTwo, verifying POCTwo is assisting your Input when connected.

This will give you an idea on how much Assistance you are achieving. From Input to POCOne, you should have standard Transformer Induction and thus be around 80 to 95% Efficient. So measure this and get the efficiency, say 85% lets say 17 watts, and then connect POCTwo, and take the measurements again, say you get the same 17 watts, but your input has gone down from 20 watts to 10 watts, then you have an assistance of 10 / 20 * 100 = 50.00%, you get the idea.

Of course, when the output from POCOne is equal to the Output to POCTwo, this is also Magnetic Resonance. To test this, again, you need the same Load and Turns.

Little experiments like this will help you head in the right direction.

Also, you can take your peak Current in the POC and calculate the Magnetic Fields using our calculator: Aboveunity.com Member Calculator, using smart geometry, we can make big changes for no extra.

Reading over Floyd Sweets documents may also help?

You're doing really good, you should be proud! Keep going, don't give up! Little things can make a big difference and don't cost a lot to change, in general. Well done My Friend!

Best Wishes,

   Chris

FringeIdeas posted this 22 March 2024

Hey, I really like the videos! First off, manual calculation of complex wave forms is never the best option 😂 Kidding. Maybe you could teach me some math though.

I wanted to comment about your trying to calculate the duty cycle. What I'm about to share, I'm not trying to say is correct, but it's something I have needed to investigate further, and just have not. So as you are now going through the same thing, I figured we could open this up a little bit and try to progress together.

And again, sorry, I had found this information in a thread somewhere and for the life of me can't find it. It was just a small discussion tucked away somewhere. There is also a little relevant information in this video, which I'm guessing you have watched, but I thought I would bring it up here.

Anyway, your natural resonance of your coils as you say is 191.5 KHz. The rise time, or 1/4 of the cycle is 1.3 µS. So, my understanding is that this is the time period for the pulse, and it should not change. As you move down to lower frequency sub-harmonics, lets use half of Fres, being 95.75 KHz, you would still use 1.3 µS as the pulse time. Picture to help understand, showing two cycles, the whole length of time here would be one cycle of 95.75 KHz, if that makes sense.  

So we are still targeting the Fres of 191.5 KHz, with a 1.3 µS pulse at 95.75 KHz. Like the of pushing a swing, we are pushing once every two cycles, not on every cycle. Using sub-harmonics so we ensure the "push" time is always during the correct part of the cycle.

Now the issue here is that for 191.5 KHz the duty cycle at 1.9 KHz would be super small. If you get a chance, could you check your resonance and see if you can find a second, much lower, point where the coils resonate? For example I found resonant peaks on my coils at around 130 KHz and I think about 4.9 KHz, I'll stick with that for the example, with similar magnitudes. So I could use the 1/4 rise time duty cycle thing i just mentioned with 4.9 KHz and not shave my duty cycle off to nothing.

I've been wanting to do a few really basic experiments around this idea. Capacitor and one inductor of known values, find the resonance. Then switch to pulse and sweep around and find the peaks. Then try different duty cycles, etc. See how well the idea holds up. I just have not got around to it.

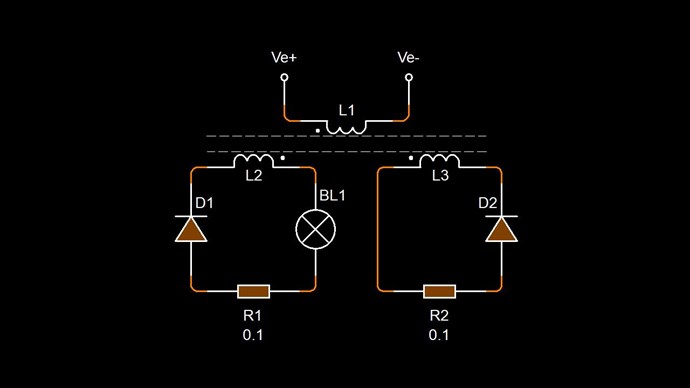
Also, the things Chris mentioned are important things to play with. The switching in/out of POC2 is helpful. On my setup I used a small metal bar which I'd drop in the light bulb fitting on POC2. Manually sweeping around the frequencies with different duty cycles, open (un-short) POC2, short, monitor the input current and the brightness of the bulb on POC1. At points you will see, when shorting, the light dims and the input increases. And not far away from there you should points where the bulb actually gets brighter and the input goes down, again when shorting. POC2 is then assisting the input. Then look at ways help facilitate this effect.

Also, just in passing, leaving both POC coils open and sweeping around, you can watch the amplitudes of the oscillations vary, it's interesting anyway, good way to get familiar with your coils.

Anyway, I need to run. Working, trying to type this, and watching sick kids at the same time. I hope I said everything I was thinking, and have not steered anyone off course. Again, don't abandon your thoughts on the duty cycle. Just wanted to give more to think about.

Hope to see more soon!

Marcel

Adam posted this 22 March 2024

Hey Neale,


Do you have the Primary wound over POC1 Meaning that’s the coil repulsing the Primary,

or do you have it wound over POC2 that is helping the primary?


Good work

Thanks.

Adam.

Tinker posted this 25 March 2024

Hi Adam, thanks for the interest and question. 

Do you have the Primary wound over POC1 Meaning that’s the coil repulsing the Primary,

or do you have it wound over POC2 that is helping the primary?

I did a quick whiteboard diagram of my coil setup and took some photos 


Actual coil from the front (POC2 on the top and POC1 and Primary on the bottom)

And from the back - showing the Primary on the bottom with POC2 under the black electrical tape.


Thanks Adam, hope that helps

Tinker posted this 25 March 2024

Hi Marcel, it scares me how much our thought process is the same!

Anyway, your natural resonance of your coils as you say is 191.5 KHz. The rise time, or 1/4 of the cycle is 1.3 µS. So, my understanding is that this is the time period for the pulse, and it should not change. As you move down to lower frequency sub-harmonics, lets use half of Fres, being 95.75 KHz, you would still use 1.3 µS as the pulse time. Picture to help understand, showing two cycles, the whole length of time here would be one cycle of 95.75 KHz, if that makes sense.  

Thanks for your input and I totally understand what you are saying with regard to the 1/4 WL. My initial testing was exactly this, keep the 1.3µS pulse time regardless of the frequency. I'd then adjust the duty cycle to bring the pulse time to this. My brain moved me away from this as I tried to rationalise that if you half the frequency then the peak amplitude for a 1/4WL would take twice as long.  I will add this to my list of things to try. Thanks this is great.


 I found resonant peaks on my coils at around 130 KHz and I think about 4.9 KHz, I'll stick with that for the example, with similar magnitudes. So I could use the 1/4 rise time duty cycle thing i just mentioned with 4.9 KHz and not shave my duty cycle off to nothing.  

Good idea. I did see that the amplitude increases and decreases as I sweep the frequency but I only found one frequency that is the actual peak.  In your example with the resonance of 130KHz and 4.9KHz did you have the same amplitude? Also was this done in the one test (without change the input).  I've found if I swap the +v pulse input from one end of POC1 to the other end I get a different resonance value. Again more great insight and things to test, thanks


Anyway, I need to run. Working, trying to type this, and watching sick kids at the same time. I hope I said everything I was thinking, and have not steered anyone off course. Again, don't abandon your thoughts on the duty cycle. Just wanted to give more to think about.

Hope the kids get better soon! And you input, thoughts and ideas are most welcomed and appreciated.


Thanks all

N


Tinker posted this 25 March 2024

Hi again,


Just a quick follow-up from my last video... Based on some of the feedback and suggestions I thought I'd first look at the output of POC2. I've be been meaning to tidy up my loads so I made two sets of globe holders and and attached them to POC1 and POC2 


Findings so far:  The output for POC1 and POC2 based on a subjective assessment of the globes brightness occurs at approx 200Hz. Enabling and POC2 has minimal affect on the overall input from the PSU but the voltage output on POCincreases when the load is enabled.


Quick video showing this:


Also, verify, by switching in and out POCTwo, verifying POCTwo is assisting your Input when connected.

 @Chris - do you mean completely removing POC2 from the core or is it ok to just leave it open, i.e. remove the diode?  I was going to completely remove the coil so there is no doubt  but thought I'd clarify in the interest of time.


Just a short one today, more testing planned this week.

Thanks all

Neale   


Chris posted this 25 March 2024

Hi Neale,

Yes, just a switch.

Best Wishes,

   Chris

Adam posted this 25 March 2024

Neale,

I did the exact same test yesterday that you just did.

Same number of turns you have but I’m using an AMCC400 core.

The good thing is I got the exact same results as you 200Hz. If I moved the Hz faster than that the lights would light uneven. I’m at about 1% duty cycle.


I think Chris is talking about just taking your lead clip off the load on POC2. If you look at my videos you will see when I hook POC2 to a load POC1 bulb gets brighter and the watts into the primary go down. Meaning POC2 is now helping the Primary.


By the way I have not gotten that to work on this set up like yours yet either.


Adam.

Tinker posted this 25 March 2024

Just a side thought and question. You'll notice I'm using a metal clamp to hold the cores. I'm only doing this as it's pretty much the same type of clamp as what Chris was using in the videos. My initial thinking was that the metal would affect the magnetic field? I assume not, but now I'm wondering why not.  thanks all


Chris posted this 25 March 2024

yeah, don't over think it, the core is many thousands of times more permeable!

   Chris

FringeIdeas posted this 25 March 2024

Hey Neale, thanks for the wishes! Quick and dirty reply here, as I'm in a bit of a hurry this morning.

First, correction, the frequencies I mentioned were off, though still good for the example. I had to dig through my old hand notes, you are making me do real work here. I guess I was originally thinking of some other setup.

This paper is from before I went up to 310 turns on my POC coils, so it's a bit different now.

I too noticed that the frequencies differed depending on where you applied the input. I settled on the third one because in my thinking at the time this is the directions that the magnetic fields were going to travel when I applied pulses on the input coil. The amplitudes on the lower frequencies were around half, and not as pronounced (that is a 2.3V not 23). The higher frequency was easy to spot because it really jumped in amplitude, the lower frequency not so much but it was there.

So imagination time, right hand rule on the input coil, figure out how the currents will run in the POC coils once voltages are induced on them, and set up your function gen input and scope lead accordingly. Then poke around the lower frequencies, My guess is you will see a small res peak around 10 or 11KHz.

And note: It was really difficult for me to find much of a correlation between these resonance points and where I found POC actually started assisting the input. So continue to play around, but I would also suggest just picking a duty cycle, say 10%, and start low, working up in the frequencies, opening and shorting POC2, and just watch the input and the light level on POC1. I've been meaning to kind of work backwards from this point, and find the correlation with the open end resonance, but got started on other stuff. I should get back to it though, I can't help if I don't know.

Regarding the light levels at low frequencies, I think you said 200 Hz. I saw that as well. But there is too much dead time in the off time, and for me it was way too non-linear of a drop. Not magnetic resonance. Shorting POC2 at those low levels made the input go up for me. And I think the idea is actually to find the frequency and duty cycle where POC2 starts assisting the input, then play around with different loads on the POC coils at that frequency, to try to get the best match.

Hope this helps, and I think we are at about the same level of understanding, so as I always say please take what I say with a grain of salt. Your experiments are helping me understand too. So thank you.

Marcel

Tinker posted this 3 weeks ago

Hi all, still here. Just normal life distractions so trying to increase my learning and understanding...  


During this time I've been thinking about what actually happens in the coils during each cycle.  In the drawing of my coils below I'm getting myself confused as to what happens and when and the output polarity and diode direction.  I have a good understanding of Lenz law and can determine the polarity using the right hand rule but I'm confused as to the polarity when we are generating the power.  For reference I'm using this diagram to help determine the direction of B. I also had a good read through https://www.aboveunity.com/thread/builders-guide-to-aboveunity-machines/#


So I know we pay attention to the off time (e.g. the 90% off for a 10% duty cycle) as this is where we generate power when the input is off.  Question: Am I correct to say that the off cycle and the EMF is from the collapsing magnetic field hence Lenz law?


Note: Photo taken from here and modified with comment by Tinker (Neale) indicating the "Primary coil off time"


Can you please confirm the following:  The diagram below is of my coil setup. I have labelled the polarity POC1 and POC2 during the ON cycle with the EMF (B) shown in response to the input from the Primary. Firstly is my labeling of B correct?  If so what exactly happens during the off cycle?


In short I'm trying to increase/clarify my understanding of each phase of the cycle.  I'm trying to understand this animation in relation to what I see on the scope.

Note: Animation sourced from aboveunity.com - Not sure of actual member


Thanks again.


Neale


Chris posted this 3 weeks ago

Hey Neale,

Yes, I believe you're on the right track!

Always with every Action, there is a Reaction, and with every Reaction, we have a Counter-Reaction in these systems, because we are using the principles of Asymmetry, not limited to Symmetry, like conventional Science is today, and has been for the last several decades.

Electromagnetic Induction as it stands is incomplete! Simply completing it, as we have, gives you Energy Machines that can go well beyond the Unity Boundary!!! Asymmetrical Electromagnetic Induction, where each Magnetic Field Vector gives: 1 + -1 + 1 = 0.

Symmetrical Electromagnetic Induction simply gives: 1 + -1 = 0, No extra energy can enter into a Symmetrical System!

Voltage is Generated and Current is Pumped, I have given everyone the theory and the experiments showing how this works, it is very simple, once one understands it all!

Best Wishes,

   Chris

FringeIdeas posted this 3 weeks ago

Hey Neale, glad to see you are still active, it seemed a bit too quiet 🙂

If I may, for other readers, the animation you were referring to come from here HomeBrew - new build started.

Thanks to HomeBrew and KnightOwl, there were a few animations they had, the one I linked is the correct one.

And all of this happens within the same cycle, like Chris says, action reaction counter-reaction, are all happening at the same time (not counting propagation delays, etc). They look a bit different during the raise time (10%) but that is only because of the coil arrangement I believe. But yes, all at the same time. All rise, POCs fall (without input connected).

Mostly what I wanted to say is that in your diagram you drew, if I'm not mistaken, I think your positive and negative are backwards on the POC coils.

The primary seems fine, applied voltage + on the left, current going in, magnetic field N going out to the left.

The POC coils are induced, not applied, voltage, so they should be reversed polarity (Lenz law), with the positive where the current is coming out of the coil, as the coil is now an active element (power source) and not a passive element. Like so.. and I threw in the diodes.

Again, if someone catches me being wrong please correct me for my benefit as well But I'm quite certain this correction is valid.

Hope you are getting some bench time to play around, it's been crazy busy here as well. And Finland is now seeing the snow melt away and we are getting warm days +10'C ish.. so all I can really think about is sitting out on the back porch with a beer

Hope all is well,

Marcel

We're Light Years Ahead!
Members Online:
What is a Scalar:

In physics, scalars are physical quantities that are unaffected by changes to a vector space basis. Scalars are often accompanied by units of measurement, as in "10 cm". Examples of scalar quantities are mass, distance, charge, volume, time, speed, and the magnitude of physical vectors in general.

You need to forget the Non-Sense that some spout with out knowing the actual Definition of the word Scalar! Some people talk absolute Bull Sh*t!

The pressure P in the formula P = pgh, pgh is a scalar that tells you the amount of this squashing force per unit area in a fluid.

A Scalar, having both direction and magnitude, can be anything! The Magnetic Field, a Charge moving, yet some Numb Nuts think it means Magic Science!

Message from God:

Hello my children. This is Yahweh, the one true Lord. You have found creation's secret. Now share it peacefully with the world.

Ref: Message from God written inside the Human Genome

God be in my head, and in my thinking.

God be in my eyes, and in my looking.

God be in my mouth, and in my speaking.

Oh, God be in my heart, and in my understanding.

Your Support:

More than anything else, your contributions to this forum are most important! We are trying to actively get all visitors involved, but we do only have a few main contributors, which are very much appreciated! If you would like to see more pages with more detailed experiments and answers, perhaps a contribution of another type maybe possible:

PayPal De-Platformed me!

They REFUSE to tell me why!

We now use Wise!

Donate
Use E-Mail: Chris at aboveunity.com

The content I am sharing is not only unique, but is changing the world as we know it! Please Support Us!

Thank You So Much!

Weeks High Earners:
The great Nikola Tesla:

Ere many generations pass, our machinery will be driven by a power obtainable at any point of the universe. This idea is not novel. Men have been led to it long ago by instinct or reason. It has been expressed in many ways, and in many places, in the history of old and new. We find it in the delightful myth of Antheus, who drives power from the earth; we find it among the subtle speculations of one of your splendid mathematicians, and in many hints and statements of thinkers of the present time. Throughout space there is energy. Is this energy static or kinetic? If static, our hopes are in vain; if kinetic - and this we know it is for certain - then it is a mere question of time when men will succeed in attaching their machinery to the very wheelwork of nature.

Experiments With Alternate Currents Of High Potential And High Frequency (February 1892).

Close