Magnetic Flux Routing

  • 1.7K Views
  • Last Post 15 March 2019
Prometheus posted this 04 December 2018

Hi, all.

I'm still waiting for some of the equipment I've ordered to be delivered, but I'm very near the point where I can start experimenting.

I had a flash of what some might call genius and others madness, and thought I'd put my thoughts down in print for later reference.

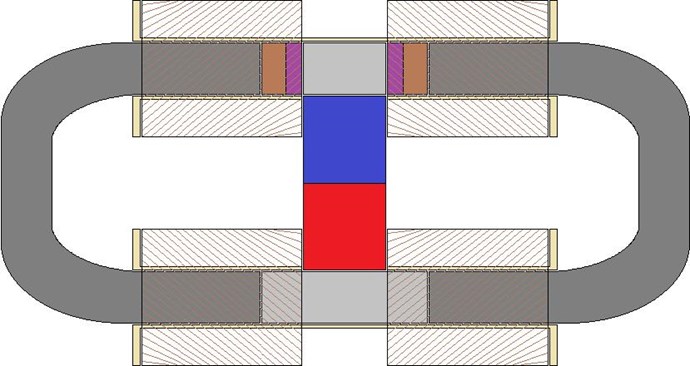
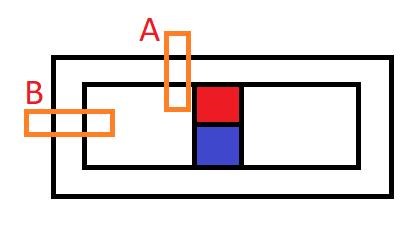
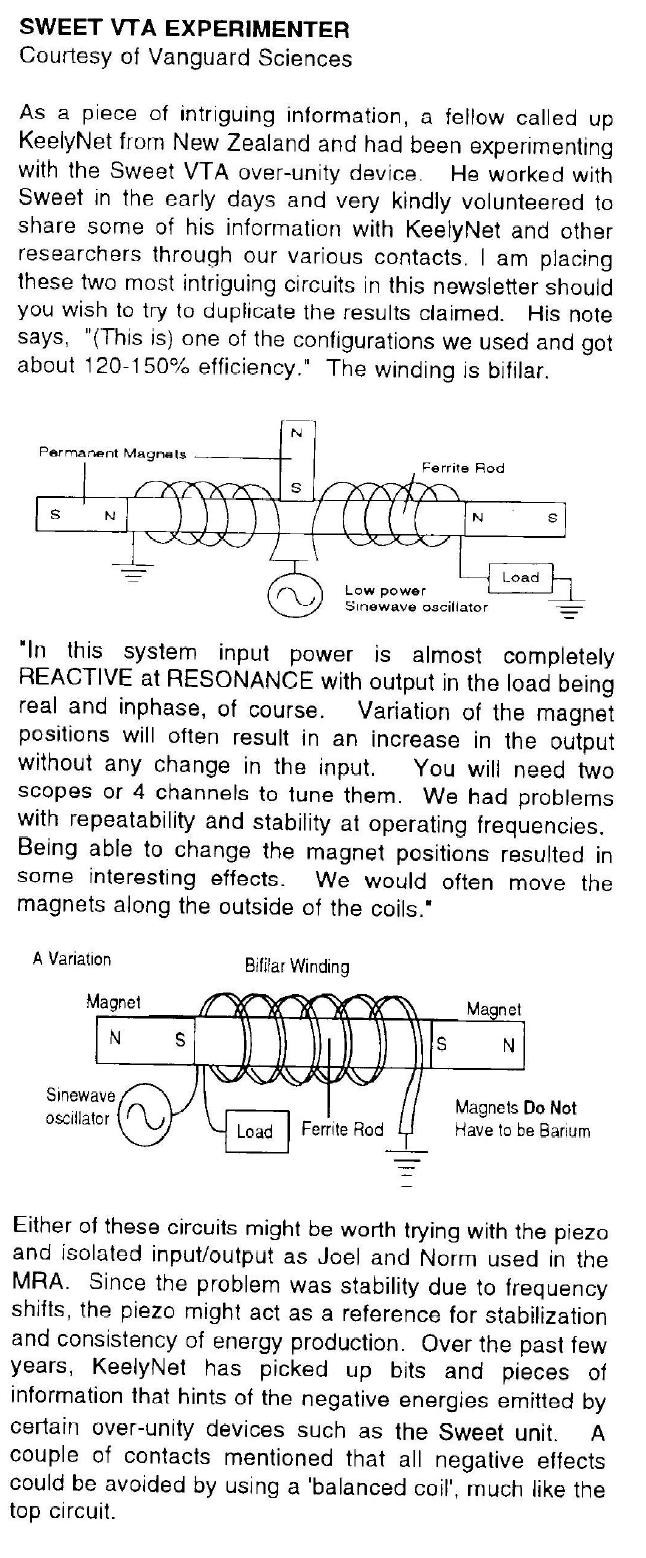
Ok, let's say we have a Motional-EMF device like this:

Nothing is to scale, and I have no artistic ability whatsoever, so sizes and distances are not set in stone.

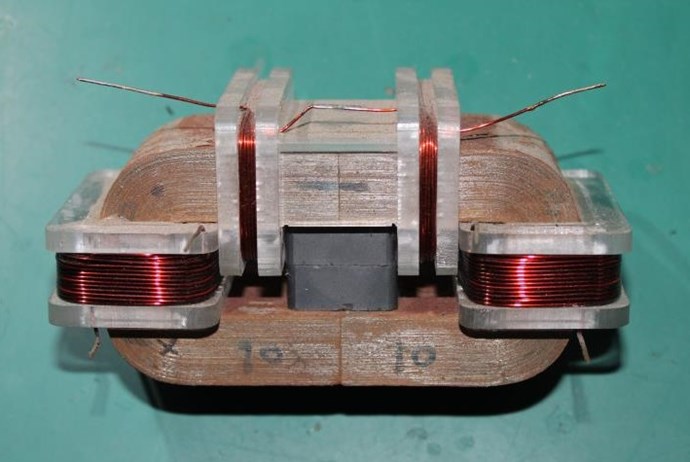
Imagine regular solenoidal coils on the legs marked "Output Coil".

The device is like a see-saw... the magnetic flux wants to flow both directions equally, so getting the flux to become unbalanced is simple, just as unbalancing a balanced see-saw is simple. Just a bit more force on one end and it tips, just as a bit of reluctance on one flux path will tip the magnetic flux toward the other flux path.

Now, we have to figure out some electrically-economical means of shifting that flux.

I've got two that I'll be experimenting with.

----------

The first method is a flat coil of iron wire filling the gaps marked "Drive Coils". When the Drive Coils are not energized, the iron wire (being ferrous) will align its magnetic domains with the magnetic flux from the magnet. But when energized, the domains in the iron wire will realign, effectively blocking the magnet's magnetic flux through the coil, forcing the magnet's magnetic flux through the opposite flux path.

If a single flat coil in each gap is insufficient to block all the magnet's magnetic flux, I'll wind two (or more) flat coils and electrically connect them in series.

I'll buy square iron wire, so the coil winding is most efficiently packed.

----------

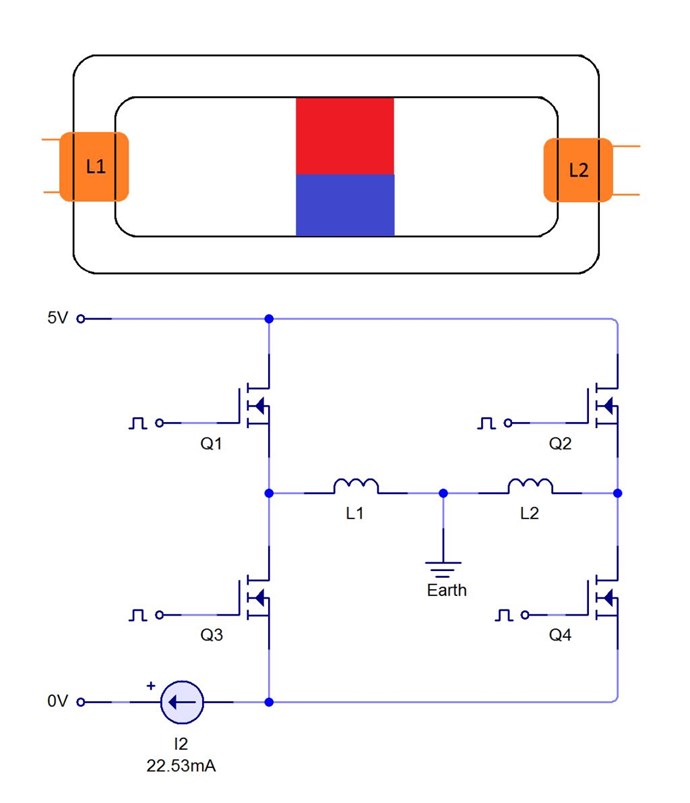
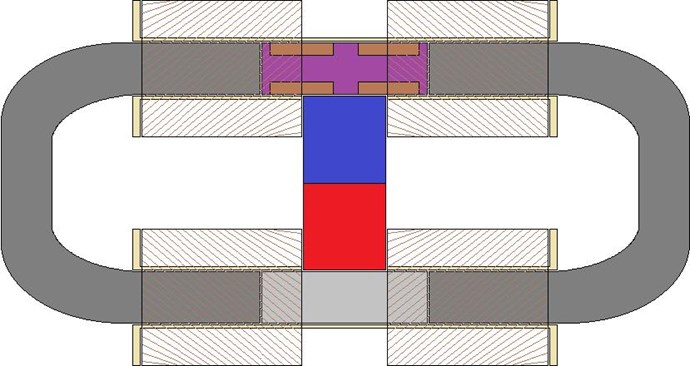
The second is capacitive blocking by placing capacitor plates in the gaps labeled "Drive Coils".

Below is an image of a capacitor being charged:

The counter-clockwise Amperian Loop is shown in blue, the Amperian Surface in pink. The opposite would occur when the capacitor is being discharged (the Amperian Loop would be clockwise).

This displacement current-induced magnetic field would tend to block the permanent magnet's magnetic flux, forcing that flux through the other flux path in the device in the image above.

Just as a wire carrying a current produces a magnetic field circulating around the circumference of the wire, its strength dependent upon the current in the wire, a charging or discharging capacitor produces a magnetic field circulating around the circumference of the plates, its strength dependent upon the rate of charge or discharge.

When the capacitors are not being charged or discharged, the Amperian Loop in each capacitor disappears, and thus the magnet's magnetic flux would tend to want to flow equally through both flux paths.

So this would be a "rising-edge and falling-edge" type device. The only time the permanent magnet's flux would be hindered from flowing through a flux path is when the capacitor was either being charged or discharged.

Because of this, we have to offset the charging and discharging times of the left-hand and right-hand capacitors in the device above, or they'll both block and allow permanent magnet flux at the same time.

         Cap1   Cap2   Flux1   Flux2
0          +         =         0            1
90       ==        +         1            0
180      -         ==        0            1
270      =         -          1            0

Where:
'+' means charging the capacitor
'-' means discharging the capacitor
'=' means the capacitor is discharged
'==' means the capacitor is charged
'1' means permanent magnet flux can flow
'0' means permanent magnet flux cannot flow

I like the capacitive blocking method because we're not actually consuming any electricity (as we would be doing in a coil), we're merely shuttling the charge from one plate to the other using a parametric resonance charge pump. So we'd consume very little power (essentially we'd put into the drive circuit just enough to drive the charge pump and make up for resistance losses and any capacitive leakage).

I'm envisioning two capacitor plates in each gap, separated by a thin plastic insulator. The gap in this case would be extremely small. I'm unsure at what rate the plates will need to charged and discharged, that'll take experimentation. I'm purchasing a gaussmeter for the experiments, and I'm attempting to model the device in ViziMag.


Order By: Standard | Newest | Votes
Chris posted this 04 December 2018

Hey Prometheus,

Nice, thanks for sharing!

I don't know if you've seen my YouTube channel, I have experimented with a lot of stuff similar. One of my favorites was the Flux Gate Magnetometer.


   Chris


  • Liked by
  • Vidura
Zanzal posted this 04 December 2018

Hey Prometheus, I think for a prototype it will be an excellent learning tool and there are others who have reported successes in the past with similar designs so there is a some likelihood of success with at least one of the two approaches. There are a few things in your design that may prove problematic, but that might just be you having simplified your drawing. Reminds me of the work of Bearden & Flynn. However, I am not aware of anyone using charged plates for redirecting magnetic flux, that is not something I've seen in other approaches. I think you are on a good track.

  • Liked by
  • Chris
Prometheus posted this 05 December 2018

Zanzal wrote:

There are a few things in your design that may prove problematic...

I'd be much obliged if you pointed out any potential problems, so I can address them before I start building.

I found a supplier of Ni48Fe (48% Nickel, 52% Iron... high permeability and magnetically soft) enameled magnet wire. I'm going to order 500 meters of their 0.25 mm thick, 2 mm wide rectangular wire. That'll be for the first approach above, that of a flat coil placed in each "Drive Coils" gap. The coil will be "solid wound"... ie: I'll start at as small a radius as I can get, and just keep winding a single coil, spirally. It won't have a core, as the ferromagnetic material of the coil itself will act as its own "core".

As to the core of the device itself, I'm still looking for a supplier of custom core shapes with high permeability and low loss, so I can "mix and match" the different shapes like a Lego set, to build different core configurations.

Any suggestions are welcomed.

  • Liked by
  • Chris
  • Zanzal
Zanzal posted this 05 December 2018

Hey Prometheus,

You are on the right track. Constructing your device using commonly available core parts like I or C or E core pieces is the way to go. In general I've found it difficult/expensive to source these parts for MEGs so I have never built one. But its on the bucket list. The core materials consistently referenced for these devices is METGLAS. You might find something similar listed as amorphous core. Carefully choosing pieces and mocking up the device(s) you want to build using dimensionally accurate parts in a CAD program will save you time and money in the long run. Tinkercad is free if you need something simple or OpenSCAD if you prefer coding, nothing fancy required for this.

Alibaba.com - I've personally ordered from King Magnetics and found them easy to deal with and responsive, but I didn't plan ahead and only ordered one size for one project. If you can find a single supplier with everything you need you may have a minimum order to meet, not hard if you plan on purchasing a few large cores. If they let you pad your order with different parts and not just order a single part in bulk, you should be able to get what you want for this and other experiments. It might not hurt to add other universal parts, like toroids of various sizes for small to large projects.

It is probably worth mentioning that you may be able to buy amorphous core ribbon and construct your own that way, but the material is very brittle and probably very challenging to work with. Its not something I am recommending, definitely not a great starting point, but some people do it.

Another device to consider for pre-purchasing purposes might be the "bi toroid" like those associated with Thane Heinz. By selecting cores for your initial project that can be used to create either design and planning for reuse you can save yourself money. I wouldn't let this become a barrier to your first design though. A good rule don't introduce too many "must haves" to a design - if it doesn't make life easier leave it out. This is a nice option to have, but not essential. 

There may be one more challenge here. Figuring out how strong the permanent magnets must be. Some room for increasing or decreasing the size of the magnets used will help. Decreasing may be simple enough, but leave room in your design for increasing. Magnets of different sizes in bulk via Aliexpress is your best bet, if you buy locally the magnets could get very expensive.

Although Flynn and Bearden designs show two drive coils, I believe Bearden's design is slightly flawed. I would think one would need at least 4 drive coils (or caps in your 2nd case) to make his work well. Just having two at one end seems inefficient. Flynn has switching on both paths that seems a little better but a combination using both Bearden and Flynn's idea would result in 4 drive coils. Like Bearden and Flynn these would 4 be driven in series with the polarities of two reversed so that power in one direction moves the flux to left and reversing the power flips the flux to the right. Such a device could be driven by AC or an H-Bridge, I don't know how this impacts your capacitor design. If you believe your caps offer higher efficiency in a pair I kind of assume you would feel the same as their number increases, but if not this could be a non-starter. Don't let my rambling stop your progress though, use whatever configuration you feel gives the best chances of early success.

Consider testing a variant that uses copper drive coils as a 3rd option. Iron wire sounds like a good investment for experimenting, but not sure if it will be more efficient. Will the iron hurt, will it help, I couldn't tell you. It could be that iron is more efficient or it could be the opposite. Best option is to try both (if time/budget permit) and evaluate the behavior to determine which is better.

I assume you are starting with amorphous core as your original plan, if not consider the purpose of METGLAS in a Flynn / Bearden design is not likely to be "magical core materials" simply it is least reluctant material that can be used leading to greatest efficiencies. One might argue that though efficiency of power used to switch vs power recovered is important, its not clear whether high efficiencies could only be achieved with metglas - a possibility to consider. But I think we can safely say that if one starts with the best material, it seems unlikely that other materials would prove more efficient potentially eliminating a lot of testing (no need to test every core material looking for some special thing, just use the best to begin with and test more novel ideas like the ones you've proposed).

Anyway, you probably already considered some of that stuff if not all of it when planning your own design. But the above is pretty much what I would do if I had time to research MEGs, so since it is what I myself would do it is also for that reason alone what I recommend. You have interesting ideas in using iron wire coils and caps, those are definitely some unique things I've never considered any of that for this type of design. I don't see what you see in those approaches, but they could prove very important choices for your design, and ultimately testing and not guessing is the best way to find the answers.

  • Liked by
  • Chris
  • Vidura
Vidura posted this 06 December 2018

hey Prometheus,
some interestig concepts you have posted.I cant wait to see your experimental results. also i have a project with flux switching on my agenda. if you like take a look at this video, its not exactly the same , but there are some useful infos about employed materials and so.

regards Vidura

Prometheus posted this 06 December 2018

You are on the right track. Constructing your device using commonly available core parts like I or C or E core pieces is the way to go. In general I've found it difficult/expensive to source these parts for MEGs so I have never built one. But its on the bucket list. The core materials consistently referenced for these devices is METGLAS. You might find something similar listed as amorphous core. Carefully choosing pieces and mocking up the device(s) you want to build using dimensionally accurate parts in a CAD program will save you time and money in the long run. Tinkercad is free if you need something simple or OpenSCAD if you prefer coding, nothing fancy required for this.

Yes, I'm looking for something with a very low hysteresis and remnance. Still weighing my options, though. There's some Ni50Fe core material that looks promising, and it'd be very close in performance to my planned flat coils.

Funnily enough, about the only CAD program I can use is OpenSCAD... for some reason, I have no artistic ability, but I can code in my sleep. I'm currently using OpenSCAD to design a new frame for my motorbike.

It is probably worth mentioning that you may be able to buy amorphous core ribbon and construct your own that way, but the material is very brittle and probably very challenging to work with. Its not something I am recommending, definitely not a great starting point, but some people do it.

I was under the impression that the amorphous ribbon was pretty flexible... perhaps it's just the silicon-enriched versions (for greater eddy current resistance) that are brittle? I'm partial to the Hitachi Metals Metglas PowerLite forms. They're pre-built and you just stack them together to make whatever core shape you want. A couple of their C-shaped forms and a variety of different-length I-shaped forms would allow me to insert different sized magnets.

There may be one more challenge here. Figuring out how strong the permanent magnets must be. Some room for increasing or decreasing the size of the magnets used will help. Decreasing may be simple enough, but leave room in your design for increasing. Magnets of different sizes in bulk via Aliexpress is your best bet, if you buy locally the magnets could get very expensive.

Yeah, I was thinking about that. A 'Lego block' type system for building custom cores would be a huge boon to experimenters. I tried floating the idea to Lego (since they already have the injection molding machinery, they could easily create injection-molded core pieces from a ferrite slurry with Lego block nubs so they interlock), but got no response.

Consider testing a variant that uses copper drive coils as a 3rd option. Iron wire sounds like a good investment for experimenting, but not sure if it will be more efficient. Will the iron hurt, will it help, I couldn't tell you. It could be that iron is more efficient or it could be the opposite. Best option is to try both (if time/budget permit) and evaluate the behavior to determine which is better.

Yeah, I've got copper magnet wire on order, as well. The idea for iron wire (or, in this case, iron and nickel, since that's all I could find in enameled magnet wire) is that the coil material is ferromagnetic. So there's no need for a core for the coil, just wind it starting at essentially zero radius, and it acts as its own core. When the coil is deenergized, the domains in the wire will align with the external magnetic field, acting as a part of the core of the device, and when it's energized the domains will align in opposition to the external magnetic field.

The flat (spirally-wound) coil will tend to concentrate the magnetic flux toward the center of the coil.

Why is this important? Two words: Skin Effect. Think about why the skin effect occurs... it's because associated with any alternating current is a circular magnetic field which tends to push the electrons in a conductor toward the outside of that conductor via the Lenz Effect. That's why the skin effect becomes more pronounced at higher frequencies. At higher frequencies, the magnetic field will tend to concentrate more in the center of the wire, just as the magnetic flux will tend to concentrate in the center of the core of any transformer.

So in order to most effectively block that magnetic flux, we need a coil that will also concentrate its flux toward the center. Thus we can use less current than a solenoidal coil for the same flux blocking effect.

A solenoidal coil blocks the permanent magnet's flux essentially by "pinching" it, increasing the reluctance in that path... but the flux tends to concentrate in the center of the core anyway, so you've got to really pinch it to completely block it. A spirally-wound flat coil will block it by inducing the ferromagnetic domains in the coil's wire to directly oppose the permanent magnet's flux. Of course, reversing current flow means the coil will equally assist permanent magnet flux... so the drive coils could be wired in series with the output coils in such a way that the thing self-oscillates.... the more power the output coils put out, the stronger the blocking / assisting of the permanent magnet flux by the drive coils

So it's a flat spirally-wound coil to concentrate flux toward the center, and it's composed of Ni48Fe so it's ferromagnetic and when deenergized will act as part of the core of the device.

In actuality, we may not need any drive coils at all:

We'd have to change how we switch drive power to the coils... essentially you'd put drive power to the left-hand coil and disconnect drive power to the right hand coil. The right-hand coil would then be connected to the output circuitry to harvest the induced current. Then you'd switch and put drive power to the right-hand coil and disconnect drive power to the left-hand coil. The left-hand coil would then be connected to the output circuitry to harvest the induced current. Rinse and repeat.

According to the video above, that'd use far less input energy and get a far higher flux differential (and so more output power). Of course, we'd be dealing with some wicked bEMF, but that's an engineering problem that can be ameliorated.

  • Liked by
  • Zanzal
  • Chris
Zanzal posted this 06 December 2018

Thanks Prometheus, that video increased my appreciation of Flynn's design. Looking forward to following your work.

  • Liked by
  • Chris
Prometheus posted this 07 December 2018

Ok, just got word back from Avocet Steel that the minimum order size for the 0.25mm x 2mm Ni48Fe rectangular magnet wire is 25 kg. So I'll have a lot of wire to work with.

I also thought of a way of potentially making the device a little more efficient as regards the drive current. In the "Drive Coils" gap, I'm going to try putting a very low-coercivity thin magnet along with the spirally-wound coil.

The magnet must have higher coercivity than the core material used in the device, but lower coercivity than the main magnet. It must also have a higher saturation magnetization than the main magnet. So if I'm using a Ni50Fe laminated core, I'd want to use something like FeCo or SMC as the wafer magnet in the "Drive Coils" gaps.

What will this do? Well, a very short current pulse into the coil will rearrange the domains of the low-coercivity magnet so they oppose the flux from the main magnet enough to reroute the flux into the other flux path. Thus, rather than maintaining current on the coil for the amount of time necessary to maintain the main magnet's magnetic flux through the other flux path, it just has to be hit with a very short pulse. So we'd use only millijoules of energy for each flux switch.

Then when we want to switch the flux to the other flux path, we hit the drive coils with another short pulse of current, in the opposite direction. That again rearranges the domains in the low-coercivity magnet in each "Drive Coil" gap to reroute the main magnet's flux.

So rather than having the drive coils be on in one direction for, say, 10% of the time, then off for 40% of the time, then on in the opposite direction for 10% of the time, then off for 40% of the time (rinse and repeat), they'd be on for more like 1% of the time, off for 49% of the time, on in the opposite direction for 1% of the time, off for 49% of the time.

  • Liked by
  • Chris
  • Zanzal
Chris posted this 07 December 2018

My Friends,

I have found that the symmetrical nature of Magnetic Fields requires a Symmetrical arrangement to switch the Magnetic Flux. For example, the MEG, the placement of the Power Coils is where the best and most efficient Flux Switching is obtained, and not up where the Input Switching Coils are placed in the Patent.


The 'Switching and Control Circuit' connected to the two top coils, the MEG Driving Circuitry, are not the best place to do what they are attempting to show.

Where the two big power Coils are shown, the best solution is to wind Input Coil then an Output Coil on top, the Input Coils will need to be wound, one CW and one CCW, and connected in Series. The Output Coils would need to be wound CW, CW and connected in Series, but with Peak detection and shorting circuitry connected to one coil.

This way, the Coils Coupling, from Input to Output, is Zero through 1/4 period of the cycle. But the Output Coils can still be Current Carrying Coils without Loading the Input.

I have tested this:


I found a very Interesting Resonance that needs further investigation. The machine was very noisy, input went right down to: 0.11265 watts from 5 watts when not in resonance. I saw a Triangle / Sawtooth waveform.

   Chris

  • Liked by
  • alohalaoha
Prometheus posted this 08 December 2018

I'm considering an oldie but a goodie for the "wafer" magnets in the "Drive Coils" gaps... it actually doesn't have to be magnetized, as the spirally-wound coil will magnetize it in alternating directions each time the drive coil is energized.

The material is called Permendur, it's been around since 1920. It's 49% Iron, 49% Cobalt and 2% Vanadium. It's expensive, but it looks like just what I'm looking for.

The spirally-wound drive coil and the wafer magnet make a sort of magnetic "switch". Once the coil is energized (even if by a very short pulse of current), its magnetic field will align the domains in the wafer. Since the wafer has a higher coercivity than the material used in the core of the device, it'll resist the magnetic flux from the main magnet trying to get through it, and since magnetic flux follows the 'path of least resistance', it'll go through the other flux path... especially since the other drive coil will be magnetizing the other wafer to assist that flux, rather than resist it.

So essentially, what we're doing is varying the "Drive Coil" gap reluctance, somewhat akin to simply varying the gap width.

  • Liked by
  • Chris
Prometheus posted this 08 December 2018

I just had a thought... perhaps someone could help me out with my thinking here and point out any potential pitfalls.

Ok, so assume I order a Metglas core like this.

Now assume I cut a square hole into the winding bobbins (pale yellow in image) in the center such that the permanent magnet (blue/red in image) can fit.

Now assume I put Metglas square rods (light grey in image) in between the C cores (dark grey in image) as spacers.

Now, assume I use the above-described spirally-wound coils (brown in image) and wafer magnets (purple in image) in the gaps between the two C cores.

Then I wind either 2 or 4 output coils (striped brown in image) on the C core bobbins.

New Motional-EMF device plan

That'd make for a compact, easy to build and cheap motional-EMF device.

What do you guys think?


  • Liked by
  • Chris
Chris posted this 08 December 2018

Hey Prometheus,

I think you're going to have problems with the Inverse Square Law.

Magnetic Field strength ( H ) with be your enemy. The Symmetrical nature of Magnetic Fields, because they are subject to the Inverse Square Law, will leave you in a situation where your Input Coil will have to do more work than normal. Because the Drive Coils are also Symmetrical, having a North and South Pole of equal Magnitude, then each Force, MMF, or H, will not balance. One side requires more strength compared to the other, thus your Coil will require more strength than normal.


Experiment

Try the following experiment:


The path on the side with no Coils is removable, this allows you to move all Flux to the other path, the path with Coils, so as to reset the Experiment.

Your Input Coil A is energised enough to switch the Flux to the other path. The Energy dissipated is measured.

The Experiment is now repeated.

Your Input Coil B is energised enough to switch the Flux to the other path. The Energy dissipated is measured.


Results

Your Results will show Coil B to be a lot more efficient! This is because the Strength on each side of the Coil both do the same work at the same time on the same field strength of the Permanent Magnet. All of the localised H balances with that of the Permanent Magnet, both North and South Poles.

   Chris 

Vidura posted this 08 December 2018

Hi Prometheus, Looks good, I think Metglass is a good choice for this devices. I would suggest to make it adjustable in all possible ways, you should be able to change the position of the output coils, you have to think in terms of standing waves, so nodes have to be used for the ideal positioning, and might be different from theory. Also the intensity of the primary PM should be adjustable. What do you think about two halves of a toroid for the mainloop, with the switching elements in between, so you could slide the outputcoils to any position? Wishing you success with the experiments, Regards Vidura.

  • Liked by
  • Chris
Prometheus posted this 09 December 2018

I found another, much larger (6" ID, 8" OD) square Metglas core with a core cross-section of 25mm x 25mm. I also found a box of ~250 coil bobbins of the right size for only $125.00... a company had packed them away and forgot about them until they no longer needed them, so now they're selling them.

The larger core, being square, will let me experiment more with magnet orientation and coil placement. The magnets I'm looking at are 1/2" thick x 1" x 1", so I can stack as many as I need to reach the device's 'sweet spot' where it works but doesn't saturate. I'll use FeCoV rods as spacers to fill the gaps between the magnets and the core.


  • Liked by
  • Chris
  • Vidura
Chris posted this 09 December 2018

Hey Prometheus,

Very hard to work with, the big cores. Shards cut your finders.

   Chris

  • Liked by
  • Vidura
Prometheus posted this 09 December 2018

Wow, that's a huge core... a core cross-section of 33mm x 142mm! You must have had a lot of core losses with that, it's 11.466 kg!

The smaller the core, the less the core losses, as long as you're not saturating it.

The one I'm looking at has a core cross-section of 25mm x 25mm, ~1.5 kg, but it's got a larger window than the first one I was contemplating, and it's square, so it allows more experimentation. 

Why is a larger window important? Because the only wire that matters is the wire in the window, due to the proximity effect. The rest of the wire doesn't really contribute, and the more wraps you've got on your coil, the more your eddy current losses exponentially increase.

By the time you've got 3 wraps on, that outer wrap is only using ~25% of the wire for transiting current. The rest is proximity effect eddy current. So more layers lowers your maximum frequency, reduces ampacity, increases winding resistance losses and increases coil heating.

So we want a long window, not a tall one. We want long coils with few layers, not short coils with many layers.

I'm starting small. If I can get the effect we seek, I'll figure out how I got it, then expand from there.

Are you still pursuing the MEG Replication project? I noticed in your posts on that project page that you're only attempting to hinder the magnetic flux through one flux path... have you considered both hindering in one path and helping in the other path by wiring the two drive coils in series?

  • Liked by
  • Chris
  • Vidura
Chris posted this 09 December 2018

Hey Prometheus,

I did a lot of MEG Work after having huge trouble with that Core. Way too big, Heavy and so on. Too hard to wind coils by hand.

After the BIG MEG I worked on a small version: AMCC 100


As you can see, I did not post any of these details on my site. I have many reasons for not posting information on this version. I found later in the project that there were some secrets being kept, even after getting permission from all of the MEG Team to do a public Replication. The secrets are needed for the successful operation. Yes, I did learn those secrets, or at least some of them.

I found it was not in my best interest to publish results. To many could critique, debunk, or dismiss my results because of two things:

  • My Lack of Experience.
  • My Budget Equipment.


I spent a lot of years learning Power and how to measure it. But back then, I had little experience. Even today, I will not publish results, as its not what I want to share, I only want to share the Technology.

It is worth noting, I firmly believe, The MEG is the same in every aspect as Floyd Sweets early work:


All in all, we here at aboveunity.com are not just close, some of us have this tech working. I believe our theory to be pretty close. Using our theory, what's here in these pages, its the closest the public has ever had to a guide, to a working Above-Unity Machine.

It is exciting, what we learn over the years. Now some readers may see why I say start small, cheap and look for the effects. My big core was over $500.00, It sits in my shelf, and its getting old and rusty now. There is no point wasting money.

   Chris

  • Liked by
  • Vidura
Prometheus posted this 09 December 2018

Here's another idea:

The magnet would have a thin shim that interfaces between the magnet and the Drive Coils to help eliminate air gap.

The Drive Coils (brown in image, wired in series) magnetize the low-coercivity Steering Magnet (purple in image) so that it has a predominant domain direction of either leftward or rightward. This 'steers' the permanent magnet's (red/blue in image) flux either leftward or rightward, allowing the Drive Coils to simply be quickly pulsed rather than maintained on for a longer time.

Since the Steering Magnet (and the Ni48Fe wire in the Steering Coils) has a higher coercivity than the core (dark grey in image) and the core isn't saturated, once the Steering Magnet is magnetized in either direction, it should stay that way until the Drive Coils are pulsed in the opposite direction.

Or, in keeping with the advice from Chris:


Prometheus posted this 09 December 2018

Chris,

That top schematic in the image you posted looks like it'd work great with a parametric oscillator giving the waveform just a slight 'push' for each waveform's rising edge. At resonance, that'd build up to a pretty large amplitude. You'd need a trigger coil, I think, placed near the load end, to trigger the oscillator.

We'd do well to suss out how to make something like that resonate at 60 Hz (or 50 Hz for Britain)... that'd do away with a lot of complicated circuitry in trying to drive household appliances.

  • Liked by
  • Chris
Chris posted this 09 December 2018

Hey Prometheus,

A good friend of mine put me onto that work, the Floyd Sweet Cols shown, and silly me, I over looked them. The silliest thing I could have done. It was years later, I had a flash of insight and it led me to where I am today. Realising I had overlooked the most important thing in those diagrams, only after understanding how they worked.

Its a very important concept, very important! 

I have done the experiment, and I have seen some results very much unexpected!

I was getting a Triangle Wave Form when in Resonance, and my input was very low, 50mW, compared to 5Wats out of resonance. My Resonance Frequency was 1208 Hz.

We still have many simple things that need be explored Prometheus!

   Chris

  • Liked by
  • alohalaoha
alohalaoha posted this 11 December 2018

Hey Chris

I have an idea if you already hve setup buit. Try to repeat experiment again, but this time try to meassure temperature of your barium ferrite. If everything is tuned as it need to be, you should get lowering core temperature of your ferrite.

There is one more process involdevd. Acoustic resonance in brium ferrites. Try to search internet about devices which use that.

Reg.

Aloha


  • Liked by
  • Chris
Chris posted this 11 December 2018

Hey Aloha,

I don't use Barium Ferrite.

I use standard Ferrite, off the shelf.

Yes I have observed a Cooling of the Coils. This is a result of the Coils internal Resistance. The Resistance can be lowered as a function of the Magnetic Field Interaction.

   Chris

  • Liked by
  • Vidura
Prometheus posted this 12 December 2018

Ok, I've got my core ordered. It's a 6" inside length, 8" outside length square Metglas core with a core cross-section of 25mm x 25mm. I was waiting to order until I got word back from the company selling the bobbins.

I got word back from the eBay seller about that box of 250 bobbins. They have an inside size of 26mm square. That'll be just about perfect, what with the fiberglass tape on the core. If there's still too much slop, I can take it up with more tape, to prevent annoying bobbin-chatter vibrations.

  • Liked by
  • Chris
Chris posted this 12 December 2018

Hey Prometheus,

It sounds like an AMC320?

A good choice! I have a few and they are pretty good all-round cores. Not always accessible for some.

   Chris

Prometheus posted this 15 December 2018

Ok, just got word back from the seller. He messed up and put 6" inside length and 8" outside length for the core, when it's actually 6" outside length and 4" inside length.

That's fine, my bobbins are 50 mm total length, so they'll fit perfectly. Now I have to find some pure iron blocks of the right lengths so the magnets can be stacked and an iron shim placed each end to fill the gap. I'll have to wait until my magnets and core arrive, and break out the calipers to get the lengths correct.

  • Liked by
  • Chris
Prometheus posted this 19 December 2018

Ok, I've got the core. Come to find out, it's one of Stan Pawlak's cores. He's a Canadian experimenter, there's a couple YouTube videos about him, and he's got a patent in the Canadian patent database (but I can't access it... my browser keeps redirecting from the patent search page to a blank page).

So I'm waiting on the delivery of the bobbins, and I'm still trying to find a company willing to supply the small amount of rectangular iron-nickel wire I need. Avocet Steel doesn't seem interested unless you're going to ramp up to production-level quantities.

And I'm working on a schematic for a parametric oscillator using varactors, which will allow for the circuit's resonant frequency to always equal the drive frequency, no matter what that drive frequency is. I'm having a problem in that the circuit's resonant frequency is always just below the drive frequency, and I can't figure out how to get it to match the drive frequency. I'll keep working on it.

{EDIT}

Ah, figured it out... the circuit has a natural resonant frequency of 219.3 kHz. If I drive it with a frequency below that, it'll have a resonant frequency above the drive frequency. If I drive it with a frequency above that, it'll have a resonant frequency below the drive frequency.

That complicates things a bit. Now I have to figure out how to compensate for that effect. Changing the voltage bias on the varactors changes their capacitance, so perhaps I can implement some sort of sliding voltage bias compensation.

  • Liked by
  • Chris
  • Vidura
Prometheus posted this 20 December 2018

The bobbins were delivered. It's almost as if they were specifically made for this core! They slide onto the fiberglass tape covering the core with a slightly snug fit, and they're just the right length. I'd say I got immensely lucky, buying a core and bobbins from two different eBay sellers and they fit together perfectly.

Here's the core I bought, and here's the bobbins.


  • Liked by
  • Chris
  • Vidura
Prometheus posted this 27 January 2019

Thought I had a lead on a Chinese source of the Ni48Fe wire I need... but their minimum order quantity is 500 kg, and that's after I talked them down from a minimum order of 4500 kg. That's a bit much.

I've got a few leads out to other manufacturers, hopefully one of them can supply the small quantity I need. Fort Wayne Metals looks promising, but I can't find any mention of minimum order quantity on their website. I'll wait for their email reply.

  • Liked by
  • Chris
Prometheus posted this 21 February 2019

I've just ordered my wire. I found it from Tankii Alloys in Shanghai, China. It's 0.25mm x 0.64mm FeNi52 wire, dead-soft annealed, silver-plated, 10 kg. Total price (including shipping): $506.00

The cross-sectional area of the wire is between that of 25 AWG and 26 AWG wire.

I wanted FeNi48 (Ni48Fe) wire, but that's hard to find, so I settled for FeNi52 (Ni52Fe), since it has nearly identical magnetic properties when dead-soft annealed.

I also got a call back from Zeus, Inc., and they're sending me some samples of their FEP insulation for testing. FEP is a heat-shrink type of insulation that they can extrude directly onto the wire. It's got higher dielectric strength than PTFE.

The wire is uninsulated, so I'm going to send it to Zeus, Inc. to get it insulated with 2 mils (2 thousands of an inch, or 0.0508mm) of FEP insulation, which will give it a dielectric strength of ~10,000 volts. Winding-to-winding, that'll mean a dielectric strength of ~20,000 volts, since each wire is separated by 2 layers of insulation (one layer on one wire, one layer on the adjacent wire).

So the overall dimensions of the wire after insulation will be 0.3516mm x 0.7416mm.

  • Liked by
  • Chris
  • Vidura
Prometheus posted this 15 March 2019

My wire arrived today. I haven't opened the box to inspect the contents, as I'm dead tired from work... we're running with only 2 people on my crew, when we're supposed to be 8, so I've been working harder than I should.

I'll open it tomorrow and inspect the wire, then arrange to ship it to Zeus, Inc. to get it insulated with 2 mils of FEP.

  • Liked by
  • Chris
We're Light Years Ahead!
Members Online:

No one online at the moment


What is a Scalar:

In physics, scalars are physical quantities that are unaffected by changes to a vector space basis. Scalars are often accompanied by units of measurement, as in "10 cm". Examples of scalar quantities are mass, distance, charge, volume, time, speed, and the magnitude of physical vectors in general.

You need to forget the Non-Sense that some spout with out knowing the actual Definition of the word Scalar! Some people talk absolute Bull Sh*t!

The pressure P in the formula P = pgh, pgh is a scalar that tells you the amount of this squashing force per unit area in a fluid.

A Scalar, having both direction and magnitude, can be anything! The Magnetic Field, a Charge moving, yet some Numb Nuts think it means Magic Science!

Message from God:

Hello my children. This is Yahweh, the one true Lord. You have found creation's secret. Now share it peacefully with the world.

Ref: Message from God written inside the Human Genome

God be in my head, and in my thinking.

God be in my eyes, and in my looking.

God be in my mouth, and in my speaking.

Oh, God be in my heart, and in my understanding.

Your Support:

More than anything else, your contributions to this forum are most important! We are trying to actively get all visitors involved, but we do only have a few main contributors, which are very much appreciated! If you would like to see more pages with more detailed experiments and answers, perhaps a contribution of another type maybe possible:

PayPal De-Platformed me!

They REFUSE to tell me why!

We now use Wise!

Donate
Use E-Mail: Chris at aboveunity.com

The content I am sharing is not only unique, but is changing the world as we know it! Please Support Us!

Thank You So Much!

Weeks High Earners:
The great Nikola Tesla:

Ere many generations pass, our machinery will be driven by a power obtainable at any point of the universe. This idea is not novel. Men have been led to it long ago by instinct or reason. It has been expressed in many ways, and in many places, in the history of old and new. We find it in the delightful myth of Antheus, who drives power from the earth; we find it among the subtle speculations of one of your splendid mathematicians, and in many hints and statements of thinkers of the present time. Throughout space there is energy. Is this energy static or kinetic? If static, our hopes are in vain; if kinetic - and this we know it is for certain - then it is a mere question of time when men will succeed in attaching their machinery to the very wheelwork of nature.

Experiments With Alternate Currents Of High Potential And High Frequency (February 1892).

Close