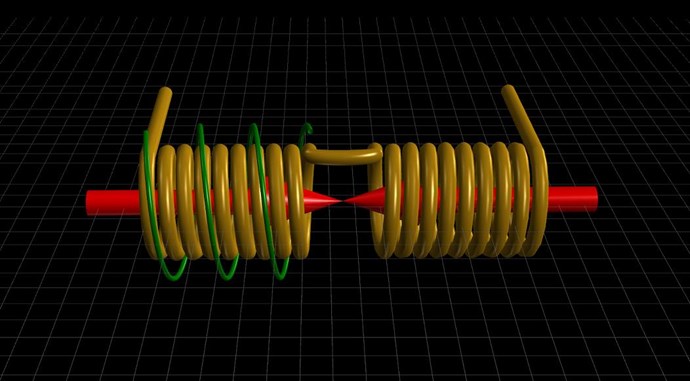
How to build your own Above Unity Machine

  • Topic Is Sticky
  • 11K Views
  • Last Post 04 November 2023
Chris posted this 01 December 2018


You Will need:

  1. One Input Coil
  2. Two Output Coils
  3. Patience
  4. Support


You need to follow the basic plan laid out here:


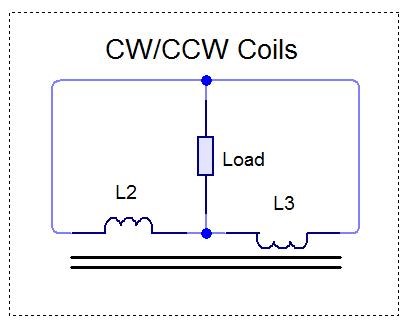
NOTE: Partnered Output Coils can be wound either CW / CCW or CW / CW Flipped.

  • CW is Clockwise.
  • CCW is Counter Clockwise.


I prefer CW / CCW.

You will need to make sure your Output Coils have Opposing Magnetic Fields, thus Opposing Currents! 


This is a Critical and Required Component!


The Operation to start with is as follows:

  1. Input Coil ( Green Coil ) brings up the Potential, then is switched Off.
  2. One Output Coil then Conducts Current ( Gold Coils ).
  3. The Second Output Coil then also conducts Current, a split second after the first, Equal and Opposite, to the First Output Coil ( Gold Coils ).


INPUT: Go for 2 Volts DC and around 320Hz or so, a Duty of around 10% or so. Slowly turn the Voltage up until you see things start to happen.

You will need to make sure the turns are greater on the Output Coils, per Coil by a factor of at least 1 : 3, so for every 1 turn on the Input Coil, you will need 3 Turns on the Output Coil and then that again for the Second Output Coil.

NOTE: Sometimes dropping a few turns on one Partnered Output Coil can be of benefit.

A small Gap between the Cored Partnered Output Coils to delay the Magnetic Field Mutual Coupling between the Coils. Circuitry can also be employed to delay Conduction on the second Partnered Output Coil.

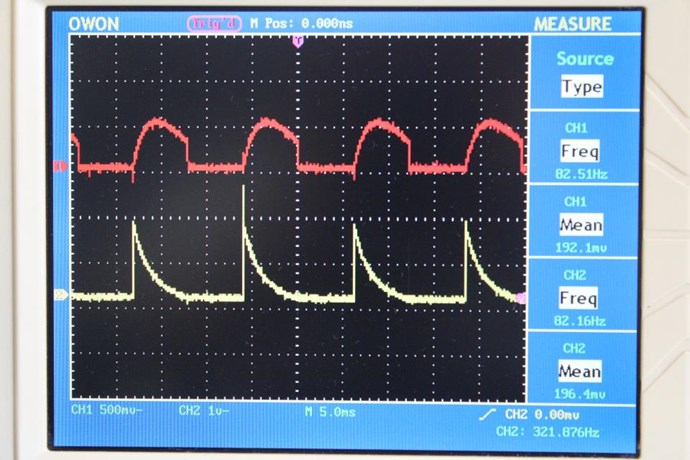
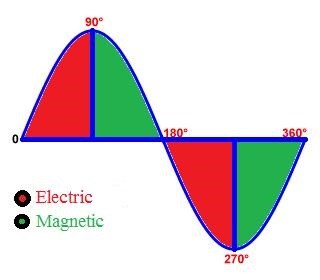
Monitoring Currents in the Partnered Output Coils, you will see the Partnered Output Coils, like The Mr Preva Experiment, will Oppose, Magnetic Fields will Oppose! The Machine works because the Fields Buck, a Bucking Oscillator!

NOTE: When you have Bucking Output Coils, you will see a Sawtooth Waveform! Look for it, its the sign you need to see to know you're getting results.

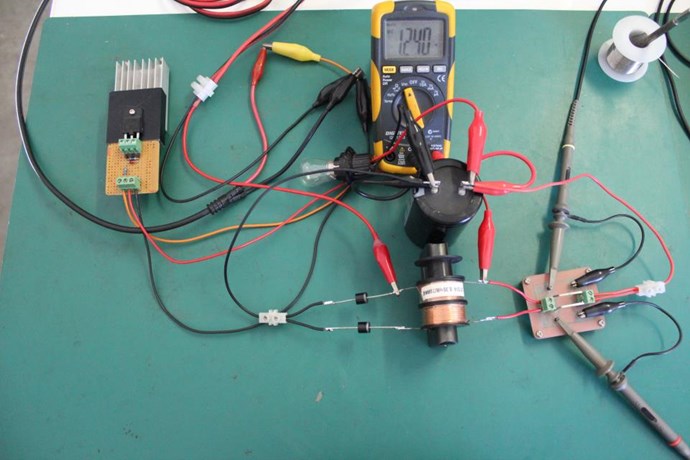
Now, its up to you, arrangement, how you Construct it. I suggest Small Cheap and easy to work with!

On your Input Coil, perhaps use 12 turns 1mm wire or slightly larger. This means your Partnered Output Coils will be approximately 36 Turns each give or take.

NOTE: Don Smith suggested 1 : 4 Ratio.

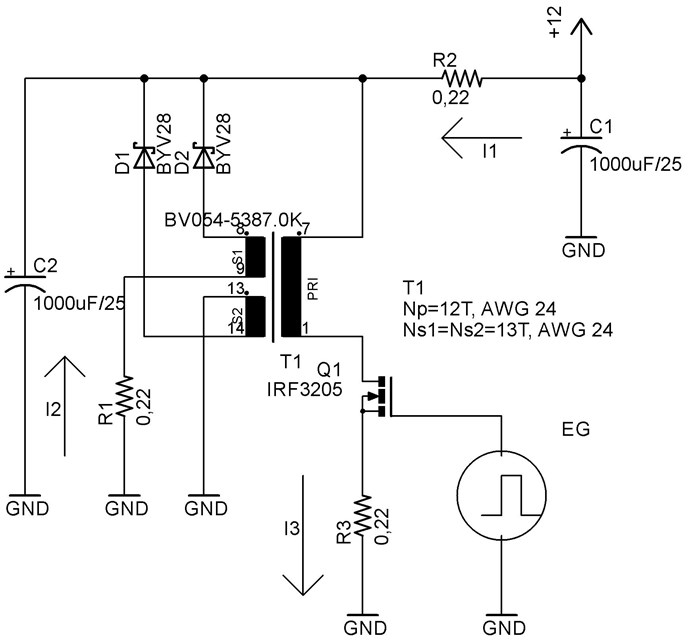
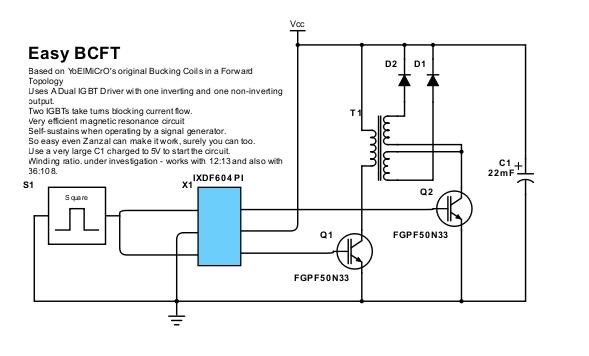
I have suggested a few Circuits already:


Of course, this is what I have found, and the Output Circuit is not limited to these Circuits specifically!

Look at the Independent Replications, for some inspiration:


  1. Bill Alek
  2. TinMan, Bradley Richard Atherton.
  3. Graham Gunderson.


Basic and up Front, No Bucking, then your machine does not work and you need to re-arrange your Machine.

This is an Asymmetrical Machine, all this I have covered here on my website. We have:

  1. Amplified Voltage. Turns Step up.
  2. Amplified Current. Bucking Magnetic Fields as in The Mr Preva Experiment.


For all we have covered, all of it, and if you've followed, then this task should be easy!

I Promise You, if you follow the rules, make your Machine do what I have said above and on my Websites, it will work. You will have an Above Unity Energy Machine! You have my word on it!

   Chris


NOTE: I expect you are experienced enough to competently work with Electrical Energy! This device can be dangerous, High Voltage and Current can very easily be achieved! I am not responsible for harm to person, and or equipment! I give you this very simple Guide as is and without warranty or guarantee. I have given a promise, and if you follow the instructions, this will work as I have stated! Making Changes will result in Failure.


Order By: Standard | Newest | Votes
Chris posted this 04 November 2023

My Friends,

Trolls and Traitors, you know, Humanities Lowest of the Lowlife Scum Bags, Bought and Paid for shills, have kept you away from the truth for a very long time, but the Community is starting to become better educated on this whole situation! Others observing what has openly happened to me, has been enlightening to most people, for the most part! Oh the Crap I have had to put up with from people, for so long! The list is extensive, the effort is mammoth, and the financial backing to get these people to do what they have, must be immense!


I have collected many Names, many entities, and many entities are from the same people! In other words, a small group of people, create many different usernames and flood the community with Complete Rubbish! Lies, Propaganda, just out right Rubbish! But, they make is sound believable, to lure you into Lies and thus Rabbit Holes that in the end, make you loose interest!

Thing is, its VERY Simple, very cheap and only complete dummies loose interest and start believing their rubbish!

Here:


People out there are showing you, all parts shown in this video and all videos, all machines, very cheap and very easily accessible!

It is only Dumb Asses that would have you believe in Magic or Vo-Doo Science, a Science that has absolutely Zero Credibility in actually Powering the Load... A very important aspect, and very simple once understood!

Voltage, via Charge Separation, and Current via the Freeing and Acceleration of Charge, the Free Electron, or the Elementary Charge, freely available inside the Insulated Copper Wire, Manipulated via Magnetic Fields, already explained and very well known:


Very simple, and the number of explanatory videos, I have given you, is also immense:


The Secret, I have already given you, thus why Members here have had so much Success!


Independent Replication is Scientific Proof:


Proof, and the Dumb Dumb Club cant see the Forest for the Trees! When too many Idiots flood the Forums, they make a mockery of the Truth! Right here, it's been here for nearly a Decade, you can SEE The Truth:


Start Here → Builders Guide to Aboveunity Machines

There are two mistakes along the way to Mastery: Not Starting and and not going all the way!

Cite: Master Shi Heng Yi

On rare occasions, Sweet saw this effect, called self-oscillation, occur in electric transformers

Ref: http://merlib.org/node/5282

The Answers you seek are right here:


I have provided 11 videos on this showing you how to approach this Technology! I have given you all of the data to make this work, and more, to make this, not just a TOY, to make this Power very much more than just a few Globes!

My Friends, when I see 10 successful replications, I will release another Video showing a bit more work, again we have had quite a few successful replications already! Do the Math in these videos! COP > 1.6 in both Machines!

Tinman was the first:


Others followed, like Captainloz:


Others also, some may not want their names used? Security for people is important to me, but eventually, we must do this as a Team and make a Stand!


We have Self-Running Machines, Our Flashlight that a Member of AboveUnity.com has achieved:


Aboveunity.com is Light Years Ahead of the other Forums!

Lighting up the Darkness!!!


We, www.aboveunity.com, is Light Years Ahead!

Oh My, there is a lot of complete idiots out there!

Best Wishes,

   Chris

Fighter posted this 21 September 2021

@Scalar wave interference, I see you're using an audio amplifier, I never used something like that with ZPM.

If you check the ZPM threads you'll see my MOSFET driver is very simple, it's something like this:

It has two channels and two MOSFETs but for ZPM I'm using just one channel and one MOSFET like in the schema above (where ZPM is in the place of the L4 coil and the DC source provides 25V).

It's not generating negative pulses, just positive pulses of 25V at duty-cycles which can be varied between 25% and 50%.

Please check the ZPM threads for the information you need:

https://www.aboveunity.com/thread/romanian-zpm-zero-point-module/

and

https://www.aboveunity.com/thread/romanian-zpm-zero-point-module-enhancements-stage/

It's all there and there is nothing secret about ZPM, all the information and experiments about it are public.

Let's keep all the info about your ZPM replication in your thread, scattering it in multiple threads is not useful.

Regards,

Fighter

Chris posted this 20 September 2021

Hey Scalar wave interference,

When you say:

Is it necessary to input positive and negative sharp pulses on the input coil?


The answer is no, it is not necessary. Only a Positive going Input Pulse is required.


When you say:

Is there a time interval between positive and negative pulses?


Youre getting ahead of yourself, focus on the machine and what it is doing and what it needs to do,


I now use the MR.fighter method directly. On this basis, can I add an input coil so that the secondary double coil can generate sharp pulses?


Again, focus on the machine and what it is doing and what it needs to do. In these machines, resonance is very important, and I believe you have not hit resonance yet. Try not to get ahead of yourself, concentrate on the machine and what the machine is supposed to do. The fine details are very important, missing steps will result in failure.

 Best Wishes,

   Chris

Scalarwave posted this 20 September 2021

hi Chris,

Is it necessary to input positive and negative sharp pulses on the input coil?

Is there a time interval between positive and negative pulses?

I now use the MR.fighter method directly. On this basis, can I add an input coil so that the secondary double coil can generate sharp pulses?

Forelle posted this 23 February 2019

Hi Jagau

i thought this is common behavior  of the bucking coils.The spike comes on the outputcoils when you switch the inputcoil off like in a "normal" coil and you see it of course  only when no load is applied on the outputcoils.I have a small flyback transformer core like Chris or Akula.

Jagau posted this 22 February 2019

Hi Forelle


Very good job, believe that we have something interesting with the configuration you use. Excellent.
I got about the same effects as you but I use only a few milliamps for almost the same result.
The source I use limits this current in order to study this effect more deeply,

let's experiment.


Jagau

Forelle posted this 22 February 2019

Hi Chris

Thank you i will try.

  • Liked by
  • Vidura
  • Augenblick
Chris posted this 22 February 2019

Hi Oliver,

Sorry, 2Mb is currently the global limit.

Shrinking down Images is easy, only a little quality loss is seen and you can still get pretty good resolution.

http://www.simpleimageresizer.com/

That might be worth trying?

   Chris

Forelle posted this 22 February 2019

Hi Chris

i was lucky that my scope was not damaged,it was by accident that i get this spikes on the scope,i should buy a differential probe.Is there a possibility that i can upload pictures with more than 2Mb?

Thank you.

Chris posted this 22 February 2019

Hi Oliver,

You can play with turns and wire size, as the Load is increased , larger wire Gauge is needed.

Turn down your input, and your duty Cycle. use less current.

Maybe use a resistive load, 10 Ohm 100 watt Resistor or something similar.

Then work on the Conduction Delay, pointed out in: Parallel Wire or Bifilar Coil Experiment

Be very careful of your equipment, large spikes like that can very easily damage scopes. Equipment normally does not like large spikes.

   Chris

Forelle posted this 22 February 2019

Hi all,

this is a short info how it goes on with my first bucking coil experiments,i did take 12 turns on the inputcoil,1,1mm dia,and 1 x 36 and 1x 33 turns on the buckingcoils,i was very impressed that i get with 2,8V and 0,8A a 1200 Vpp,accidently my load (lamp) was damaged and i was wondering why it did not light up and instead i saw about 5mm long sparks inside the lamp and very high spikes on the scope .This is not compareable with the regular spike that you  get with like for a Bedini system,if you imagine with only 2,8V and such few windings 1200 Vpp.

I would like to build a little bigger device where i can adjust the gap when it is running and where you can adjust the position of the coils.Chris,you never mentioned the wire size for the bucking coils is there a size that works better than an other?I forget, i had 10% dutycycle and 270Hz.

Oliver

Chris posted this 17 February 2019

Hey Zanzal,

Excellent, so Voltage is what you're seeing. You're using a DC Pulse on the Input Coil, its being Loaded and Current increases when your load is connected, so you have Lenz's Law between Input and Output. I am guessing this is right, yeah?

If so, I would look toward the replication of: Some Coils Buck and some Coils DONT to see how Input to Output Isolation techniques can be used.

Also, the Voltage induced on your Output Coils can be increased dramatically by using information in this thread:  Parallel Wire or Bifilar Coil Experiment - at very little cost.

When you catch the wave, you will know. Jagau posted some good information on 'ferroresonance', I pointed out, that the Effects I am sharing with you are very similar:

The Thread: Impulse Pressure Wave, particularly Jagau's post in the pdf document on Ferro-Resonance, also describes these effects.

Ref: My Post Here.


Catch the Wave, get your Voltage up, not to high, but high enough to make a difference, use Conduction delay techniques through Timing to get these effects. But remember, this is not the only way. Other ways exist, but they are harder. I recommend sticking to this when learning. 

   Chris


P.S: Monitor your Currents, its important to monitor your progress!

I have shown this in the thread:  Some Coils Buck and some Coils DONT - It is very easy to see, once one learns enough, that the Voltage is important, as the Voltage increases, the Current must also increase!

Really simple EE facts.

Zanzal posted this 16 February 2019

I used the circuit CW/CCW coils:

The wave form is captured on a hand held oscillscope with the probe and probe ground where the blue dots are on the above. Load is a 1ohm resistor.

YoElMiCrO posted this 16 February 2019

hi Zanzal.
If the measurement occurs in the drain of the mosfet, that waveform is normal, seems to have saturation?
The positive peak is due to the back emf, which has a high value for having no load.
For that reason flyback topologies can not remain without load and is a normal behavior for an inductor.

Chris posted this 16 February 2019

Hey Zanzal,

What's the Circuit, are you measuring Current or Voltage?

In my thread: Some Coils Buck and some Coils DONT I show Current scope shots that have a similar shape. Seen again here:


I should point out, this waveform is a constant, the basic shape is seen throughout: Akula, Graham Gunderson:


The very sharp change in Current is explained here.


One Current Up-Hill and one Current Down-Hill. In a parallel configured situation:


Equivalent to:


However, I have diodes eliminating the overshoot.

Maybe a little more info and I might be able to give you a little better information.

   Chris

Zanzal posted this 16 February 2019

This is a scope shot from a recent test using the CW/CCW coils circuit taken across the load:

Chris, is this what we are supposed to see for that circuit or does the waveform indicate something done incorrectly?

Edit: The circuit is the CW/CCW coils circuit in the original post and the load is a 1ohm resistor.

Chris posted this 16 February 2019

My Friends,

The Numbers come with the birth of the effects I have described on this forum. Yes, its like:


The Scientist put the work in, followed the outline for the birth, and then came the moment of euphoria.

Paying attention, learning the outline and following the rules, simple rules, will bring success.

Your machine is a Pump, you must make it pump! Some details here: Parallel Wire or Bifilar Coil Experiment

   Chris

  • Liked by
  • ISLab
  • Augenblick
Zanzal posted this 16 February 2019

I went back and looked at the CW/CCW Coils circuit and did a quick retest. Using a 20W 12V DC 0.6 ohm bulb as the load I noticed that the current appeared to be under reported by my meter. The bulb seemed brighter than the current would have suggested. I did need to feed in a decent amount of power before I saw a noticeable reversal. It is not a sawtooth exactly, but a dip followed by an exponential slope in my case. Sawtooth might be how really good ones appear. Diodes were unnecessary, all that was needed was sufficient input power. It is impossible to know if it is underunity or overunity without accurate power measurements, so that is going to be a problem. I am not used to dealing with AC current, so I am not sure if my meter reported it accurately and the bulb simply looks brighter because it is AC.

Using the RMS AC voltage over a 1 ohm resistor and trying to maximize that number relative to the input power is probably the best approach I can think of for now. Will hopefully get some time to play with it this weekend.

Chris posted this 05 February 2019

@All,

I wish to share some fantastic results!

Zanzal has replicated YoElMiCrO's Circuit and got some very good results!

Zanzal's Thread: Zanzal's Easy BCFT Circuit


YoElMiCrO's Circuit.


Zanzal's Circuit.


You see now, together we can change the world! We can! We have much more power than you think! You, here working toward the future will be remembered forever as the ones that led the Driving Force to make a Change!

Its all just a way of thinking, no Magic involved!

   Chris


EDIT: Zanzal has reported an error in his result, please check the Thread listed above.

Chris posted this 01 February 2019

Nice Gravitation!

The Mr Preva Experiment is a step towards a working Above Unity Machine! Very nice waveforms there!

   Chris

Gravitation posted this 01 February 2019

Ok from what i see, it seems to be good to have diode in reverse at the output branch of the Mr Preva experiment to force current to flow only in the center of the coils. When diodes are there, the sound of the transformer is deafening. And i am very suprised that the current in the center is almost pure DC without capacitors. Watch pictures

The frequency on the scope is wrong, i was at 2500Hz on both shot. Notice that the current monitored in A & B (on the scope) were negative DC and the 1 ohm resistor (R3) was positive DC.

With diodes :


Without diodes : (the transformer makes a little sound, nothing compared as before)

Next step is going to put some capacitors to reach resonance and see what's will happens

Gravitation posted this 30 January 2019

Many thanks for the super precise answer ! Very good idea to have listed all the threads that can help ! Vidura, yes i confirm to you that my coils were opposing magnetically in this screenshot.

It is very clear for me now, i will continue on the way that you said and post some news later


Chris posted this 29 January 2019

Hi Gravitation,

Thanks for sharing! Welcome!

If I may point out, your Current is correct but in reverse. When one Pushes a Ball Up a Hill, One does not want any Resistance, one wants a task that is easy as possible.

We must not interfere with the Magnetic Field on the Up Hill journey! We must allow the Magnetic Field to build to maximum value with Zero Interference.

Where we want to use the Magnetic Field is on the Down Hill Journey:


Excess Electrical Energy can only be "Generated" by a Changing Magnetic Field! A Changing Electric Field burns a Heat Death - See Don Smith Quotes.

So, when a system is transforming from Electric to Magnetic, one must not allow any interference!

When a system is Transforming from Magnetic to Electric one can use the Changing Magnetic Field to "Generate" an Excess. Only using Partnered Output Coils however, not possible using a Single Coil.

The Partnered Output Coils must have sufficient Voltage and as a result Magnetic Fields ( Opposing Currents ) to see gains. Some work is required here to maximise your systems Energy "Generation". Some threads that may help: Asymmetrical Regauging, Magnetic ResonanceImpulse Pressure Wave, Non-Linear Inductance, Electromagnetic Waves, Increasing the Rate of Kinetic Energy, E=mc^2, Nano Second Pulses, Charge Separation, Resonance, Force, Parallel Wire or Bifilar Coil Experiment, Lenz's Law Experiment, Reduced Impedance Effect, Timing, Parametric Excitations of Electric Oscillations, Some Coils Buck and some Coils DONT, Accelerating Electrons, Electrical Energy...

Two Magnetic Fields ( Partnered Output Coils ) Slapping together very fast "Generates" a Voltage higher than two Magnetic Fields Slapping together Slower:


Ref: https://www.youtube.com /watch?v=xvNNTc6ZPtQ


Magnetic Fields Stand the same as Ocean Waves Stand:

Ref: https://www.youtube.com /watch?v=EUXOZAinUPk


A Vertical Wall of Water, huge Force.

NOTE: This Wall of Water is the Amplitude of the Voltage Peak! Voltage is bought high, because of the Magnetic Field Change! This is the Regauging part, seen here:


You are on the right track, but just have the Currents on the wrong side of the Cycle.

   Chris

Vidura posted this 29 January 2019

Hi Gravitation and welcome. It's good to see new members joining and doing practical experience. The sawtooth wave is inverted in your screen shot. The current have to be at maximum value in the beginning of the work cycle and fall linearly or exponential depending of parameters. Check if your coils are actually opposing magnetically. Regards Vidura.

Gravitation posted this 29 January 2019

Hi Chris and all !

First, thanks to all to share and making this forum very interesting ! I will be happy to share also my experiences here !

I'm working on this subject and it is very surprising that there is nothing new from 3 weeks ago. This topic is named "How to build you own above unity machine" and newer posts are on other topics on this forum. Everybody should be here no ??

Ok I've first replicated the Mr Preva experiment (success) and now trying to get above unity. Working for now with diode and bucking coils. With various configurations of putting diodes in the output, i'm now near the 1:1 for power input/output (1:0.85 in real). I don't have put capacitor to reach the resonance with coils. Is capacitor needed for above unity ? (Looking at Akula's schematic,  the answer seems yes)

Chris you are talking like a man that he has found and done a above unity machine. Is it true that you have done an over-unity machine ?

I put also here a screenshot of the current monitoring on the output bucking coils showing a sawtooth (1 ohm/5watt ceramic resistors). Chris, is this sawtooth that you are talking about in the beginning of the post ? I was here at 2 Khz on the bucking coil (10% Duty).

Thanks in advance for your help !

sawtooth current


Vidura posted this 14 January 2019

HEY GLENNMR2018,

YOUR POST HAS BEEN MOVED INTO A NEW THREAD, YOU CAN FIND INDICATIONS ABOUT HOW TO USE THE FORUM SITE  IN THE LINK:HELP WITH USING THE FORUM AT THE TOP RIGHT SIDE

REGARDS VIDURA

glennmr2018 posted this 14 January 2019

hallo guys~i have only just worked out how to actually view the latest posts here ~ by clicking on 'view latest posts' down below and scrolling down to the bottom!~ Chris , is there any easier way? this is why i posted the same thing 3 times last night~i could not even find what i had posted. While i apologize for this nontechsavy mistake.. i didn't expect you would delete the whole...lot! sigh!~i suppose this is 1 of the penalties i pay for having Aspergers Syndrome!

Visualize the Shape of Things Not Yet Seen with Eyes !! ... .. .

Chris posted this 13 January 2019

Zanzal is right,

That many posts of that nature should have their own dedicated thread. We are seeing a White Noise problem now. I urge new comers to start thinking about others, existing members.

I have moved Glenmr2018's posts.

   Chris

Zanzal posted this 13 January 2019

Hey glennmr2018,

Welcome back. A couple of suggestions from experience:

I recommend avoid sharing ideas that you haven't built in someone elses thread. Its white noise that most experienced replicators have learned to simply ignore but it can be annoying to the thread owner who is trying to convey an important concept and doesn't want their thread filled with unproven attempts to innovate. Proven innovation is always welcome.

From experience I can tell you that if you haven't already built a working POC any innovation on the idea is a waste of time. There is an order to things in life, first you must learn the working principle, then you can expand upon that principle and integrate other principles.

Start simple with Mr Preva replication. If you can replicate the concept behind MrPreva then feel free to share your replication of that experiment (if you have not already.) Its sort of a right of passage and its the very important principle behind what Chris teaches here. Its not a concept you can skip and expect to be successful.

You should look back and delete any duplicate posts you may have made. Chris may do this for you.

Anyway, that's just some advice, you can do as you wish. Feel free to update us on how your idea works out.

Chris posted this 12 January 2019

My Friends,

It is amazing how the world has changed in recent years!

Some years ago, this would have been laughed at, criticised, and disregarded. Now we know better! I am so proud of you all, and what we as a team, have, and are achieving! It is you that's actively changing the world!

Our Charge is Magnetic in Nature! Because it has an electric charge, this charge carries a Magnetic Field!


Each Ball Bearing / Magnet ( Cyan Ball ), can be made to move:


Remember, the Copper Wire, the Insulated Copper Wire must be bared on the ends to access the Charge! Insulation is not a fundamental instrument of "Generating" Energy.

Conductivity is!

The Insulation acts as a Guide, to direct your Charge that you have under pressure, to induce Velocity of the Charge.

Build your Pump my Friends! Show us how your pump is designed and we can compare!

   Chris

  • Liked by
  • Augenblick
mrblobby posted this 12 January 2019

Copied and saved to the 'aboveunity' folder on my laptop.

Vidura posted this 10 January 2019

The information from Gorchilin is very recomendable to read for understanding  of the magnetic resonance.

Regards Vidura.

alohalaoha posted this 09 January 2019

Hey Chris - check these new topics from Vyacheslav Gorchilin site

Slow drift magnetic waves in Partnered Coils Configuration

http://gorchilin.com/articles/coil/magnetic_wave?lang=en

and this one

2nd order magnetic wave resonance math in PC configuration

http://gorchilin.com/articles/coil/magnetic_wave_resonance

The Trure Partnered Asymetric Buck configuration

  1. Two coils conf., parallel winding
  2. Choke conf. - high voltage, low current
  3. Bifilar conf, - low voltage, high current
  4. Asymmetric Partnered Buck conf. - high voltage, high current. Remark. Coils need different wire lenght.!

Regards

Aloha

Jagau posted this 09 January 2019

Yes a very good point
Don Smith suggested this fact in one of his lectures in 1994,

we must have this kind of waveform


Jagau

Vidura posted this 08 January 2019

A good point Chris, I have observed this waveform in some transformer tests, sometimes almost a triangular shape.

Chris posted this 08 January 2019

My Friends,

When building your Machines, remember you must account for a Inductive, Inductive Time Constant.

The Time it takes for the Bucking Fields to move from maximum value to zero is accounted for, the same as the Time it takes for the Magnet to fall through the Copper Tube:


Remember, what we are aiming for is exactly the same effect! Asymmetrical Regauging:


If you do not leave enough Time, after your Input Pulse, your Output Pulse will be insignificant, Asymmetrical Regauging, shown above requires a short On Time and a Long Off Time. You also must get your Timing correct so as to Catch the Wave down to Equilibrium or Zero. A Sawtooth Wave Form. Floyd Sweet showed a Sine Wave, but look how straight is sine edges were:

Ref: 25 : 51 - Floyd Sweet Secrets - Remastered - 13-06-2006 - 6.05 AM


Compared to a standard Sine Wave:


A visible round edge difference seen. The Straight edge shown in Floyd Sweets Scope Shot is the Asymmetrical Regauging. A DC Cycle each Half AC Sine Cycle.

   Chris

Chris posted this 08 January 2019

Hi Fer123,

Excellent example! Yes, there is a component here that is the same! Andrey Melnichenko is one of my hero's! Remember what he went onto:


The last video is with Arthur Trankle from now Steho Energy showing the works of Andrey. Pin 5 on the 34063 IC is of very short Duty Cycle but many of them. this is in attempt to catch the wave.

   Chris

fer123 posted this 08 January 2019

Hello to all I found this video Chris if is not appropriate remove please, I think It can help. Thanks.


Wistiti posted this 29 December 2018

Excellent !!😁

  • Liked by
  • Chris
  • Augenblick
Atti posted this 29 December 2018

Thank you for your comment.

  • Liked by
  • Chris
  • Augenblick
Jagau posted this 29 December 2018

Me too i have a lot of fun with logic

Jagau

  • Liked by
  • Chris
  • Augenblick
Chris posted this 29 December 2018


Chris

Jagau posted this 28 December 2018

I have no doubt in my mind that what Chris teaches is exactly what we have to do. It is up to us to develop from this concept.

You must not wait to have everything cooked in your mouth and simply copy the result.


I am a little surprised by your reactions, lets go at work. Magnetic resonance is what we have to work on, let the electric resonance drop.

I am making a very explicit video to prove what Chris taught me to do.
You will understand then that he was right.
Jagau

Zanzal posted this 28 December 2018

Please ask again. Has anyone already dealt with the layout? Could you share your experience?

I've already built my transformer according to Chris' specification, 20awg, 2x12 turn primaries (2 just in case I need to swap polarity), 2x36 turn secondaries. Armed with additional knowledge from my simulations I have on hand a slew of diodes I can switch between. In early testing with a Joule Thief configuration, I was able to elicit what I believe was a ferromagnetic resonance reaction my core. That's a good sign, but I know most ferromagnetic resonance reactions do not cause OU, but simply waste power while causing massive over voltages. Finding the island of stability can be challenging. I'll share what I find.


cd_sharp posted this 28 December 2018

Hey, friend,

Has anyone already dealt with the layout?

Not exactly, but if L3 would be reversed it would become very interesting. I add it to my todo list.

"It's just the knowledge of the coils and how they interact with each other" (Stephen Mark)

Chris posted this 28 December 2018

Hi Atti, @All,

Yes, when people follow exactly, what I have laid out, the same exact instructions with "no improvements" from those that are not in the know, you will have an Above Unity Machine!

Some have had successes of varying different degrees.

   Chris

Atti posted this 28 December 2018

Hey Chris 

I'll read it all right.

Please ask again. Has anyone already dealt with the layout? Could you share your experience?

Thanks.

Chris posted this 28 December 2018

Hey Atti,

If I may suggest, go back and do The Mr Preva Experiment again.

I see you were using 50% Duty Cycle in your diagrams. You need to go back and follow the instructions. The Timing cycles are important and need to be followed! The description of how the Coils are excited - It is important to be followed!

Our Input is NOT the Source of our Output! Our Output is a "Generation", an Induction event! Not related to out Input. This was shown in The Mr Preva Experiment. Like I have said, our Input is for Potential Only.


A Transformer is very well engineered piece of electrical apparatus. We are not building a Transformer!


I apologize, my efforts to share, my efforts are great, but I grow wary. 

   Chris

Atti posted this 28 December 2018

Chris and everyone else.


   (  Fix me if I'm wrong , criticism is not a problem 


Everyone has seen this arrangement many times. Still, it doesn't matter how we do it.

A drawing helps a lot in understanding the theory.But we confess.
In practice, however, we can learn more than producing only theories.

Many years ago I did a similar experiment that Chris presented to us. The essence of this is that all four columns of the transformer had the same basic circuit diagram. The effect is very interesting.Just a detail of the wiring diagram.
I have implemented many other similar schematic diagrams.

All in all here.

http://www.vems.hu/freeenergy/pajert/index.htm?FoAblak=../pajert64/MEGKiserl_Attila.html

But what's the point!

The following video shows the following.

Practical implementation doesn't matter at all !!! It can be seen that at tight coupling, the increase in voltage or the decrease in current gives a different value than in the case of loose coupling. The value is completely different if it is controlled by H bridge. There is no significant drop in power there. The value is completely different if the added voltage or associated output coil is diode.

Has anyone else done similar measurements?

Chris posted this 28 December 2018

My Friends,

Something to keep in mind, Input power can be wasted and is often wasted, because the machine control is not quite as ideal as we may like.

The best example is in Brads Rotary Transformer. Remember, you need to catch the wave, Frequency and Duty Cycle is required to get the correct Subharmonic:


You can see, all the spikes in there, the spikes after the first peak at the top of the Sawtooth Waveform, all the spikes are wasted energy after the wave for has been caught. On the other side of the diode:


We see, the Sawtooth Waveform is not clean, its all over the place. We really need to aim for a clean evenly distributed Sawtooth Waveform. Graham Gunderson was one of the best I have seen:


Seen in red, the Sawtooth waveform is the Asymmetrical Regauging. We have covered this in some detail in my thread: Asymmetrical Regauging

This is Electrical Energy "Generation" at ZERO COST to your Input. It is entirely between the two output, the Partnered Output Coils.

   Chris

We're Light Years Ahead!
Members Online:
What is a Scalar:

In physics, scalars are physical quantities that are unaffected by changes to a vector space basis. Scalars are often accompanied by units of measurement, as in "10 cm". Examples of scalar quantities are mass, distance, charge, volume, time, speed, and the magnitude of physical vectors in general.

You need to forget the Non-Sense that some spout with out knowing the actual Definition of the word Scalar! Some people talk absolute Bull Sh*t!

The pressure P in the formula P = pgh, pgh is a scalar that tells you the amount of this squashing force per unit area in a fluid.

A Scalar, having both direction and magnitude, can be anything! The Magnetic Field, a Charge moving, yet some Numb Nuts think it means Magic Science!

Message from God:

Hello my children. This is Yahweh, the one true Lord. You have found creation's secret. Now share it peacefully with the world.

Ref: Message from God written inside the Human Genome

God be in my head, and in my thinking.

God be in my eyes, and in my looking.

God be in my mouth, and in my speaking.

Oh, God be in my heart, and in my understanding.

Your Support:

More than anything else, your contributions to this forum are most important! We are trying to actively get all visitors involved, but we do only have a few main contributors, which are very much appreciated! If you would like to see more pages with more detailed experiments and answers, perhaps a contribution of another type maybe possible:

PayPal De-Platformed me!

They REFUSE to tell me why!

We now use Wise!

Donate
Use E-Mail: Chris at aboveunity.com

The content I am sharing is not only unique, but is changing the world as we know it! Please Support Us!

Thank You So Much!

Weeks High Earners:
The great Nikola Tesla:

Ere many generations pass, our machinery will be driven by a power obtainable at any point of the universe. This idea is not novel. Men have been led to it long ago by instinct or reason. It has been expressed in many ways, and in many places, in the history of old and new. We find it in the delightful myth of Antheus, who drives power from the earth; we find it among the subtle speculations of one of your splendid mathematicians, and in many hints and statements of thinkers of the present time. Throughout space there is energy. Is this energy static or kinetic? If static, our hopes are in vain; if kinetic - and this we know it is for certain - then it is a mere question of time when men will succeed in attaching their machinery to the very wheelwork of nature.

Experiments With Alternate Currents Of High Potential And High Frequency (February 1892).

Close