Building a Smith Generator

  • 19K Views
  • Last Post 15 October 2022
  • Topic Is Solved
sampojoe posted this 12 January 2018

I am starting work on building a Smith Generator.  Thanks to your work here, I am getting the role of Bucking Coils on the circuit.  I found this link for starters, a pdf that purports to tell you how to build one:  

projectavalon.net/forum4/attachment.php?attachmentid=25399

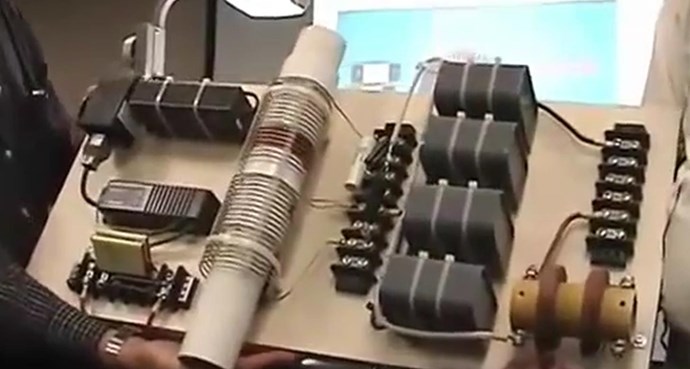
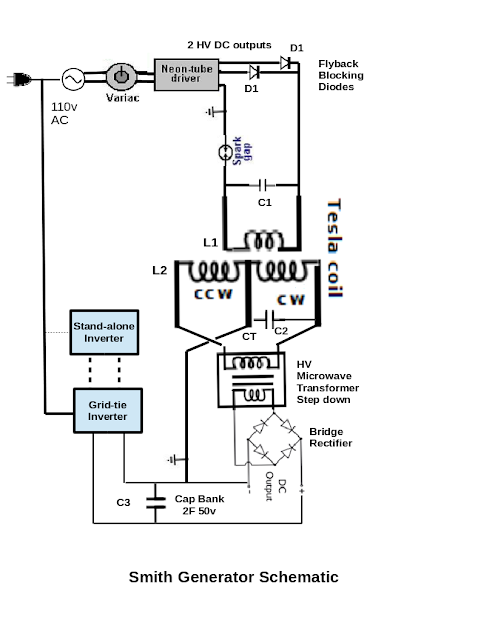
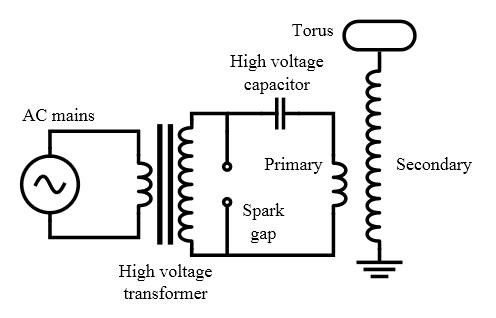
I extracted another schematic and made it an attachment below.  What they do not mention anywhere in the document is that coil L2 most likely is a Bucking Coil, as you have most eloquently shown here!  I guess they do say it is a "Tesla Coil".  I guess that could be a Partnered Output Coil.  I have seen similar schematics on youtubes by kdkinen, where he shows his replication attempts seemingly at least generating OU.  His schematics I can clearly see the Partnered Output Coils.  So with this understanding I think I will attempt a replication.   It seems very simple.  You use a 30 ma NST to get thousands of volts.  The front of the the circuit as shown uses a small inverter driven by a 12v battery to get 120v AC, which is fed thru a variac to control the input voltage to the NST.  The final output is supposed to be up to 8000v @ ~20A DC, as the L1/L2 is 4:1 step-up!   Pretty astounding.

I am not going to use a battery to run an inverter to drive the system.  I will just initially plug my variac into the wall.  You do need a real sine wave input for this.

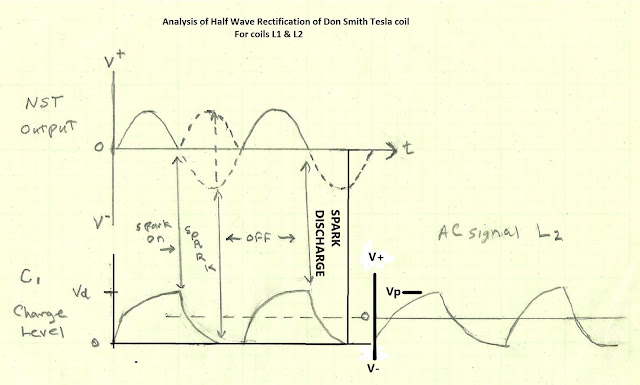
So the front of the circuit feeding L1 starting with the output of the NST is grounded at the center point tap of the NST.  The output of the NST is rectified to extract the starting HV and then reconverted to AC with a spark gap tuned with resistors and caps to the coil L1 for about 31.5 kHZ AC .

Here is a hand drawn schematic online and in the pdf : Hand Drawn Don Smith Schematic

I got a little excited about solving the performance issues of the L1 circuit and clicked the solved button thinking it just applied to the post by Marathonman showing how Tesla built such circuits. But no, it got applied to the entire trhead, and is apparently a big database issue to correct.  So please ignore the green solved check!

Attached Files

Order By: Standard | Newest | Votes
Chris posted this 12 January 2018

Hi Sampojoe - This is awesome!

If I may, Don Smith made many videos, but very little actual news coverage, very little anywhere except for the videos.

However, the videos contain really good and very accurate information. Careful counting of the turns, there is a 1 to 4 ratio. This is a common theme in these devices.

My main and best snippet id:


The Coil Don marks as L2, is actually 2 Coils. I have fount it much easier to think of them this way.


 If one treats each Coil Separately, then one can also measure the Current in each Coil and ensure that the Currents are opposing. By Measuring the Currents, one can view direct improvements. But be careful, High Voltage and Current can damage equipment very quickly!

Don Smith was a big believer in the One Quarter Wavelength principle:

One Half Wavelength:


One Quarter Wavelength:


I also have seen the same importance, and its also been pointed out by many others before:

Resonance frequencies may be maintained quite constant at high power levels so long as the load remains constant. We are all familiar with AM and FM propagation, where in the case as AM, the voltage amplitude varies, and with FM, the frequency is modulated.


 However, the output power sees a constant load impedance, that of the matched antenna system. If this changes, the input to the antenna is mismatched, and standing waves are generated resulting in a loss of power.

Floyd "Sparky" Sweet - Magnetic Resonance

I have said it before, I am still learning, I will always be a student of Life, I do not have all the answers, but I have seen this importance before. When the right Resonance is achieved, the Coils Magnetic Fields Oppose, the Currents are 180 Degrees out of phase, and excess Power is the "Generated" by the Laws of Electromagnetic Induction. Another of my favorite Videos:


I know you have great knowledge in these areas, and much of what I have said is most likely obvious to you, but wanted to try to help.

Don Smith did write one of the pdf documents, I have a copy here: Don Smith

Thank You for your post, please keep us updated!

   Chris


  • Liked by
  • cd_sharp
  • Augenblick
sampojoe posted this 12 January 2018

I am starting to line up parts, figuring out the coil build...  If anyone knows anything about this comment would be appreciated.  

wow Chris, thanks, so much info so fast!  Yes I can't help thinking of the L2 as 2 separate coils also. After all I cannot see something being called one coil when it is wound clockwise for half of it and then reversed to counter-clockwise for the second half!

Regarding your first video snippet, I had watched that on youtube before somewhere, and I thought Don was being somewhat deceptive about it being "one coil with the center cut out".  That would imply both parts would be wound in the same direction, while the essential feature of bucking coils are 1/2 CW and the other wound CCW.  After all I think he would've wanted to protect some secrets so he has a chance of making some money and a living off it ;-)

sampojoe posted this 12 January 2018

The L2 coil in the pdf is described as a Barker & Williamson Airdux Coil here.  But again that is indicating its a "one coil" thing.  I suppose they could make those coils CW and CCW, but it would have to be a special manufacture request possibly.  They make no distinction when ordering.  But I will try to build it myself I think.  I would like to use insulated wire as opposed to bare. I can't imagine it would change anything but make it safer.  The oscillation frequency on the L1 would be any high amount that you get by adding in the parts accordingly and then it is supplied by the spark gap, I surmise.  Then the L2 capacitance and inductance would have to be more carefully matched at this 1:4 ratio.


  • Liked by
  • Zanzal
Chris posted this 12 January 2018

Hey Sampojoe, Agreed. Thanks for the link.

I have reason to believe, and I may be wrong here, but I believe it may be possible that the Parallel Resonant Cap on half of L2, might possibly be a Harmonic of the Primary Resonant Frequency, maybe the second Harmonic.

Don Smith might have been good at drawing Circuits, but he most definitely knew most of the technical aspects about Coils, LC Tanks and Wavelength Theory.

I have said before, and as you already know, some of these devices need to be Grounded, to Earth, and not Negative as such.

   Chris

sampojoe posted this 12 January 2018

In the youtube "don smith seminar on how to make it"  at the 24m mark you can see he holds up PN NPS 12010, which I believe is 120v at 10kv.   I ordered this at ebay, 10000V-10KV-30mA-Neon-Electronic-Transformer-Power-Supply-Rectifier-50Hz-60Hz.  I assume since it says its rectified, its DC output, which will save the diodes & rectification on the spark gap side of the circuit I do believe.

sampojoe posted this 12 January 2018

So that would coincide with the 1/4 ratio/wavelength, making it a factor of 4 harmonic?

Chris posted this 12 January 2018

Hey Sampojoe,

Possibly the 4th harmonic, but this would not give us a very good Current Phase relationship in the two Coils marked as L2.

I believe, possibly the 2nd harmonic, may be better because at the sine at 1/4 wavelength on the second harmonic is a forced function of the wavelengths interactions together, for example, they would be opposite at 1/4 wavelength when in resonance.

This way, as long as the system is in Resonance, the Coil L2 would have opposite phase no matter what, Q would go sky high.

Been a long hot day, am tired so hope this is readable and make a little sense at least?

   Chris

  • Liked by
  • Zanzal
  • Augenblick
sampojoe posted this 15 January 2018

In the YT video I mentioned above, "Don Smith Seminar How to make it" Don is interviewed for about an hour and discusses many things.  I am sure it is in one of your videos Chris, and there is that wonderful Don Smith YT Channel you've found too.  At the 37m mark, Donspecifically stated that the circuit does not have to be tuned or run at a resonant frequency.  He said that the NST is pumping the L1 circuit as the driver and provides what the circuit needs.  I am parapharsing from memory here.  So I would say the circuit should be built to operate near what the spark gap would provide if tuned, something in the RF range, but is not the critical factor to have resonance, and be perfectly tuned.  So clearly what may be important would be the jagged waveform generated by the sparkgap, the high voltage, the step-up to even higher voltage and the Bucking coils to rip open the zero point energy field.  I am eager to put an O-scope on it when I get something going.

sampojoe posted this 15 January 2018

I am moving a little slow on this project as I am finishing up a tesla style DC asymmetric motor first, another couple weeks.  It is a real beast with dual commutators eliminating stupid Edison motor Counter EMF.  I have added in some circuitry to try to reclaim all the energy that should be rattling around in those coils I am kind of excited about and have been working on it for many months off and on...  Its a pretty big motor.  These style motors run at nearly twice the RPM as the Edison style motors.

Chris posted this 15 January 2018

I am sure it is in one of your videos Chris, and there is that wonderful Don Smith YT Channel you've found too.  At the 37m mark, Donspecifically stated that the circuit does not have to be tuned or run at a resonant frequency.

Hey Sampojoe, re the bit about resonance above, if I may suggest, stay reserved on this. I think this is very important, all my experiments show a Resonance is best. Don Smiths book is titled: "Resonant Energy Systems", so it might be an idea to stay very reserved on this.

Only trying to help, don't want to shut doors before you get to them.

   Chris


  • Liked by
  • Zanzal
  • Augenblick
sampojoe posted this 16 January 2018

Roger that, reading and listening.  Planning a 3-5kw system with grid-tie capability.  Incredible that the system shown in your pic above, and spoken of in videos listed and covered in the pdf with build directions is supposed to be able to do 160KW, or 8000v at 20 amps!  Figuring components...

Chris posted this 18 January 2018

having trouble finding the bit in the video you mentioned Sampojoe, did you get my PM?

Don did say:

If youre going to go the Magnetic Resonance route, the world is your oyster.

Don Smith - @40:40 Don Smith Resonant Energy Devices Video - 2006 Tesla Tech


We know, we have Experiments to prove this is true, Magnetic Resonance, where the Currents are 180 Degrees out of Phase is very important. One being The Mr Preva Experiment.

   Chris

  • Liked by
  • Augenblick
sampojoe posted this 18 January 2018

I have some points of confusion in mapping terminology to designing the coils in the circuit.  My pdf I listed is calling one or both of the coils a Tesla Coil as does Don Smith in any one of his videos discussing this device.  

  • Is the entire L1/L2 assembly a Tesla Coil design derivative?  Not sure if Don just has extreme familiarity and just never describes the details of the construction, is concealing something, or just expects you to be able to build and hook one up blindfolded.  
  • When I studied a Tesla Coil it was composed of a tower coil with many winds all in the same direction.  The pancake coil was described as bifilar with the two wires connected on one end, and had much fewer turns.  I believe the pancake coil in this construction is the bucking coil because if you follow the current down one wire to the joined end going in one winding direction, the current reverses here and unwinds its way out.  So this L1/L2 construction is the opposite, with the bucking coil having more turns.  Is this analysis correct so far?
  • L1 is the "Primary" coil, where power is inserted, and L2 is the bucking coil, but in the Tesla Coil construction I describe, the pancake , or bucking coil, looks to be the primary.  If this is a correct analysis, it looks like things can be switched around and it all depends on what is needed from the circuit for the desired results, step-up, step-down, whatever.

  • Liked by
  • Augenblick
Chris posted this 18 January 2018

Hi Sampojoe - If I may clarify, what device are you going to build?

In your original post I thought it was the Early device;


But after your last post I am not sure. Can you post a picture of which device you have planned?

   Chris

  • Liked by
  • Augenblick
Chris posted this 18 January 2018

I have just seen the Video you were referring Sampojoe:


At the 37 minute mark Don goes into a method I have no idea about. I have not had any luck with this sort of circuit, tried similar things a few time but truly not spend enough time to say weather this works or not. I simply just don't know, for all I know, it might.

The success I have had, are only with the other methods. Mentioned above. Where turns, wavelengths and frequencies are adjusted to get the system to work.

The Image above works, this method is very similar to the Kapanadze work, and also follows closely the work of Floyd Sweet. As well as many others.

Those that want to learn can start with The Mr Preva Experiment, Dom Smith's device shown above, is the Scaled Up Version of The Mr Preva Experiment.

   Chris

  • Liked by
  • Augenblick
Chris posted this 18 January 2018

In the below video, watching and listening carefully to what Don is saying when he wraps the Looped Cable around his arm, he describes what we have covered for years also:


   Chris


  • Liked by
  • Augenblick
  • baerndorfer
sampojoe posted this 18 January 2018

Yes I am planning exactly the early unit. I really want to build something a little less lethal, say 3-5KW, not 160KW capable.  I saw him describe a 2KW system for a vending machine & refrigeration unit in Japan.  I am thinking the capacitor bank just needs downsized a bit.  

Concerning the last video posted, I am fairly sure it is the earlier device, identical to the picture posted here, which he started explaining at about the 30m mark.  He is just isolating the L1 at 37m.  

Since I am confusing things with my questions in the previous post, let me ask simply to make sure we understand things, 

Would you agree that the L2 of his early system is a Bucking Coil?

I have found another description of a build on-line for a 2kw system.  I have tried to clean it up with some additional explanations I have added.  It has a nice parts list and explains power transmission on the L2 nicely, but it looks like the 160kw early system.  I am going to try to attach it and my original document also for readers.

I want to make this a grid-tie system.  So the question is how to get from ~8000vdc to 12-48vdc.  I am thinking I should not rectify it, but maybe step down the AC voltage first with a transformer, just keep stepping it down until I get it within range for a particular grid-tie inverter.  

Chris, do you think I could insert a step-down operation without breaking the circuit? or maybe not going 4:1 but maybe 3:1, after all I only want 3-5KW.

  • Liked by
  • Chris
  • Augenblick
Chris posted this 18 January 2018

Yes I am planning exactly the early unit. I really want to build something a little less lethal, say 3-5KW, not 160KW capable.  I saw him describe a 2KW system for a vending machine & refrigeration unit in Japan.  I am thinking the capacitor bank just needs downsized a bit.  

Concerning the last video posted, I am fairly sure it is the earlier device, identical to the picture posted here, which he started explaining at about the 30m mark.  He is just isolating the L1 at 37m.  

WOW, if I may suggest: "Little Steps for Little Feet" Start at the start and work forward. Compare what we have talked about already, learn what the requirements are, study, first. 


Since I am confusing things with my questions in the previous post, let me ask simply to make sure we understand things, 

Would you agree that the L2 of his early system is a Bucking Coil?

I am a firm believer in hard facts. Perhaps the following snippet, applying the Right Hand Grip Rule, will answer:


I also think the last video I posted, with the Looped Cord, wrapped around Don's arm answers this question. Don does say several times, mentions "Generators" and how the Fields oppose.


I have found another description of a build on-line for a 2kw system.  I have tried to clean it up with some additional explanations I have added.  It has a nice parts list and explains power transmission on the L2 nicely, but it looks like the 160kw early system.  I am going to try to attach it and my original document also for readers.

I want to make this a grid-tie system.  So the question is how to get from ~8000vdc to 12-48vdc.  I am thinking I should not rectify it, but maybe step down the AC voltage first with a transformer, just keep stepping it down until I get it within range for a particular grid-tie inverter.  

I would stick to the known facts, not diverge at all, go with what you know to be true.

Then apply known laws of Electromagnetic Induction and expand that just a little.

Chris, do you think I could insert a step-down operation without breaking the circuit? or maybe not going 4:1 but maybe 3:1, after all I only want 3-5KW.

Again, I would not change a thing. Keep everything the same. Throw a bunch of incandescent Bulbs on the end like in the Videos.

I was late to the table with Don Smith. I did not intensely study until well after all my research with Floyd Sweet. I spent a long time proving things wrong, chasing red hearings, and in the end spending a lot of money where I did not need to.

What happened to me? Over night I evolved. It clicked, my small, basic very simple experiments paid off. I learnt about Electromagnetic Induction, carrying a Magnet and Coil around all the time while in the Lab, the coil was always short circuited, and always the coil would expel the Magnet, always appearing to be a greater Magnetic Field from the Coil than from the Magnet. But why?

Time Rate of Change.

Don Smith is spot on! On occasion he may not give the best information, perhaps he did not like the other person. But Don's basic layout and how it all works is spot on! We have proof, we can experiment on the bench and prove what he says to be true. It may not always be easy, but it does work as stated. The Mr Preva Experiment proves what Don says to be true, Floyd Sweet proves Don to be true.

Primary, 4 Turns, Secondary 17 Turns, then Centre Tapped, and Tertiary another 17 Turns, the Tertiary opposes the Secondary, the Secondary Opposes the Primary and the Tertiary assists the Primary, so: 1 + -1 + 1 = 1

What's the End Goal:

  • Amplify Voltage
  • Amplify Current

We do know how to do it, the very simple steps are laid out. Its just a case of following the guide. Lay out the Plan and stick to it.

   Chris


  • Liked by
  • Augenblick
  • ISLab
Chris posted this 18 January 2018

Hey Sampojoe - Why is a Common Mode Choke not OU? What's the true purpose, and what does it truly do?

There is a few reasons, but one in particular I am looking for.

Why do we have a Power Correction Ratio, or a Power Factor? What's its purpose?

   Chris

  • Liked by
  • Augenblick
Chris posted this 18 January 2018

A little more Hard Data from Don: @3: 30


Ah, the devices I have invented, which there are a number of them, they all, ah, actually, accelerate Electrons. Theyre Electron Accelerators.

Don Smith 1998 Office Interview Part 3 @3: 30


We have heard this before, a very simple experiment proves this, The Mr Preva Experiment.

   Chris

  • Liked by
  • Augenblick
Chris posted this 20 January 2018

There has been some confusion and as a result some disagreement about recent posts on this thread.

Accurate, indepth study of the basic principles of Energy "Generation" will clear up any and all confusion. One must be willing an able to take fundamental Facts and move forward.

The Right Hand Grip Rule is an important method of interpretation.


Which interprets directly to:

Which is exactly what Don Smith has already told us in His Book: "Resonant Energy Systems":


Observing the Arrows Don Smith indicated also gives a very clear and definite indication of the Fields associated in his Coils.

Fundamental Fact: Lenz's Law is Equal and Opposite, Lenz's Law is the Direction of Energy that is "Generated" in regards to its Source.

FYI, in 2014 I posted this image


At the time, none understood its importance, none investigated. Why?

What happens when the Input gets switched off?

Please people, observe the fundamental facts, do not let anything get in the way of Facts! For they are our only real Tool other than Truth!

   Chris 

sampojoe posted this 26 January 2018

I have started a blog to post images from.  Here is the high level schematic of the generator from the Project Avalon Construction Guide.  SG HL schematic
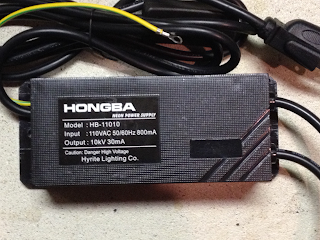
I would like to focus on the Neon Tube Driver.  In Don's instruction videos about building this system, he uses a model NST 12010.  I believe it is  a 120VAC input, 10KVDC output.  I believe any Neon Sign Transformer NST) will work of similar specs.  You could probably use a lower value, as the out-put of the step-up Tesla coil to the capacitor bank is 8KV.  To avoid overdriving them, the variac must operate the NST at a fraction of the voltage.  I have ordered an NST of the 10KV design, and it appears to have a rectified output already.  I can't seem to find anywhere that they bother to explain it, assuming that we all know how exactly neon signs work, if we are buying a replacement ;-)  If DC as I suspect, what are the pair of diodes doing on the output side?  I think I heard in a Don Smith video or it may be in the Project Avalon document that they may be needed to catch and stop flyback voltages associated with the spark gap operation on the L1 coil.  If anyone can confirm that the NST's output is DC, I would appreciate it.
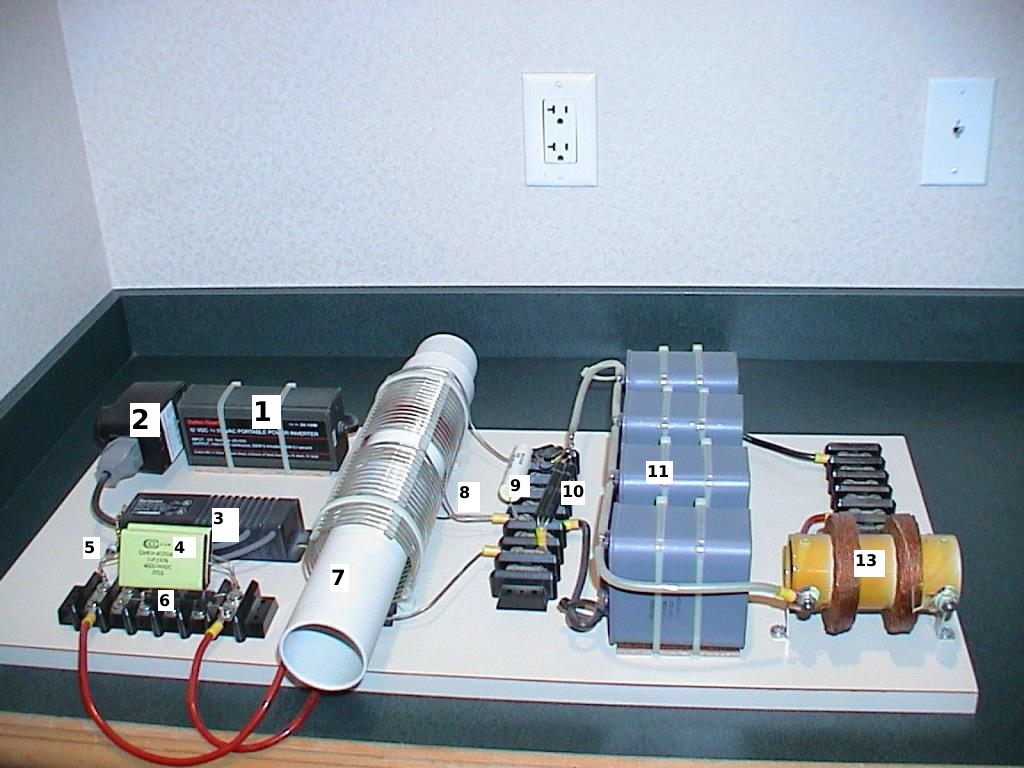
  • Liked by
  • Zanzal
  • Chris
sampojoe posted this 26 January 2018

Here is the well-known picture of the Early Smith Generator which has all major components enumerated. Component 1 is a 12v inverter Don used to prove he could output way more power the available by the small 12v battery used to run the system.  I intend to eliminate that and just plug the variac into mains 110vac.  2 is the variac.

Early Smith Generator w/numbered parts

  • Liked by
  • Zanzal
  • Chris
Chris posted this 26 January 2018

I believe this is fairly close:


   Chris

  • Liked by
  • Zanzal
  • Augenblick
sampojoe posted this 27 January 2018

Concerrning component 6 in the above photo of the DS generator,I believe they are the diodes on the NST output lines.  The designations can't be read but they do have a line on one side like a diode of that type of body should.  They are on the schematics.  If the diodes are catching flyback voltages, you can't go wrong using them in the circuit, as flyback voltages can get high also and might prevent NST burn-out. I think the NST puts out rectified voltages.  If it were AC, usually a bridge rectifier would be used to get all the energy,  and having 2 lines would be unusual.  I would assume that both as DC, its just combining for power distribution.

  • Liked by
  • Zanzal
  • Augenblick
sampojoe posted this 30 January 2018

I have been going over the Energetic Forum Don Smith thread and have also found the kdkinen channel on youtube on the Don Smith Generator.  It turns out that kdkinen must be Mr. Clean on that thread, which Chris has mentioned he tried to share there about page 380 above.  kdkinen has many videos, and they are not easy to go thru. But he starts off not having much success getting the extra power, and its instructive as he goes over voltages and performance of various components.  But he has a moment where he stumbles across the Partnered coils arrangement because he just plays with connections.  He is using clockwise coils on both sides of L2, of course the fundamental mistake in the Don Smith Generator.  But at 2:52 he states "rather than trying to centertap the middle of both clockwise coils" and previously tries to explain a "parallel" connection of coils.  He is actually hooking up the end of the left coil to the centertap.  So he is now driving current from left to right in the clockwise coil which would create identical magnetic fields as a correct Partnered output coil with current going from right to left CCW!  Even a blind squirrel can find a nut sometimes ;-)  

  • Liked by
  • Augenblick
sampojoe posted this 30 January 2018

Component 10 area has 2 HV resistors.  This must be the voltage dividers attached to the L2 circuit as shown in the hand drawn schematic.  These would get very hot.  I plan on using transformers to step down voltages before rectifying them.  I am currently looking for the right circuit software to draw up a complete schematic, hopefully reflecting all values of components.

  • Liked by
  • Augenblick
Chris posted this 30 January 2018

With Coil Turns and Direction of Voltages and Currents, a very small cheap and quick experiment like The Mr Preva Experiment can teach you all you need to know.

I have covered three configurations in my Thread: Some Coils Buck and Some Coils DONT.

I think it is smart to work on a small cheap scale to learn as much as possible, scaling up later on is easy.

The following Video shows how the Currents Oppose, one to the Left and one to the Right, Mr Preva Style:


Which is exactly what Floyd Sweet told us:

In the specific case of positive charges moving to the right and negative charges to the left, the effect of both actions is positive charge moving to the right. Current to the right is: (See Below Equation)

Negative electrons flowing to the left contribute to the current flowing to the right.

Floyd "Sparky" Sweet - P.2 The Space-Flux Coupled Alternator


When you have Current Opposition, you know you are "Generating" this Current, it is MUCH easier to measure at low Voltage/Current levels, then getting a Voltage Polarity right, and then work on Turns and Frequency.

I don't encourage, and never have, building large scale devices unless one is very experienced, they are just too dangerous! Start small, start cheap, learn as much as one can with simple experiments. Trust me, you will be so much better off!

   Chris


P.S; Ask yourself, Why did Stan Meyer have a Diode in a Tuned RLC Resonant Circuit:


  • Liked by
  • Augenblick
Marathonman posted this 30 January 2018

Well look what i have sitting in my closet collecting dust.


Marathonman

Attached Files

  • Liked by
  • Chris
  • Augenblick
Chris posted this 30 January 2018

Component 10 area has 2 HV resistors.  This must be the voltage dividers attached to the L2 circuit as shown in the hand drawn schematic.  These would get very hot.  I plan on using transformers to step down voltages before rectifying them.  I am currently looking for the right circuit software to draw up a complete schematic, hopefully reflecting all values of components.

Hi Sampojoe - I believe Components 10 are Parallel Diodes, not resistors:


Hand Drawn Don Smith Schematic


The two diodes seen in the diagram you posted. As I pointed out before, in the Stan Meyer Circuit, Why is a Diode placed in a Tunned RLC Resonant Circuit?

@Marathonman, you're nearly there! Nice Coils!

   Chris

  • Liked by
  • Augenblick
sampojoe posted this 30 January 2018

Beautiful Partnered Coils there, has that mirror image quality!  Roger that Chris on the diodes and not resistors.  I must point out discrepancies in the hand drawn circuit and the this High level schematic: Hi-level SchematicThe hand-drawn one I believe has errors.  It is showing the use of resistor voltage divider, which is just one method, although crude, to get a desired voltage, after all it is supposed to be many thousands of volts at that location, which I tried erroneously to map onto the photograph.  This hi-level has none, leaving it up to the builder to divise a method to step-down the voltage.  I do only see 2 diodes in the photograph.  Are they the two closest to L2 in the hand-drawn image or should there just be a bridge rectifier?  Bridge rectifiers recover the most voltage, so I lean toward that, but the hand-drawn bridge does not seem to have a chance to function properly there as it is already receiving a half-wave rectified signal from each of the other diodes closer to L2.  I think it should just have a bridge rectifier.  Looking at the high-level diagram, there are the 4 diodes.  I believe they are in a bridge rectifier arrangement there, which I plan to build into my first attempt.  Also the Bridge rectifier in the hand-drawn image is definitely on the wrong side of the capacitor bank.  It must rectify voltage going into the bank if the capacitors are going to charge.  All in all, a fairly unreliable amateurish circuit.

Concerning the Mr. Preva experiment, I have trouble following the connections and coil wiring.

OH please note, did anyone catch on the Don Smith videos, presenting his generator designs how he kept asking someone to please calculate the energy input and output of the NST, and see how the manufacturer was blatantly stating that the it was Overunity!  So Chris in your spec shot on the NST lets take a look!

input: 12v @ 5A = 60w   output: .03A @7500v = 225w  

Isn't that interesting.  Reminds me of Gerard Morin's work.

  • Liked by
  • Augenblick
sampojoe posted this 09 February 2018

My Don Smith source document I posted in the beginning of this thread states:

"The output of the neon-tube driver circuit is used to drive the primary "L1" winding of a Tesla Coil style transformer. This looks ever so simple and straightforward, but there are some subtle details which need to be considered.  The operating frequency of 35.1 kHz is set and maintained by the neon-tube driver circuitry, and so, in  theory, we do not have to do any direct tuning ourselves."

My NST will be here any day now, but I am still puzzled at how it might be working.  Is it 10KV DC or AC?  Is the spark gap giving us AC?  But why would it oscillate at exactly 35.1 kHz?  Oh well I will find out soon, but the above statement supports a Don Smith statement about tuning I referred to earlier and posted the video.

Here is a schematic of what I would like my final system to look like.  I plan on using a microwave transformer to step down the voltage to about 50v for input to inverters, either a standalone or grid-tie.

Planned Smith Desigh

I am trying to correct a problem in the hand drawn image vs the simpler high level schematic from my source document with the bridge rectifier.  I am a little unsure of the deciphering of the bridge rectifier in the hand drawn circuit, between the ground and cap C2 placement.  I believe C1 and C2 are tuning caps to get the coil to perform at the frequency called out for the NST, which I am still trying to understand.

  • Liked by
  • Augenblick
Chris posted this 09 February 2018

Hey Sampojoe - Another great post.

Don said on many occasions he calculated the Coils/Lengths of wire and got it spot on for the Frequency.

I have been stuck on these calculations for  along time. I am aware of much Antenna Theory, RLC Resonance with Damping Factor, many other equations also, but I am still short of being able to get the figures required.

Have you done any Calculations to try to work out the factors required?

   Chris

  • Liked by
  • Augenblick
  • ISLab
sampojoe posted this 09 February 2018

Just getting to that, but still am winding my asymmetric motor alot ;-).  I will start with the instructions in my source document.  I plan on building L2 as an air coil, as opposed to wrapping it around a PVC pipe, as my document indicates there could be some attenuation at RF frequency.  I am going to use my Navy electrician manual to compute a Henry value for L1 and L2.  A copper weight ratio of 4:1 between L1 and L2 is used in the document for starters. 

  • Liked by
  • Augenblick
Chris posted this 10 February 2018

I have done a lot of calculations in an attempt to further understand, or try to understand the theory.

Dons machine I was late to the party on, did not study much till only a few years ago. I had read and did now but I was concentrating on the VTA.

Don Smith's Coils: using 2 Pi r N

L1:

  • Length: 95.75 CM - not including Lead Length.
  • Calculated Inductance: 2.85 Microhenryies, approximately, however LCR Resonant Inductance is 102.5 Microhenries approx:
    • Resistance: 22.67 Ohms (XC)
    • Inductance: 102.5 µH
    • Capacitance:0.2 µF
    • Frequency: 35.1514 KHz
    • Series DF: 0.500733
    • Parallel DF: 0.499268
    • Bandwidth: 35.2030


The Wavelength at 35.1 KHz is 8541.1 meters, across a Coil of: 0.9575 meters.


L2: Each Half

  • Length: 406.96 CM - not including Lead Length
  • Calculated Inductance: 51.5 Microhenryies, but, could be, and should be a lot more, if the ratio above is anything to go by, we should see an inductance of around: 1852.19 µH.
  • First Harmonic, the Fundamental:
    • Resistance: 408.50 Ohms (XC)
    • Inductance: 1852.19 µH
    • Capacitance:11.1 nF
    • Frequency: 35.1007 KHz
    • Series DF: 0.500012
    • Parallel DF: 0.499988
    • Bandwidth: 35.1016

My figures could be completely wrong, they are all calculated from the Coils Dimensions and other known factors.

I would be interested to see what others can come up with?

   Chris

  • Liked by
  • Augenblick
  • ISLab
sampojoe posted this 13 February 2018

I have gotten my NST today!  So time to get serious, coil construction to be started soon.  I want to put an O-scope on the NST, for starters.  (My motor project is nearing completion, getting that off the table.) Found a great video on youtube about building and tuning a tesla coil ! 

Got my college texts on Electricity and Magnetism, my USN manual, and the basic idea of an RLC circuit is to only permit the oscillation of the tuned frequency where Capacitive Reactance is equal to Inductive Reactance, showing how the values are calculated.  This seems like quite the juggling act when you throw in the frequency variation achieved with changing the spark gap.  I am not sure where I have seen my previous explanation of the construction of the pancake coil of a tesla coil, involving a bifilar filament, which makes it the equivalent of a Partnered output coil to eliminate Lenz's law.  It might have been a Tesla patent.  However, it seems a lot of these Tesla coils online don't exhibit this structure... ?  I think the first step is to just get L1 to operate at it's harmonic frequency, somewhere in the RF range (near 35.7kHz), and determine what it is.  Then try to build L2 around that.

  • Liked by
  • Chris
  • Augenblick
sampojoe posted this 20 February 2018

OK here it is, my first overunity device, my new NST:

my NST I just ordered  

check it out:

input .8A x 110vac = 88 watts

output: .03A x 10000 vac = 300 watts

I can quit now.  (joke)  ;-)

Just re-iterating what Don stated in one of his YT presentations.  It was funny, he was taunting anyone in the audience to verify if the NST was an off-the-shelf OU device, begging someone to perform this calculation.

So my NST output  is AC.  In my source document at the beginning it states this about the NST:

"The neon-tube driver circuit is a standard off-the-shelf device used to drive neon tube displays for commercial establishments. The one used contains an oscillator and a step-up transformer, which together produce an Alternating Current of 9,000 volts at a frequency of 35,100 Hz (sometimes written as 35.1 kHz)."

The diodes then on the L1 circuit are rectifying the signal.  The two outputs show identical output AC voltage, as there is no voltage difference between them.  I had thought that the ground wire would be a centerpoint/transformer core ground, and there would be twice the voltage difference between the output wires, but this has proven to not be the case.

Don has stated that the L1 circuit drives the output L2 coil, and would operate at the 35.1kHz.  He indicated it might naturally operate at that frequency.  Well not unless it is tuned with capacitance adjustments, as the spark discharge will turn L1 into an AC circuit upon discharge.  Spark gap adjustment will be usable to change the frequency.  I assume it must match the NST and in one cycle, the capacitor is charged and the spark discharges?  Any insights appreciated.

It makes you wonder about the need for the spark gap.  Indeed Mark Belanger of Advanced Electronic on his youtube channel shows some operation of his Smith Generator work without a spark gap.

The single diodes shown then are not for "flyback" protection then, but for rectification.  As single diodes, the shown rectification scheme is a half-wave rectification.  If full-wave rectification is used, will it be more efficient?  I will look into this.

  • Liked by
  • Chris
  • Augenblick
sampojoe posted this 21 February 2018

Coil Design.  In my source document it says this:

"we need to pay special attention to the ratio of the wire lengths of the two coil windings as we want these two windings to resonate together. A rule of thumb followed by most Tesla Coil builders is to have the same weight of copper in the L1 and L2 coils, which means that the wire of the L1 coil is usually much thicker than the wire of the L2 coil. If the L1 coil is to be one quarter of the length of the L2 coil, then we would expect the cross-sectional area of the L1 coil to be four times that of the wire of the L2 coil and so the wire should have twice the diameter (as the area is proportional to the square of the radius, and the square of two is four)."

Looking at what I have laying around, I am going to use 6ga (4.1153mm dia) and 12ga (2.0525).  But sadly the 6 gauge is bare and the 12 gauge is insulated.  I believe you need L2 uninsulated to avoid attenuation at the RF freq.

  • Liked by
  • Chris
  • Augenblick
sampojoe posted this 27 February 2018

Found some bare 6ga and bare 12ga at Home depot for a few dollars.  Got a design for the L2 frame and L1 inner coil worked out.  Got some vinyl tubing that will be able to cover and insulate the L1 wire.  Got a design for the spark gap together and raw materials.  So time to start building.  Got most components up to the low voltage cap bank I want to use.  I figure I better be able to see some OU at the AC output without the final big investment of inverters and cap bank.

I have analyzed the question of the NST output diodes.  Since we have AC out at 35.7 kHz, I wondered if a full wave rectifier operation might work better.  I figured the spark gap alone was setting the frequency initially.  But what happens since I have established by Don Smith's words and my source document that the NST drives the circuit at its RF frequency, but some tuning of the circuit is still needed?  I will try to illustrate why.  I have drawn some signal curves I expect to see here.

Don Smith Tesla coil analysis

Looking at the NST voltage outputs, the solid curve represents the half wave rectification.  Lets just look at that first.  The NST in each increasing voltage cycle will pump charge into the C1, until the discharge voltage is reached for the spark gap.  In tuning the circuit, the C1 must be of the proper size and the NST run at the best voltage and the spark gap set at the right distance so that Vd is reached in the first 90 deg of the charge cycle.  Then the spark gap must discharge in the next 90 deg. of the cycle.  If a full wave rectified signal is used, represented by the first dashed curve on the positive side of the X-axis.  As the spark gap fires, current flows as the voltage drops  possibly to zero, as the plasma in the spark will lower the reisistance.  If there is the full wave rectification the continued voltage application may prolong the spark time, and it may continue over into the next charge cycle.  It could be almost continuous.  It is probably very important for it to go to zero and stay down for a good part of the quadrant.

Notice the sawtooth-like pattern that results coming out of the capacitor, with the spark having a typical decay pattern, I estimate.  It will be an oscillating DC signal, but the L2 coil will convert it to AC, moving the zero line up to the midpoint in the pattern, as it steps up the voltage and current hopefully.

I am thinking that Vd should be designed and must occur some time before Vd is reached on the downturn between 45 and 90 deg of the NST curver on top, first cycle.  If it does not discharge, the capacitor will have to be charged by a second pulse.  This will result in halving the frequency seen by L2.  I think power goes up with the square of the frequency so that of course is undesirable. 

If Vp is reached pretty close to the high voltage of the NST curve and the spark discharge is completed in the next 45 deg. of the cycle as the NST voltage goes to zero (spark must stop immediately at 0, clearing out plasma, and resistance jump back to Megaohms level), then use of full wave rectification might allow doubling the frequency!

sampojoe posted this 01 March 2018

 check out www.jovion.com .   They are working on a Casimir effect endless battery discussed by sarah westall here  

.   This sounds a lot like what Don Smith alluded to in his later videos.

  • Liked by
  • Augenblick
Chris posted this 04 March 2018


@All following - I want to express importance in my statement:

Don Smith was 100% correct in everything he told you in his videos! Everything I can personally attest to being correct!


From time to time he may not have been clear, but always he clarifies, perhaps in another video. If one takes the time to take and note important bits of information, or quotes there are many critical very important Quotes:


The Magnetic System that is driving it, it has to be equal and opposite, that's your Lenz's Law, equal and opposite. So that means that, your, one of those is your Magnetic Field and the other is your Electrical Field. And the Magnetic Field is Amps.

Don Smith - /watch?v=W7GHqw7d1No&t=19m1s


The Ratio is 1: 5, so not only do you get the L1 and L2 gain you get 5 times that. ... Well ah, the L1 wire should be an even division of the what ever the length of L2 is. That way they're able to talk to each other, the Frequency, if you worry about the frequency, don't worry about that, just build the thing so it looks nice, and ah make ah, an even division, even multiple or even division of the lengths or the wire that you want to talk to each other, and they will be talking to each other!

Don Smith - /watch?v=W7GHqw7d1No?t=20m5s 


Q: The device right beside the caps, is that a spark arrester? PB: The device right beside the caps... A: Ah, a lot of your electronic devices have things which control the voltage, you know like spark gaps, that is a radio frequency spark gap, its used for lightning arresters on computers and things that are sensitive to Voltage so if Lightning hits, anything over a certain amount will go to ground, so that's the ground post on that high voltage thing there (Neon Tube Transformer), so im, ah, grounding it back into itself.  When its running, that flashes, you see the flashes in it, ah, all the time.

Don Smith - /watch?v=W7GHqw7d1No&t=30m41s


That wont make sense to anyone who thinks like a electrical system you have to think in terms of Magnetic Flux, because if you're using Electrical Flux everything is dying a heat death, and you loose the energy almost immediately, in Electrical Flux, but in Magnetic Flux you can make as many copies of the original as you want without  depleting the original at all. So if you're chasing Electrical Flux you're chasing the wrong rabbit, you need to be chasing the Magnetic Resonance Flux!

Don Smith - /watch?v=tASY07r9AD0&t=18m10s


In a closed system, and you're boxed in Ohms law works, but if get over, and that's on he electrical side, but when you move over onto the counter part of it, the Magnetic side, none of those laws apply. Its a whole different system and most of the critical information is missing, intentionally. So, In effect what you have, on the Magnetic side, you can make as many copies as you want without depleting the source.

Don Smith - /watch?v=W7GHqw7d1No&t=44m07s


The Generator is not generating energy at all, its actually disturbing the ambient background, and its collecting the energy out of it. Now all of these devices are doing the same thing except they are doing it with radio type devices.

Don Smith - /watch?v=W7GHqw7d1No&t=35m43s


This is your L2 system, but its a double one, setup so that the Amps and Volts and everything are in there in the proper order.  This one I built in 1994.

Don Smith - /watch?v=W7GHqw7d1No&t=26m34s


There is Logic here, Don Smith gives you 100% correct information! I can attest to all this being true and correct from my work! 

   Chris

Chris posted this 04 March 2018

I have asked the question before:


Why does Don use Diodes on the Output?


We know, for sure, the Input is a LC Resonant Spark Gap configuration, almost exactly like Nikola Tesla showed us 100 odd years ago:


Where, the 3 turn coil shown above is Dons L1 Coil which is 4 turns, and Don's Caps, 2 x 0.1 in parallel, is the Capacitor shown above, and the High voltage Neon Tube Transformer is the Step up transformer shown above.

Don's Secondary is completely different as we already know. Don's L2 Coil, as I have pointed out, is as described:

This is your L2 system, but its a double one, setup so that the Amps and Volts and everything are in there in the proper order.  This one I built in 1994.

Don Smith - /watch?v=W7GHqw7d1No&t=26m34s

   Chris

  • Liked by
  • Augenblick
  • ISLab
Jagau posted this 05 March 2018

Hi Sampojoe,

great works i follow you with interest, i am working on same Don Smith project as you.

Very interesting. I would like to share with you my progress.

Jagau posted this 06 March 2018

As Chris said it is better to understand with small voltages and increase thereafter to better understand how it works. I begin to understand what is happening in this little coil that is called L1.

I built L1 and with a calculator found the ideal capacitor for L1 to be resonant. Without using a spark gap, connect my function generator to this LC combination. I easily found the resonance frequency of my LC tank and with the help of my oscilloscope I could verify the accuracy of the result.

We all know that the parallel LC tank is like an open switch when we reach the resonance frequency. By placing a small lamp in series and with my function generator actually visualize that the filament of the small lamp was barely visible. There is a bit of loss in the cables and the extensions and rarely reaches perfection.

These are my first observations, soon afterwards.

Chris posted this 06 March 2018

Jagau, this is excellent advice!

Be safe, work with small Voltages first, study very simple Coil Interactions, Currents especially, Voltages will come later. Study, Current is the Magnetic Field, one is analogous to the other, and see what Don Smith was saying:

So if you're chasing Electrical Flux you're chasing the wrong rabbit, you need to be chasing the Magnetic Resonance Flux!

See above Quotes.

This exact same principle is seen in The Mr Preva Experiment, the reason I have pushed this experiment so strongly. Once one properly understands this experiment, one is very close to the next step: I = V / R - Ohms Law is very real and accurate for Electrical Currents and Voltage, and making this connection is the next step! 

Don Smith used Diodes, on his output and also on his Input. The Diodes serve multiple purposes!

  • Protection.
  • Half Wave Rectification - ( Important to understand ).
  • Timing of Half Wave Rectification .

Half Wave Rectification:

You need from Tesla only one half wave. Otherwise Tesla will take what she gave, back !!!

Ruslan Kulabuhov - Quote


Your Input Magnetic Field must not be subject to Lenz's Law Criteria, thus Timing. "What goes Up, must come Down"

Timing is something I saw many years ago, but it did take me some time to understand... There are a lot of pit falls or traps for people, its only dedication that gives the steps to climb from these traps. Most would give up.

Two methods I know of to Time a System:

  • DC Switching.
  • AC 1/4 Wave Resonance - This I still find Tricky!

DC Switching is extremely easy, small $14 Microcontrollers can be extremely powerful when working with DC Switching techniques. I have already shown some of my work here: Reliable and Flexible Switching System a continuation of a thread I started, April 25, 2014, Reliable and Flexible Switching System

AC is a little trickier, theory here is a little vaguer and many would argue its validity. By using 1/4 Wavelength's or similar, its possible to bring on Magnetic Resonance in the Output Coils without the input being affected, simply this is a timed response from the drawing of Current at 1/4 Wavelength. 

Don Smith and many others point out the Importance of 1/4 Wavelength's.

To all reading, we here at AboveUnity.com, are only steps away from changing the world forever, but we must do it together, or like history has shown, it will never happen!

I urge you, create your own Thread in the Replication Section, by replicating and showing your progress, and thus your understanding of these very important interactions, we can see when the right time is to move to the next step!

   Chris

sampojoe posted this 07 March 2018

Thank you Jagu and Chris, I guess I will first try to get the reactance tuned to a set of coils I build using an o-scope as Jagu has suggested, but I may be ignoring a quarter wave antenna approach.  Here I have some analysis.

I have a question about the quarter wave antennas used by the Don Smith Generator. Given that the frequency of the operation is 35.1kHz, the period is 28.49 microseconds (us). So in that time, the signal will travel 2135.3m, and q quarter wavelength is 533.8m.


  1. How can any antenna or coil on a Don Smith generator be said to be a quarter wave, using 10 turns on L1, coming in at about 6.8' on a 2.5” diameter form and use an NST at 35.1kHz?


    Focusing on the quarter wave verbiage, here is a statement on p19 from my source document:

    “A rule of thumb followed by most Tesla Coil builders is to have the same weight of copper in the L1 and L2 coils, which means that the wire of the L1 coil is usually much thicker than the wire of the L2 coil. If the L1 coil is to be one quarter of the length of the L2 coil, then we would expect the cross-sectional area of the L1 coil to be four times that of the wire of the L2 coil and so the wire should have twice the diameter (as the area is proportional to the square of the radius, and the square of two is four).”

  2. The PJ Kelly book posted by idea1man is a digitized version of Chris' only Don Smith book that he is known to have written, Resonant Energy Systems. So it is wonderfully searchable by key words. Several areas have great details of coil construction. But nowhere can it be found a good description of a Tesla coil that contains the partnered output coil description. Hopefully this is the missing secret sauce deliberately left out. But returning to the concept of how to build a quarter wave device, on page 44, a quarter wave length calculation is presented under the section “AIR CORE INDUCTION COIL BUILDERS GUIDE”:

    “To obtain the wire length (in feet) use the following: If using one quarter wave length divide 247 by the desired frequency (megahertz range is desirable).”

    Since the NST is at .0351 MHz, this calculation yields 7037' wave length. Calculating by hand yielded 7004 ft, which is within my rounding errors and Don's thumbnail calculation.  And thus a quarter wave length is about 1760' At a 4:1 ratio approximate, L2 would be some 7037' long, back up to one wavelength. These are out of the question to build for me now with the heavy gauges. So some compromises will be tried in the coil design, i.e. using the 10' size Don ascribed to the coil L1.  I would have to switch to some fine wire coil structures. 

There seems to be a glaring discrepancy between Don's rhetoric in his videos showing his demo models using the NST and his calculations in his book for coil construction around RF antenna theory (See Chris' video explaining quarter antennas earlier in this thread) I would like to see this style generator working in one of his conference videos again. If someone knows where to look, I would appreciate a point to it. If a close-up camera shot of a working model is available, something can be learned. I do believe the close-up pictures we have used in this thread may be just non-working concept models he was using, so as not to “give away the shop” entirely. However, he has stated such a unit could deliver 160 kilowatts! Who among us would not be happy at just one or 3 Kilowatts? So I assume a non-quarter-wave antenna would just suffer attenuation and signal loss. Not being an RF engineer, I have no idea how much. In circuitry analysis, any wire length greater than 1/10 of a wavelength should be considered a transmitter. As Don's model seems to show about 10 turns for L1, we are shorter than that even, but I think it will transmit something significant inserted inside L2. At this point I am leaning toward building something like as shown in the pictures around the look of a 3” Barker & Williamson off-the-shelf coil, as Don seems to favor that style of coil, and see where we are at that point, sticking to the requirement that L2 must be 4 times longer than L1, but at the same weight, which is why I have selected 6ga wire for L1 and 12ga wire for L2. Any other insights and comments appreciated.

PS Chris, should we be moved to your Replications page?

  • Liked by
  • Chris
  • Augenblick
sampojoe posted this 07 March 2018

Meanwhile I have built a spark gap.  

https://1.bp.blogspot.com/-XsFMNk870LQ/WqAIDXIkvhI/AAAAAAAAAGI/7nkivzxNXlQ73msH-cuA_IRqeEv0XE0VwCLcBGAs/s640/MySparkGap.png

  • Liked by
  • Chris
  • Augenblick
Chris posted this 07 March 2018

PS Chris, should we be moved to your Replications page?

Hi Sampojoe - Please, if you could. I would like to keep things in their place. Makes browsing for specific topics easier. However, discussion can continue here if you like?

The 1/4 Wavelength topic is a tricky topic. I have much information here on this forum about Wave Theory. I also know some EE's that state Wave Theory is incomplete!

The way I think of it is as so, some will say I am wrong:

If we apply a Voltage changing over time, or a frequency, to a Coil, we are applying a Current, thus a Pressure that varies in Time also. This Pressure is the Increasing and Decreasing Magnetic Field, which is an Electromagnetic Wave. The Transfer, or Transmitting of this Electromagnetic Wave is subject to the very same already shown to work principles as an Antenna. Now comes the question, "So Transformers are subject to Antenna Theory" - Yes is the answer. We already know this is true for RF Transformers.

We use 1/4 wave Impedance Transformers and there are calculations that can calculate the values.

1/2 - One Half Wave is the optimum Length for transfer of Energy, not 1/4, but Grounding for Antenna is used to get the other 1/4, so 1/4 + 1/4 = 1/2 or 0.25 + 0.25 = 0.5, but there is something we need to think about:

Each one of the Partnered Output Coils, if each one is 1/4 Wave length, or 0.25 the Wavelength and we have two, partnered Coils, then we have 1/4 + 1/4 = 1/2 or 0.25 + 0.25 = 0.5 which is 1/2, One Half Wavelength.


Re Wire Gauges:

Wire Gauges are important, basically the Wire Gauge determines the Resistance of the Wire. However, the rules you outlined: "A rule of thumb followed by most Tesla Coil builders is to have the same weight of copper in the L1 and L2 coils" - might be something to be cautious of. Floyd Sweet did not show this rule: 48 Turns #28 to 240 Turns #20...

I would not use this "Rule of Thumb" to determine your experiments just yet. Put it in the book to investigate later.


I got a good shot of Don's small cap:


Sampojoe, regarding your statement:

So it is wonderfully searchable by key words. Several areas have great details of coil construction. But nowhere can it be found a good description of a Tesla coil that contains the partnered output coil description. Hopefully this is the missing secret sauce deliberately left out.


I think if you look close enough, you will see this in all Don's devices, in fact, 9 out of 10 Devices everywhere! Don said:

This is your L2 system, but its a double one, setup so that the Amps and Volts and everything are in there in the proper order.  This one I built in 1994.

Don Smith - /watch?v=W7GHqw7d1No&t=26m34s


Using the Right Hand Grip Rule, and also following the Output Diode Direction vs the Coils Directions surely speak volumes to most people. Many other references to hard data also exist in this thread. I urge everyone, learn first with The Mr Preva Experiment.

So I think, once enough understanding of these Coils is obtained, one will be able to see a whole new world open up right in front of them, endless world changing possibilities!

   Chris

  • Liked by
  • Augenblick
  • ISLab
Chris posted this 08 March 2018

I started to write a post a few days ago, but I decided it wasn't time yet... Perhaps I was wrong.

I asked the question:

Why does Don Separate Voltage and Amps?


There is a very good reason he does, and it is actually correct to do so!

We, Science has a tendency to relate Voltage with Amperes and Amperes with Voltage, one is hand in hand with the other. This way of thinking is wrong. Ohms Law tells us this!

A Voltage gives rise to a Current, in other words, Once a Voltage, or E.M.F, has been Induced, this Voltage gives rise to the potential for a Current to flow, this Current can be predicted via Ohms Law: I = V / R

However, the E.M.F, or Voltage can exist with out any Current Flow what so ever! 

A Battery, the Terminals can be measured to have a particular Voltage, and only when Loaded does a Current Flow, switch off the Load, and the Current no longer Flows! 

So, I strongly urge all following, a Voltage, the Terminal Voltages at the Ends of the Coil is the E.M.F - A process that is considered the Free Transformation in a Transformer - Once this Voltage is obtained, the Current can be predicted by Ohms Law: I = V / R

Step the voltage up to infinity, the Current goes up to infinity! I hope you can see my Point!!!

   Chris

  • Liked by
  • Augenblick
  • ISLab
Chris posted this 08 March 2018

So you all know, and I have said it before, Don Smith information is a Vault of Gold!

Please, spend some time, cross reference what I have said to what Don has said!

https://www.youtube.com/channel/UC0tu2-2OJCrmbdyGYzui6jw/videos

This is such important information!

   Chris

  • Liked by
  • Augenblick
We're Light Years Ahead!
Members Online:

No one online at the moment


What is a Scalar:

In physics, scalars are physical quantities that are unaffected by changes to a vector space basis. Scalars are often accompanied by units of measurement, as in "10 cm". Examples of scalar quantities are mass, distance, charge, volume, time, speed, and the magnitude of physical vectors in general.

You need to forget the Non-Sense that some spout with out knowing the actual Definition of the word Scalar! Some people talk absolute Bull Sh*t!

The pressure P in the formula P = pgh, pgh is a scalar that tells you the amount of this squashing force per unit area in a fluid.

A Scalar, having both direction and magnitude, can be anything! The Magnetic Field, a Charge moving, yet some Numb Nuts think it means Magic Science!

Message from God:

Hello my children. This is Yahweh, the one true Lord. You have found creation's secret. Now share it peacefully with the world.

Ref: Message from God written inside the Human Genome

God be in my head, and in my thinking.

God be in my eyes, and in my looking.

God be in my mouth, and in my speaking.

Oh, God be in my heart, and in my understanding.

Your Support:

More than anything else, your contributions to this forum are most important! We are trying to actively get all visitors involved, but we do only have a few main contributors, which are very much appreciated! If you would like to see more pages with more detailed experiments and answers, perhaps a contribution of another type maybe possible:

PayPal De-Platformed me!

They REFUSE to tell me why!

We now use Wise!

Donate
Use E-Mail: Chris at aboveunity.com

The content I am sharing is not only unique, but is changing the world as we know it! Please Support Us!

Thank You So Much!

Weeks High Earners:
The great Nikola Tesla:

Ere many generations pass, our machinery will be driven by a power obtainable at any point of the universe. This idea is not novel. Men have been led to it long ago by instinct or reason. It has been expressed in many ways, and in many places, in the history of old and new. We find it in the delightful myth of Antheus, who drives power from the earth; we find it among the subtle speculations of one of your splendid mathematicians, and in many hints and statements of thinkers of the present time. Throughout space there is energy. Is this energy static or kinetic? If static, our hopes are in vain; if kinetic - and this we know it is for certain - then it is a mere question of time when men will succeed in attaching their machinery to the very wheelwork of nature.

Experiments With Alternate Currents Of High Potential And High Frequency (February 1892).

Close